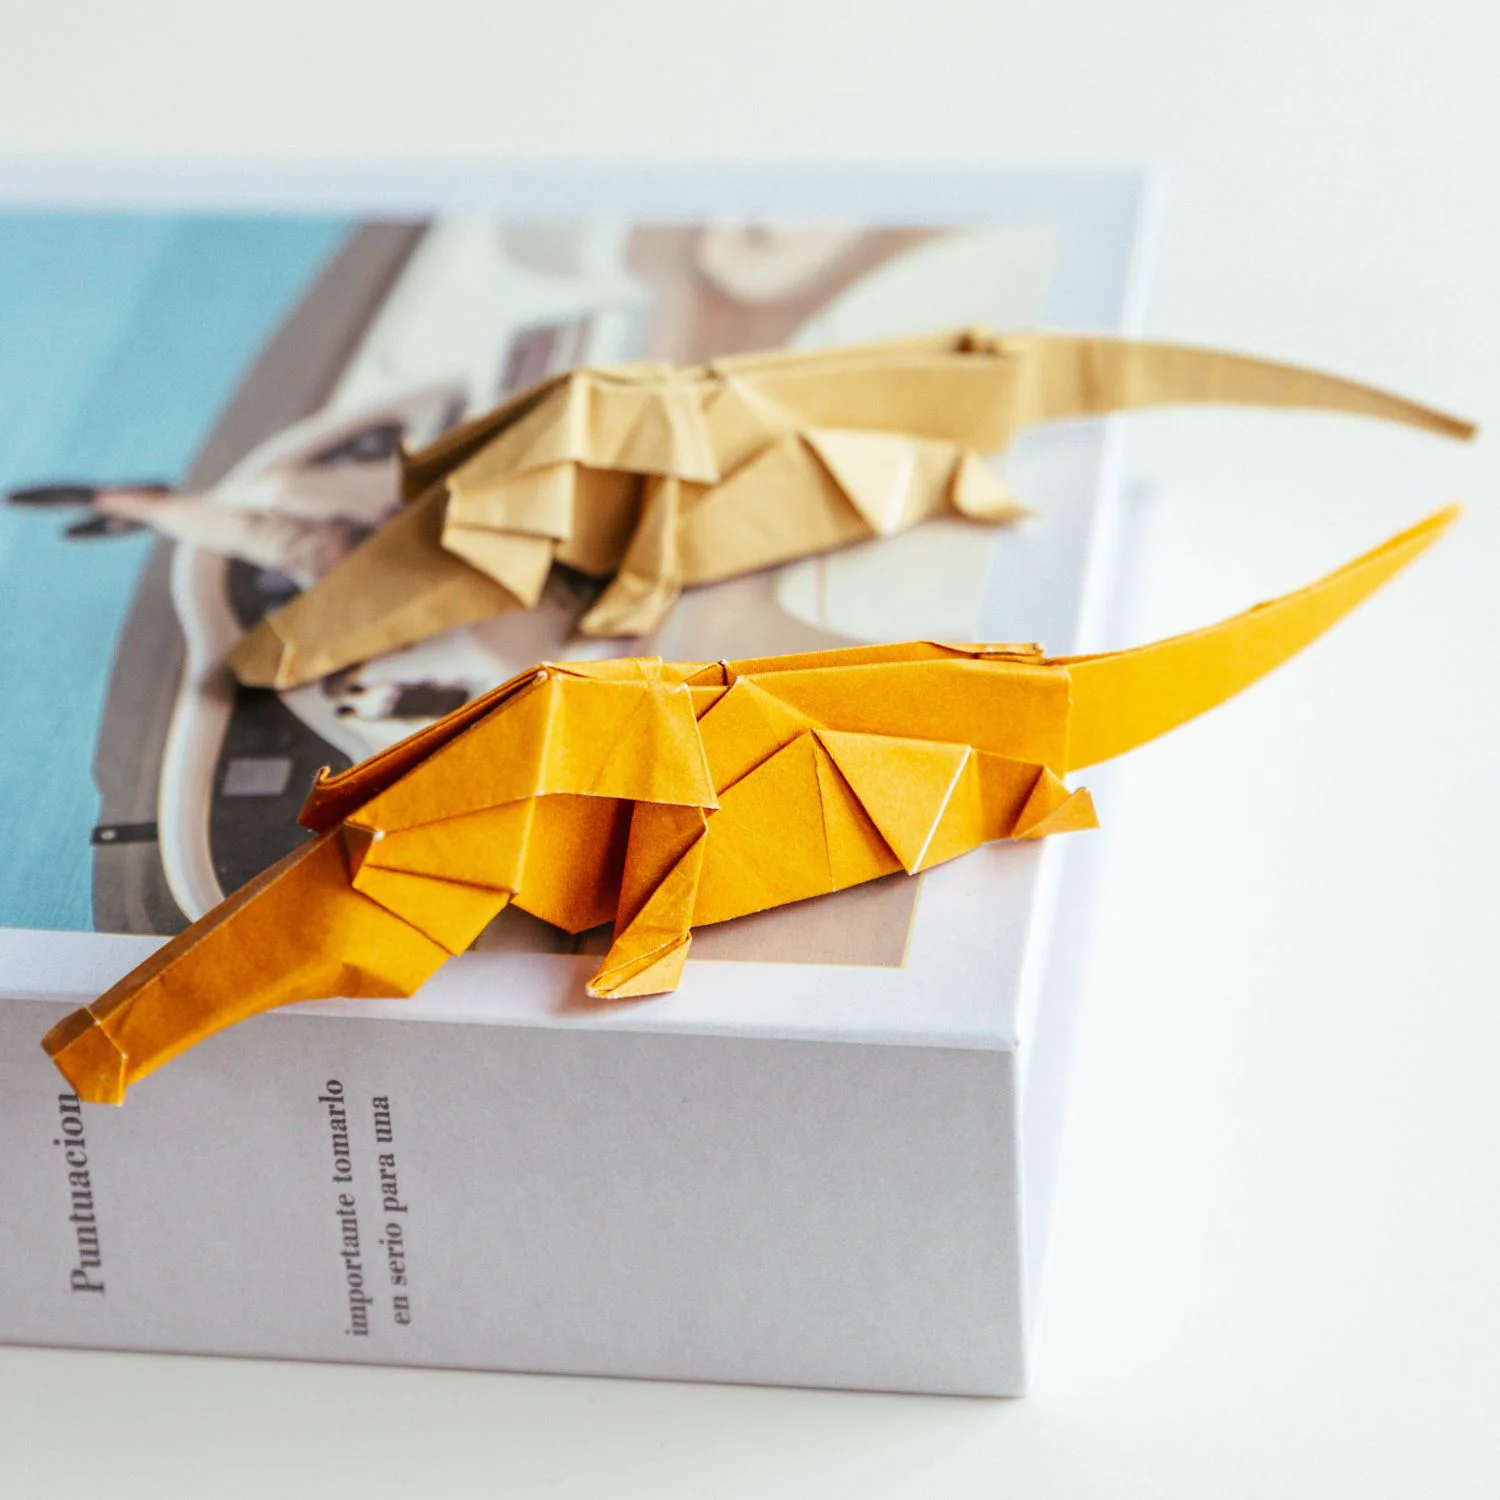
This is a super cool and lifelike origami scorpion, each part captures the essence of the real scorpion. Especially the curved telson and sharp stinger are sure to impress you! It would be an eye-catching decorative piece for your home, office, or origami art display.
Although it looks complicated, don’t be afraid, because we provide very detailed and clear pictures and text guidance, so you can try or challenge it no matter what your origami level is without worries.

If you are new to origami, start here from our beginner guide to know the basics and how to read the step-by-step instructions.
- Folding time: 20 minutes
- Paper: 20×20 cm
- Difficulty: Middle
Material
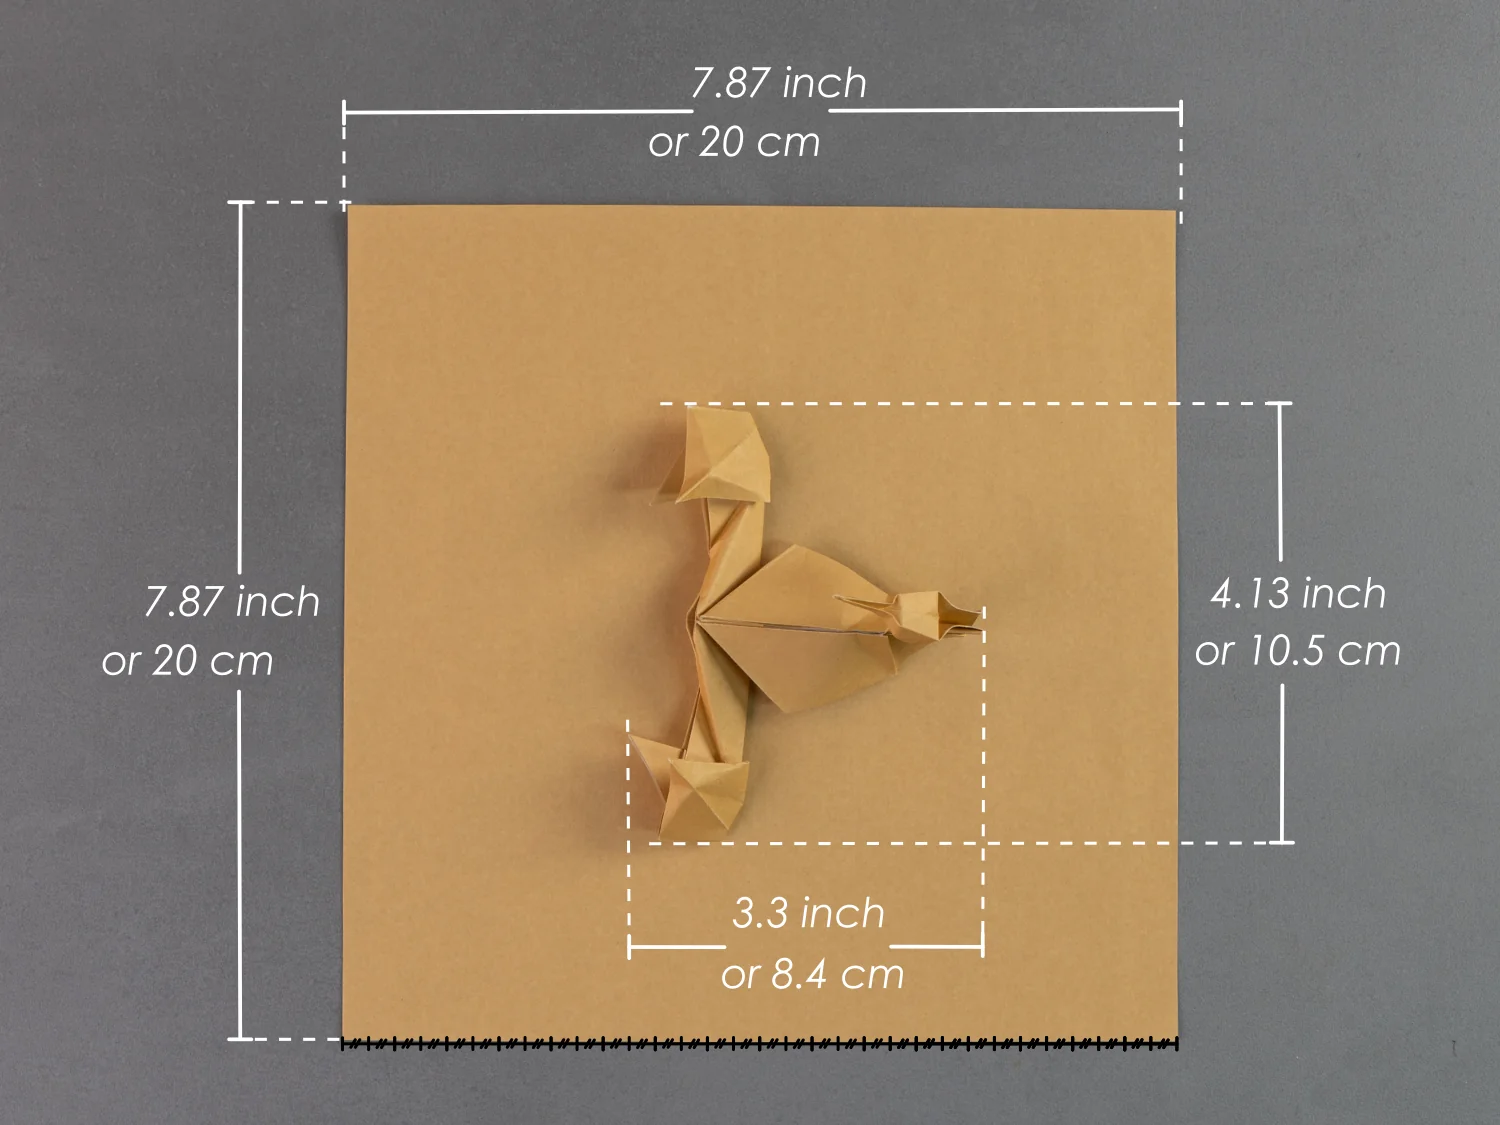
Prepare 20×20 cm origami square paper with different colors on each side. Feel free to experiment with various colors to give your scorpion a unique outlook.
Step by Step Instructions
Step 1
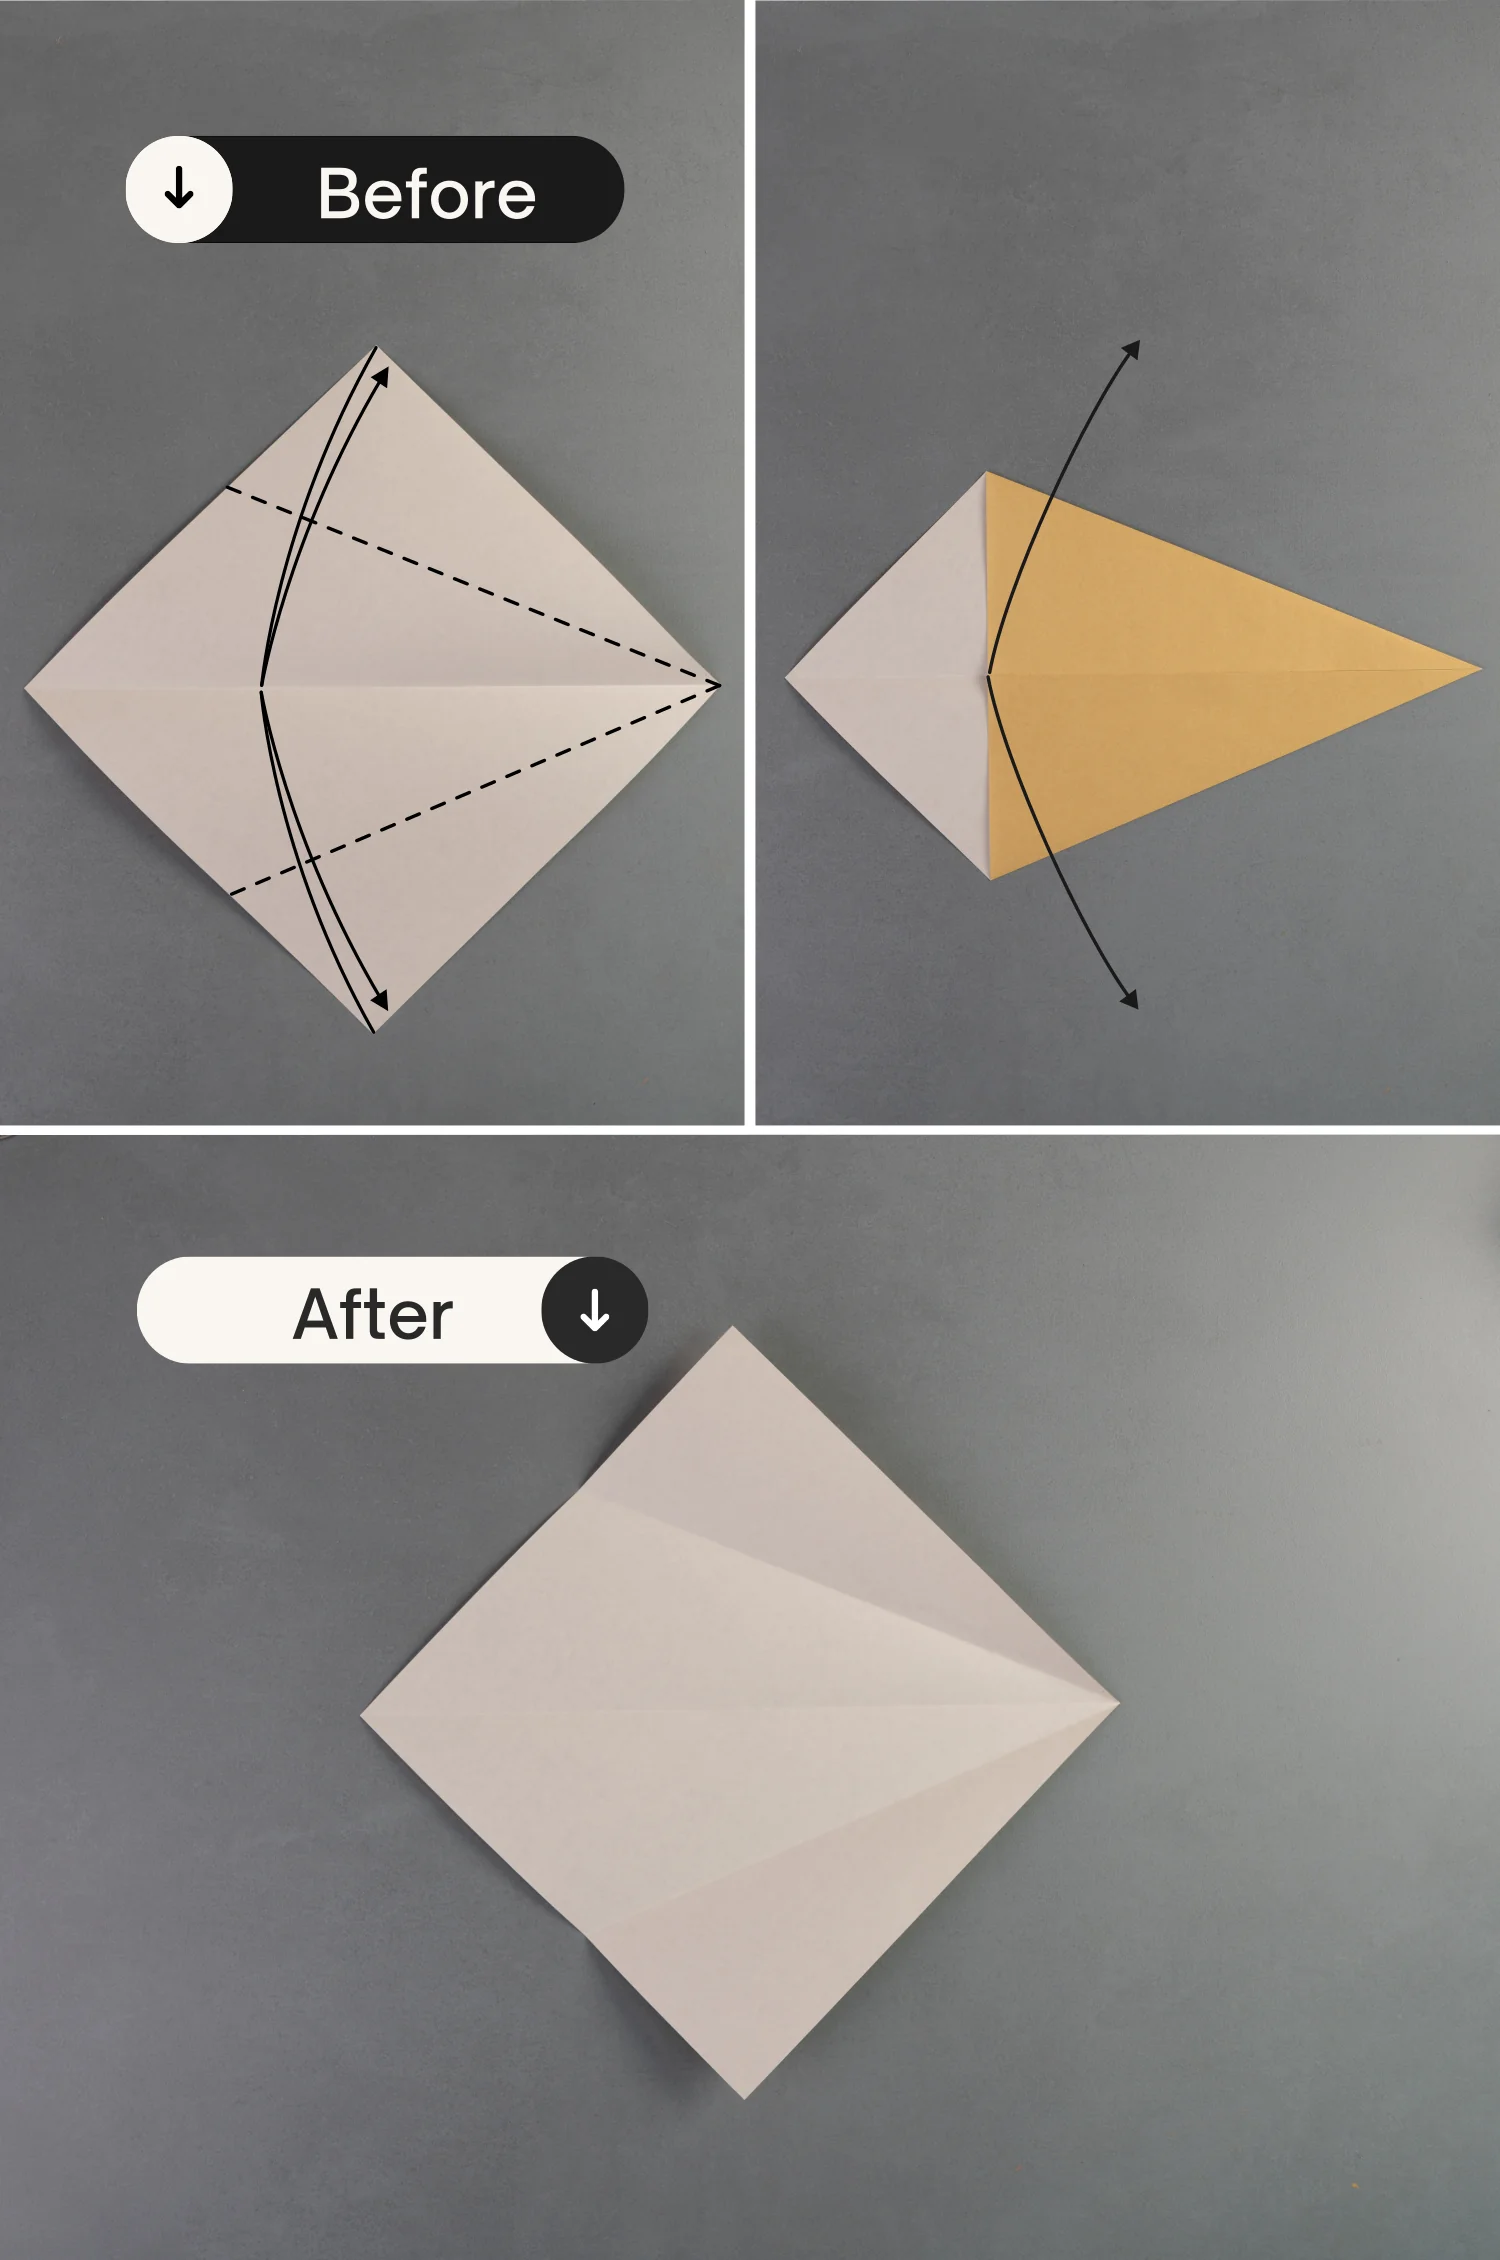
Place the paper with the desired display color side down to begin folding, fold it in half horizontally, crease it well, and unfold it.

Step 2
Fold the top and bottom right edges to align with the horizontal crease, crease them well, and unfold them.
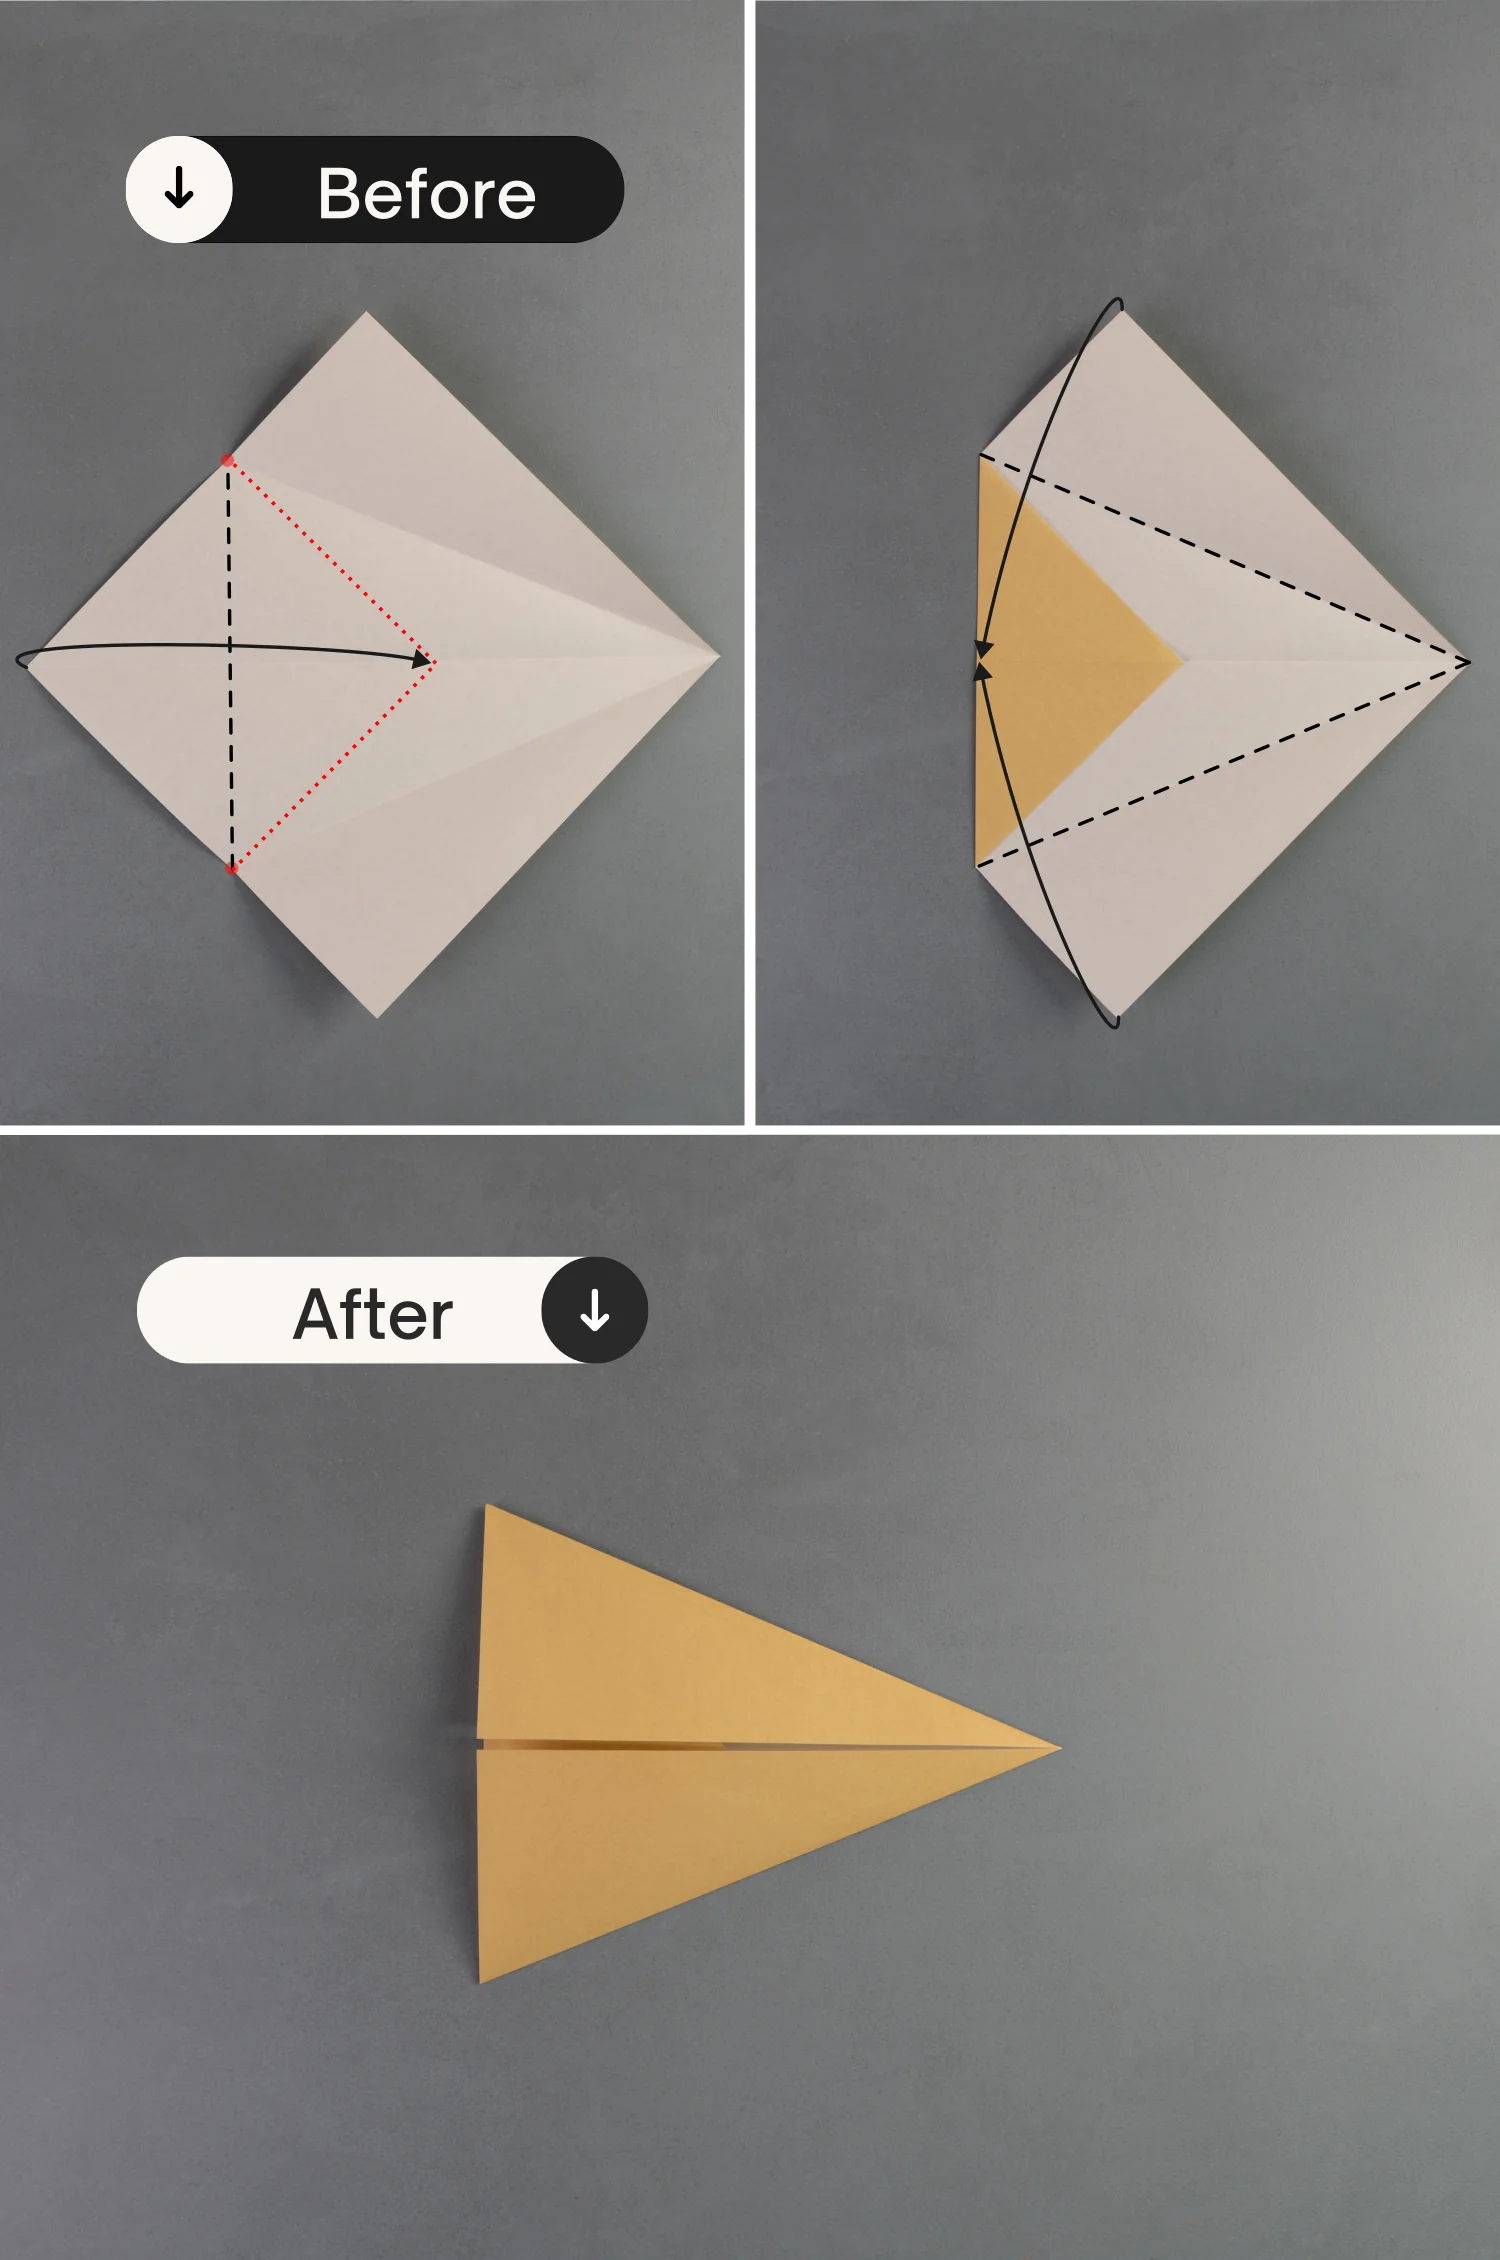
Step 3
Fold the left point toward the right along the black dotted line that connects the two red spots, then fold the top and bottom right edges again as you did in the previous step
Step 4
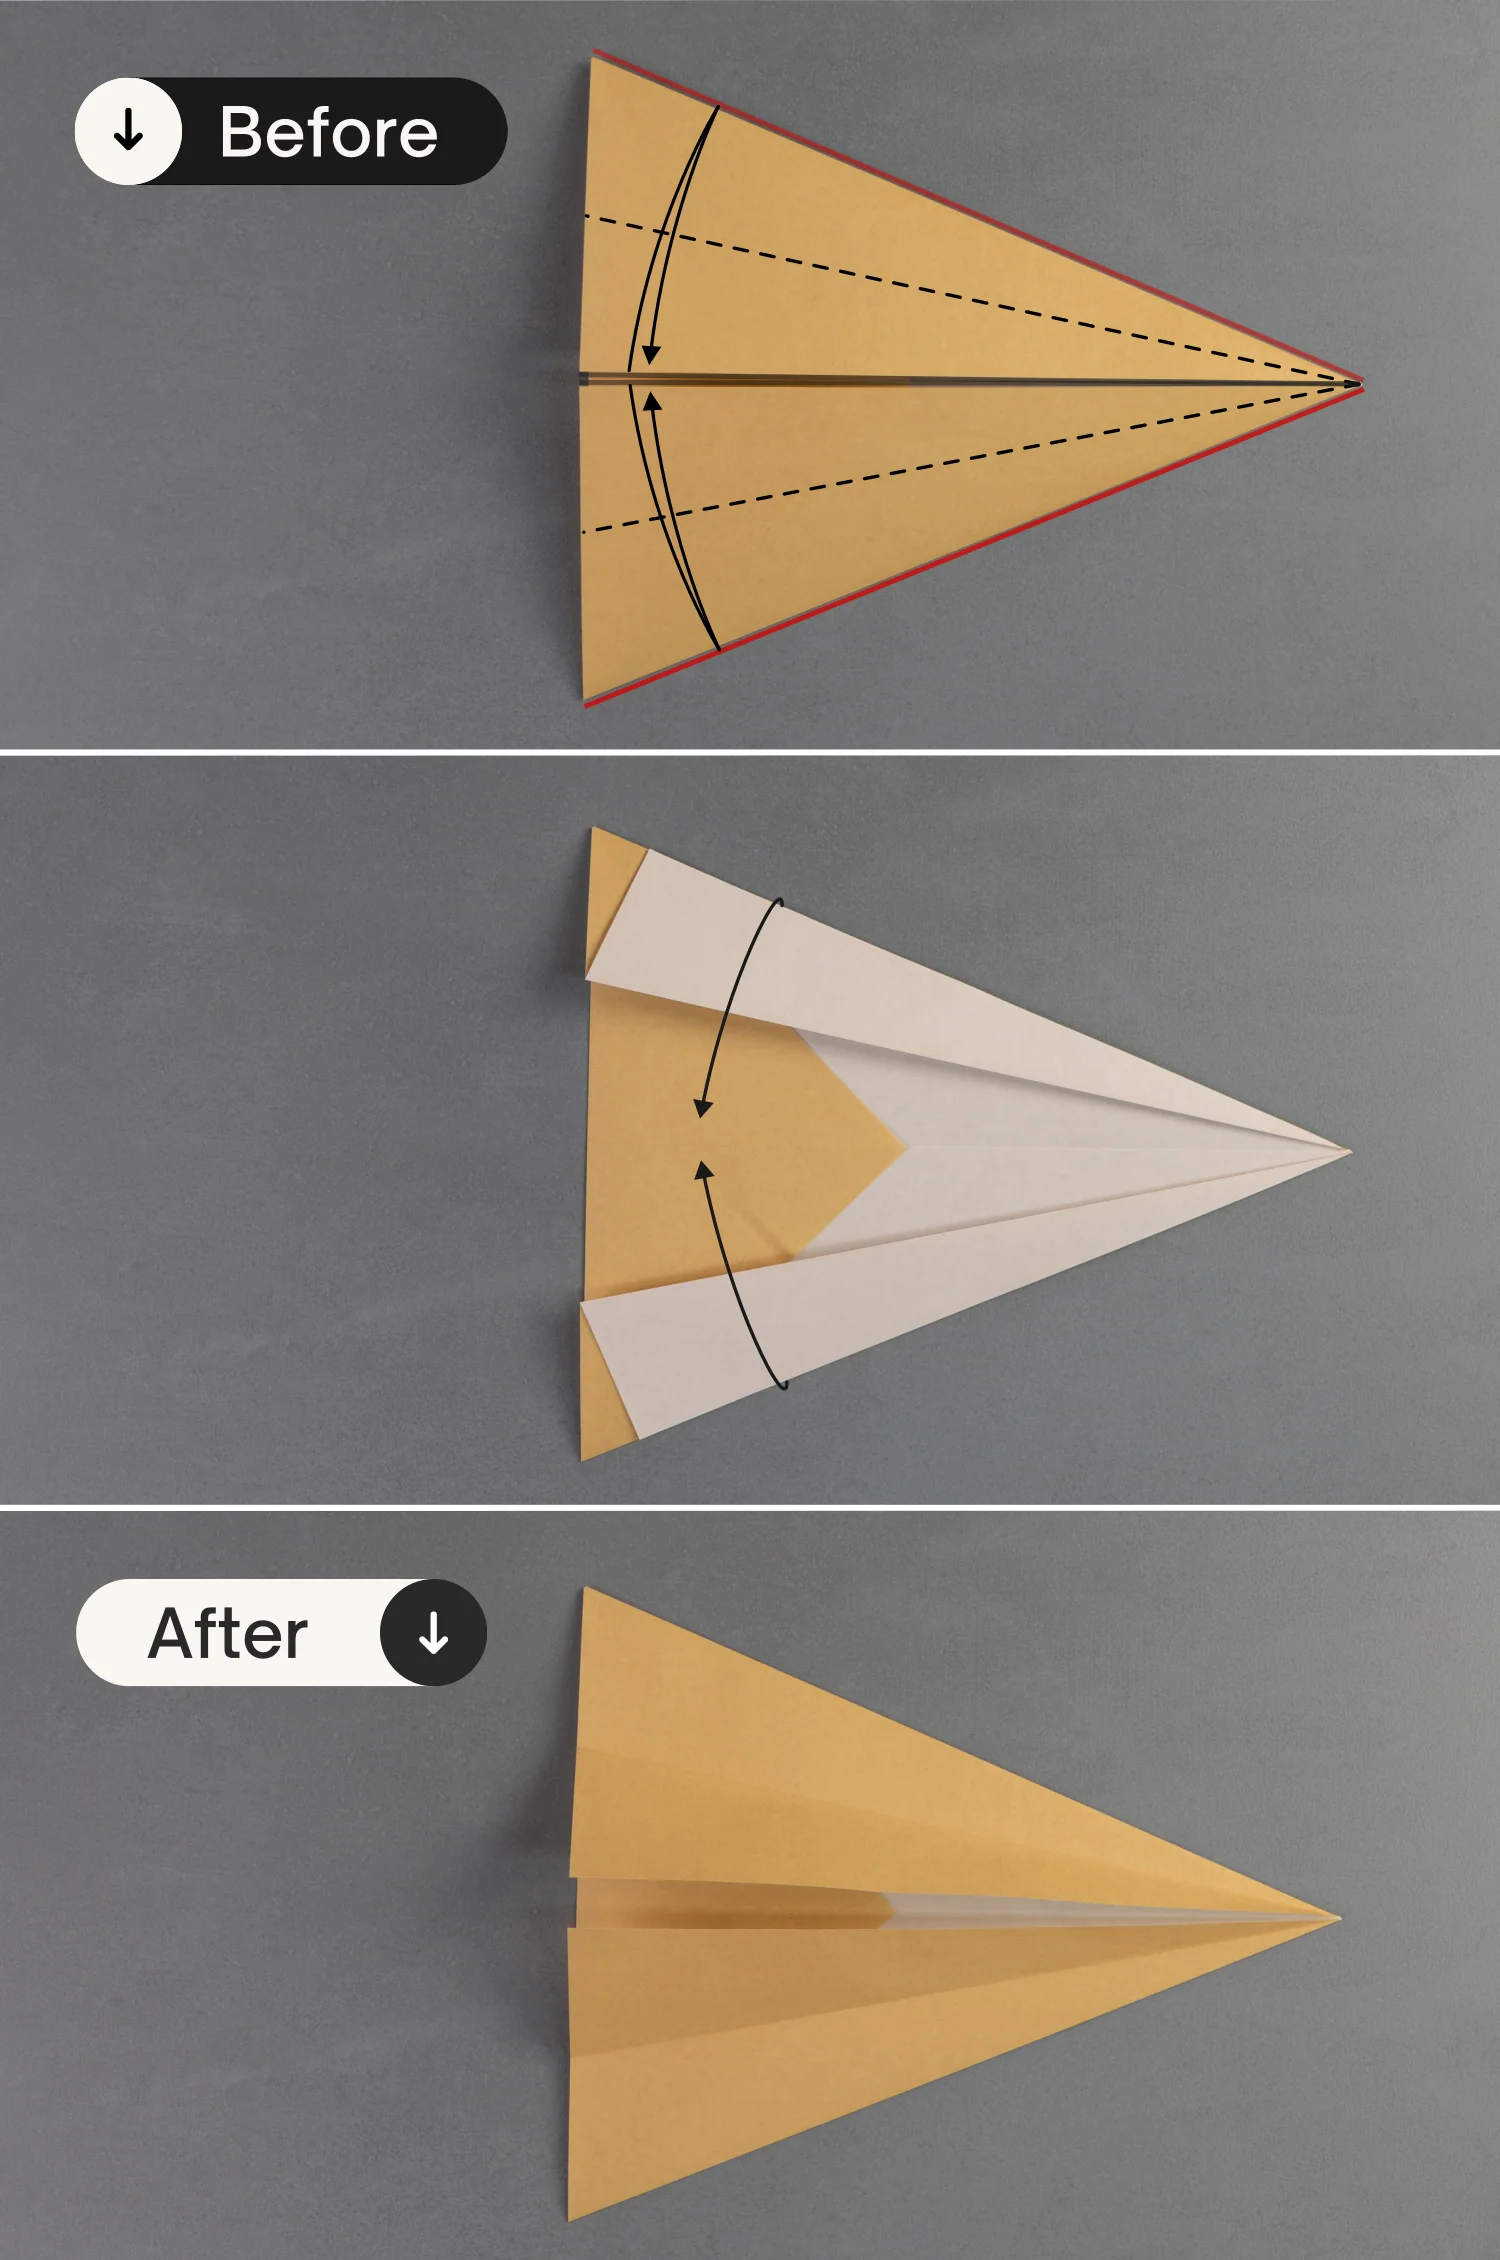
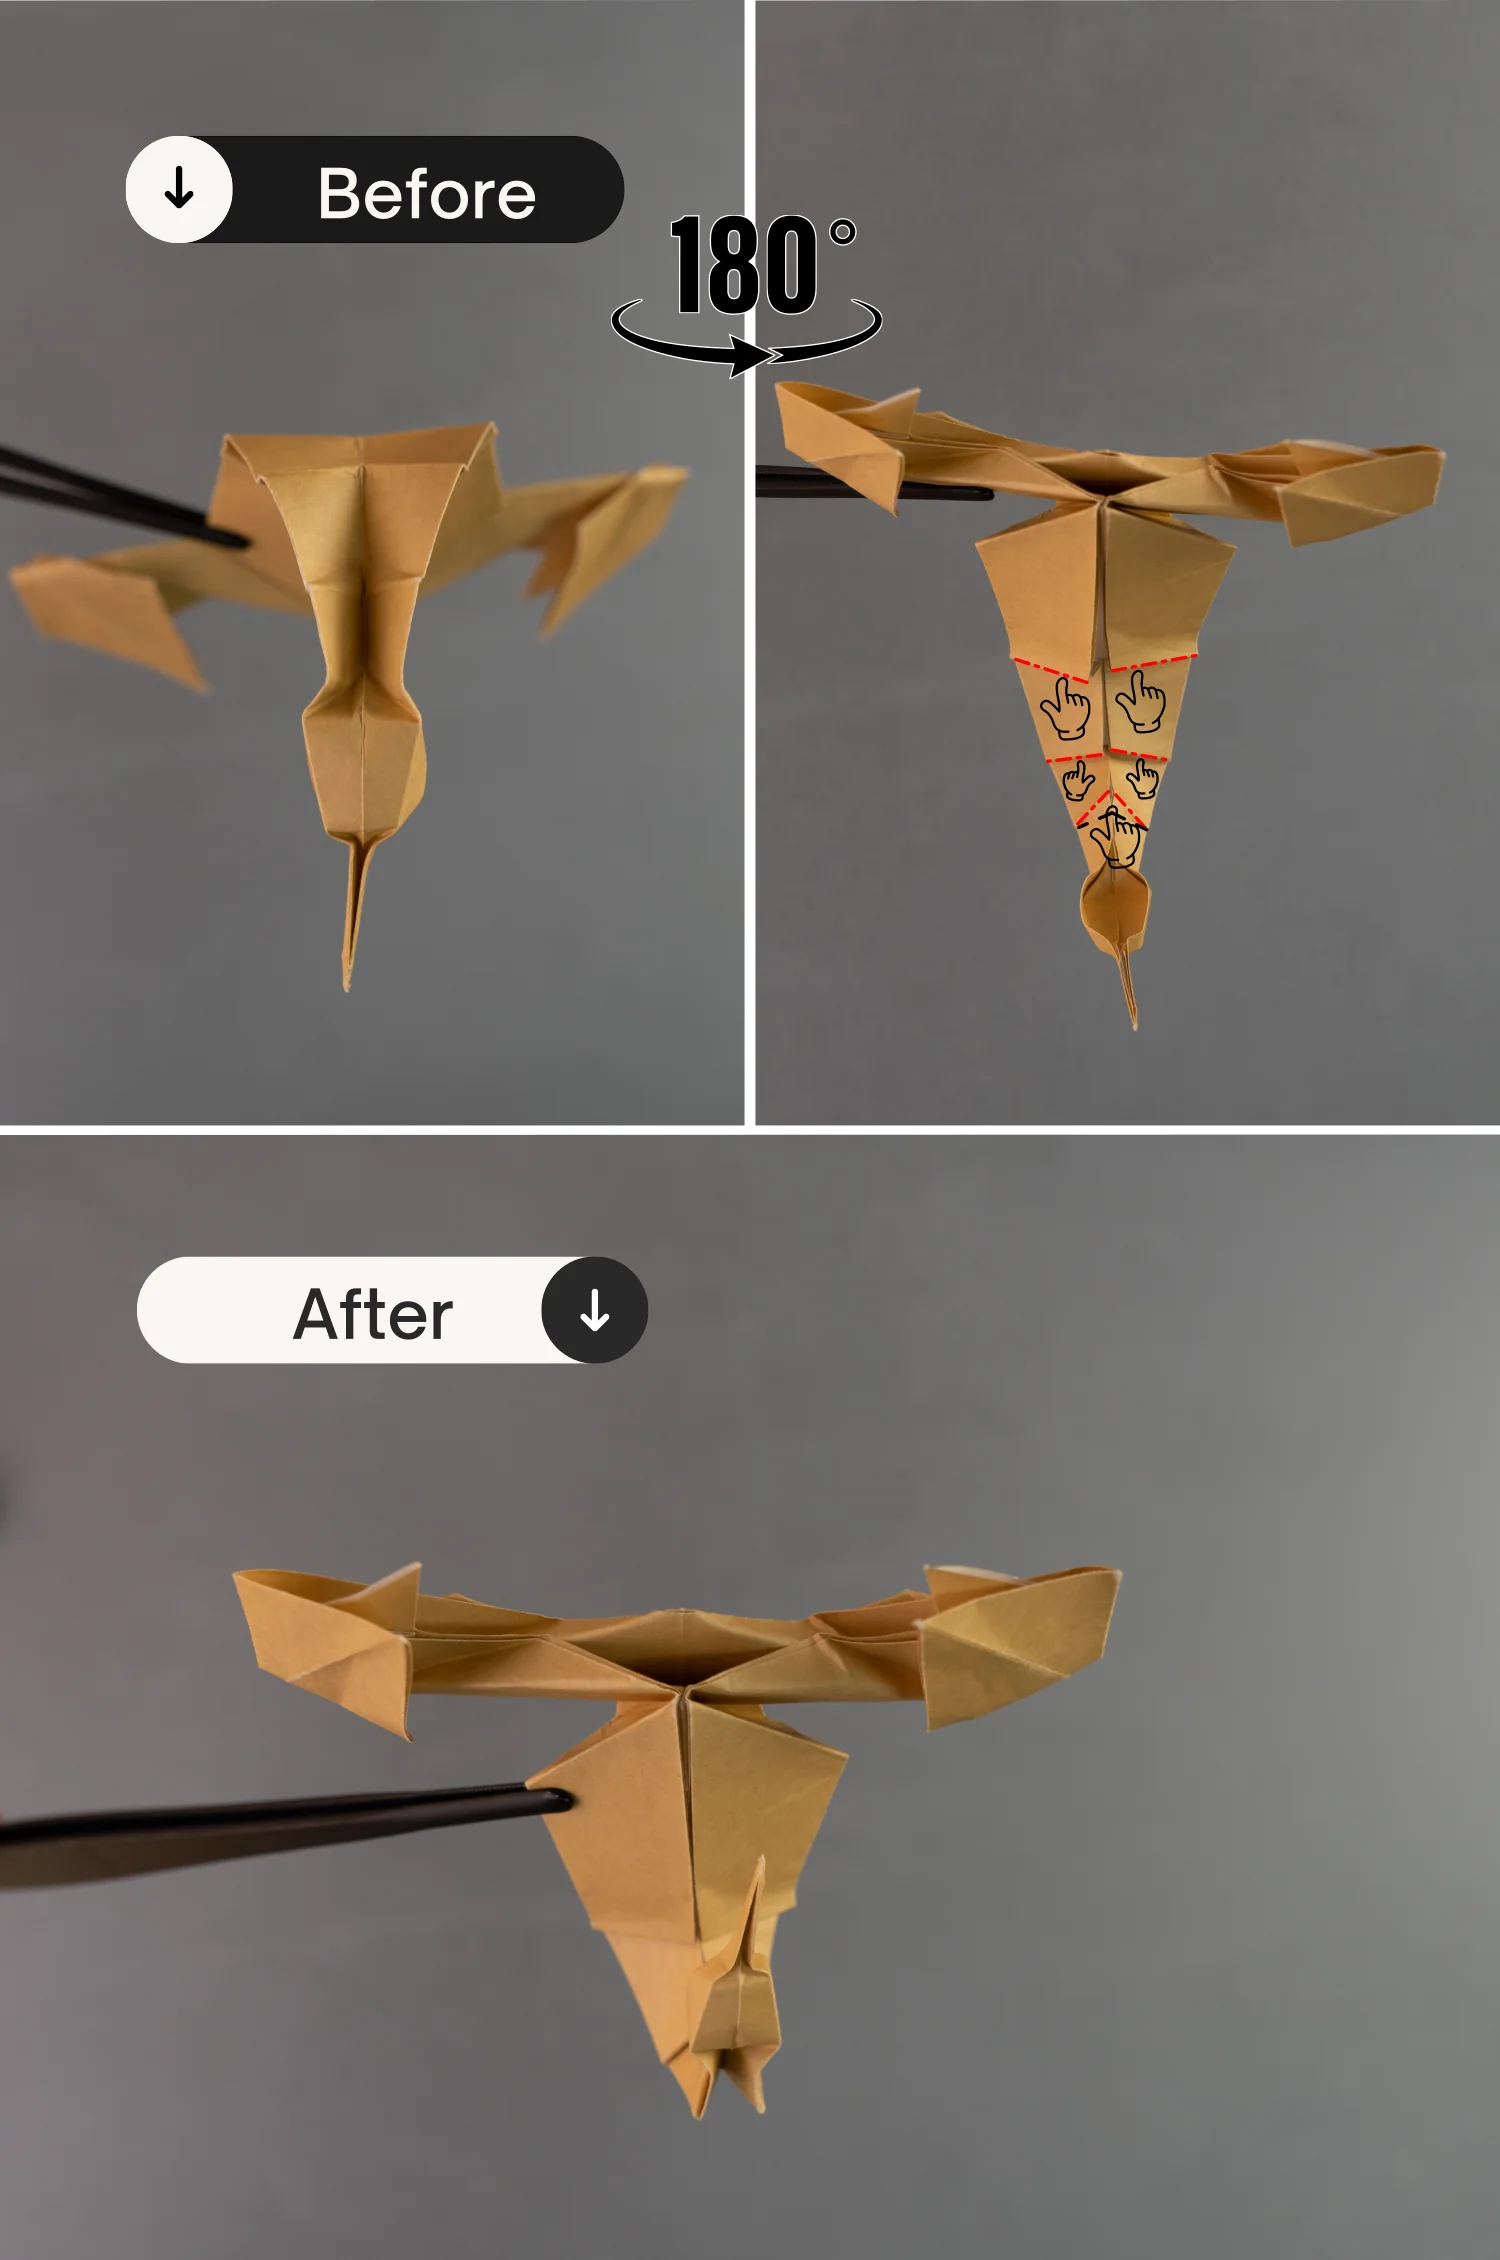
Fold the bottom edge of the top triangle indicated by the black line to align with the top edge indicated by the red line.
Fold the top edge of the bottom triangle indicated by the black line to align with the bottom edge indicated by the red line.
Crease them well, then unfold them.
Step 5
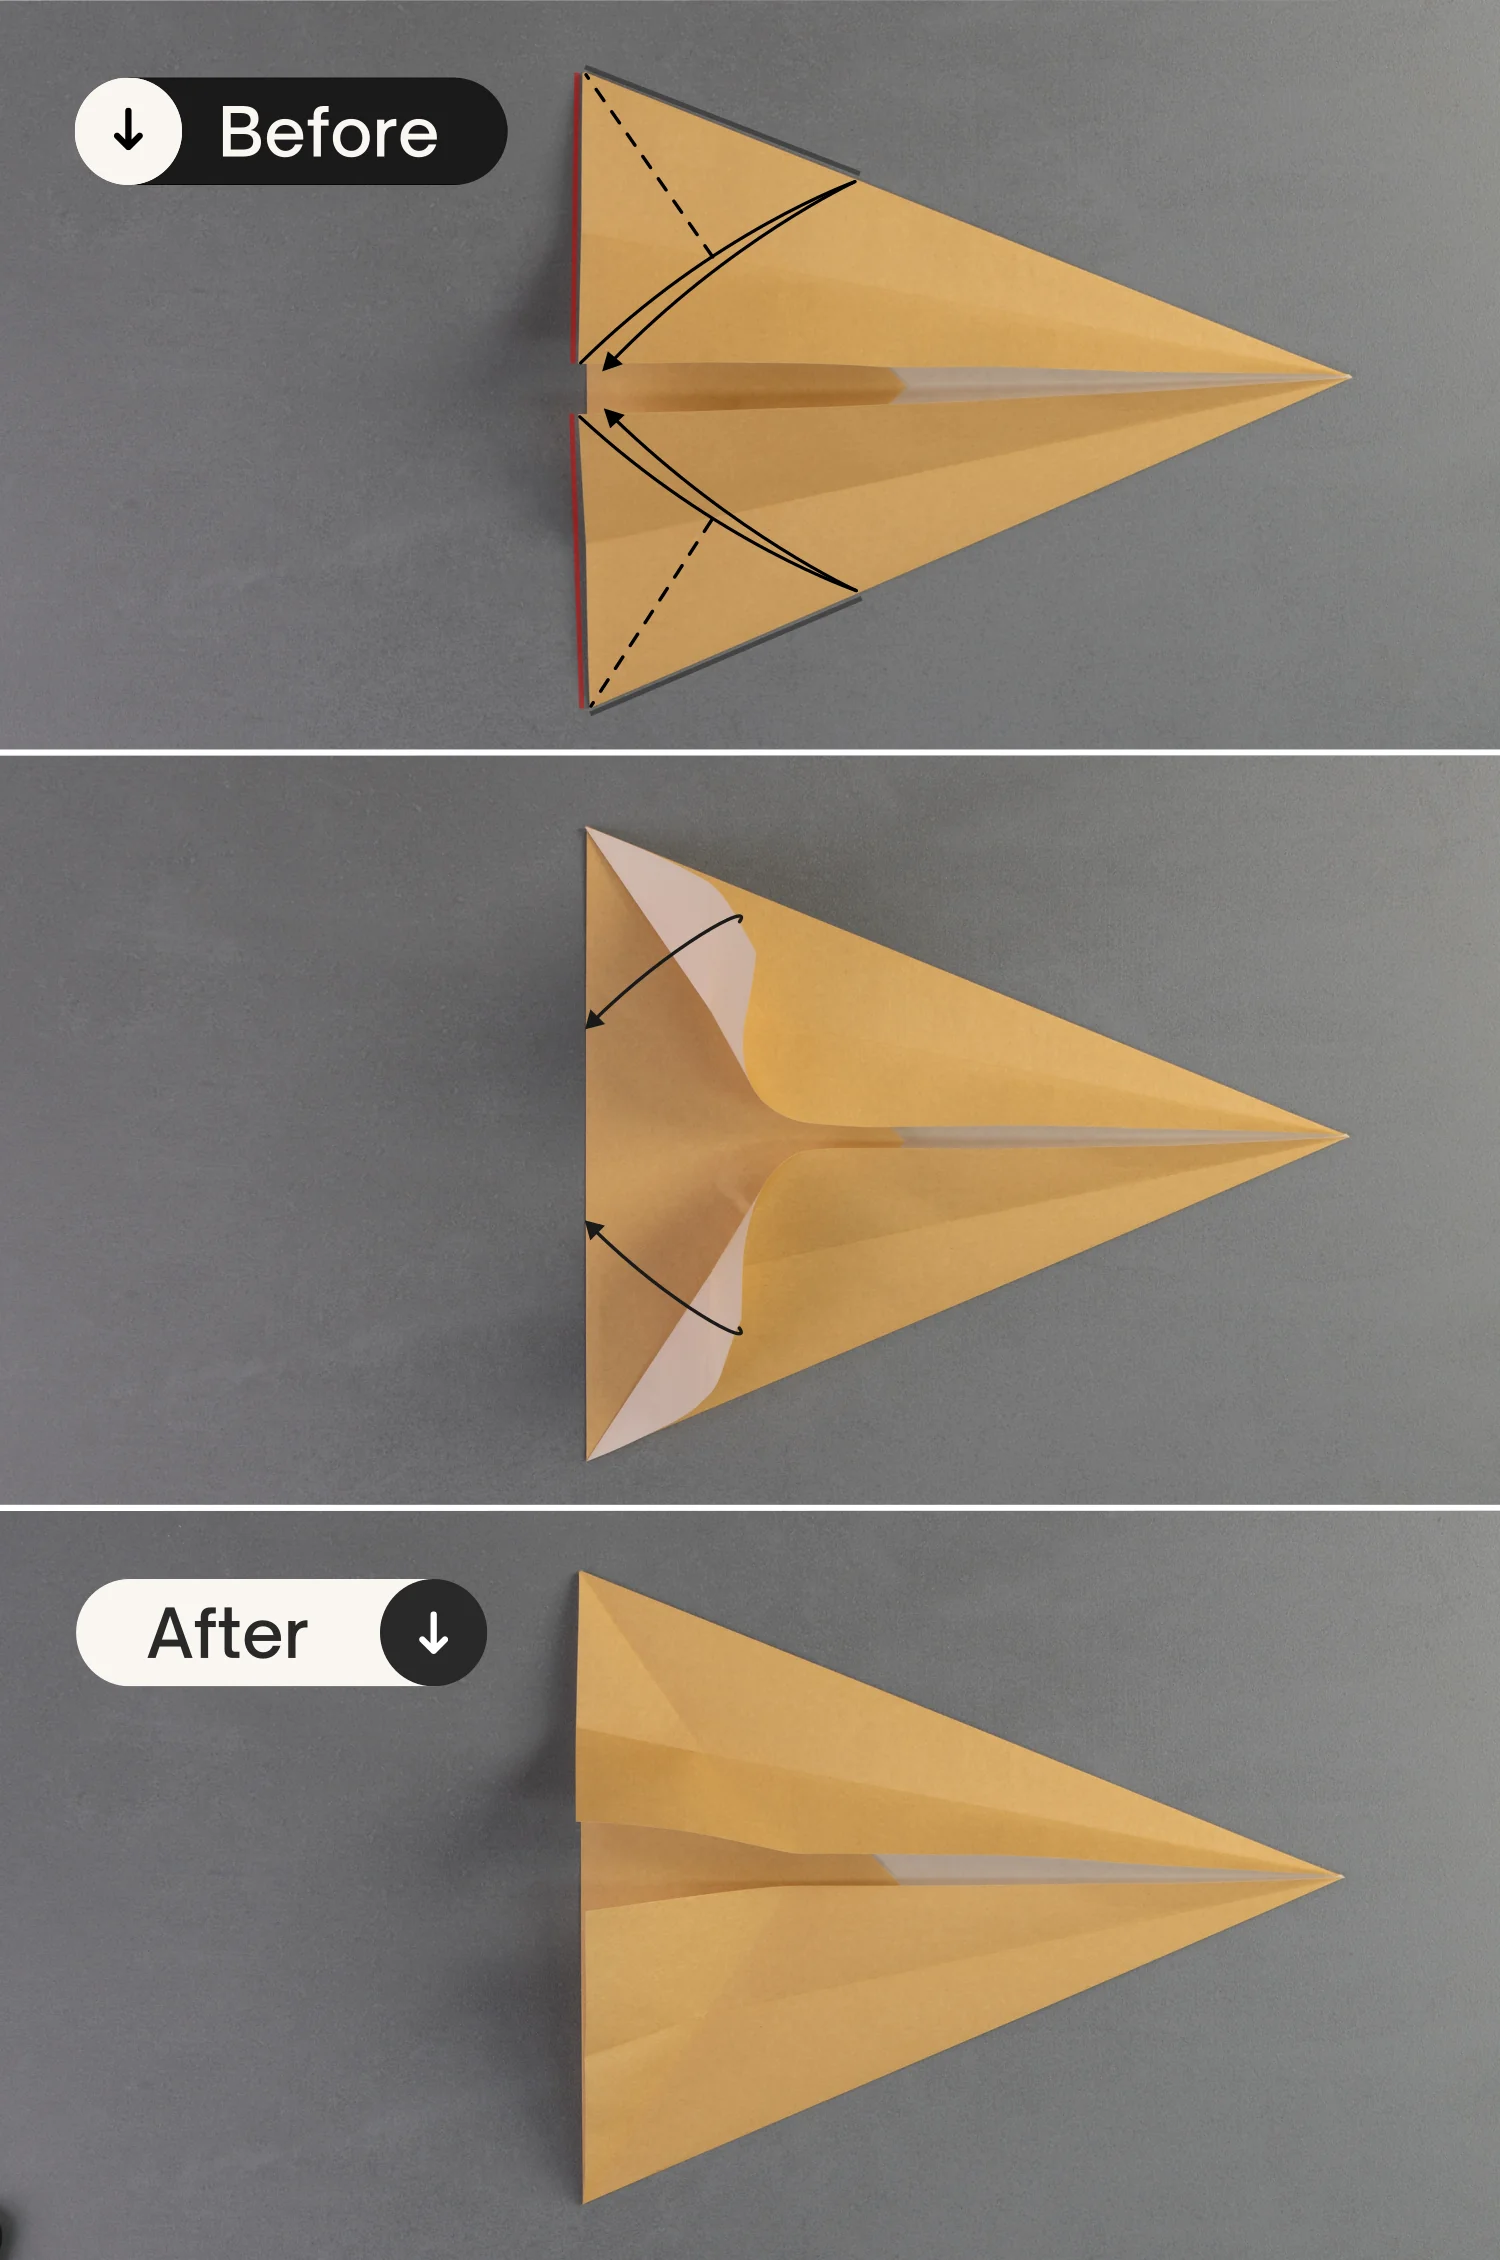
Similarly, fold the two edges indicated by the red lines to align with the edges marked by the black lines, crease them well to leave two creases shown by the dotted lines, and unfold them.
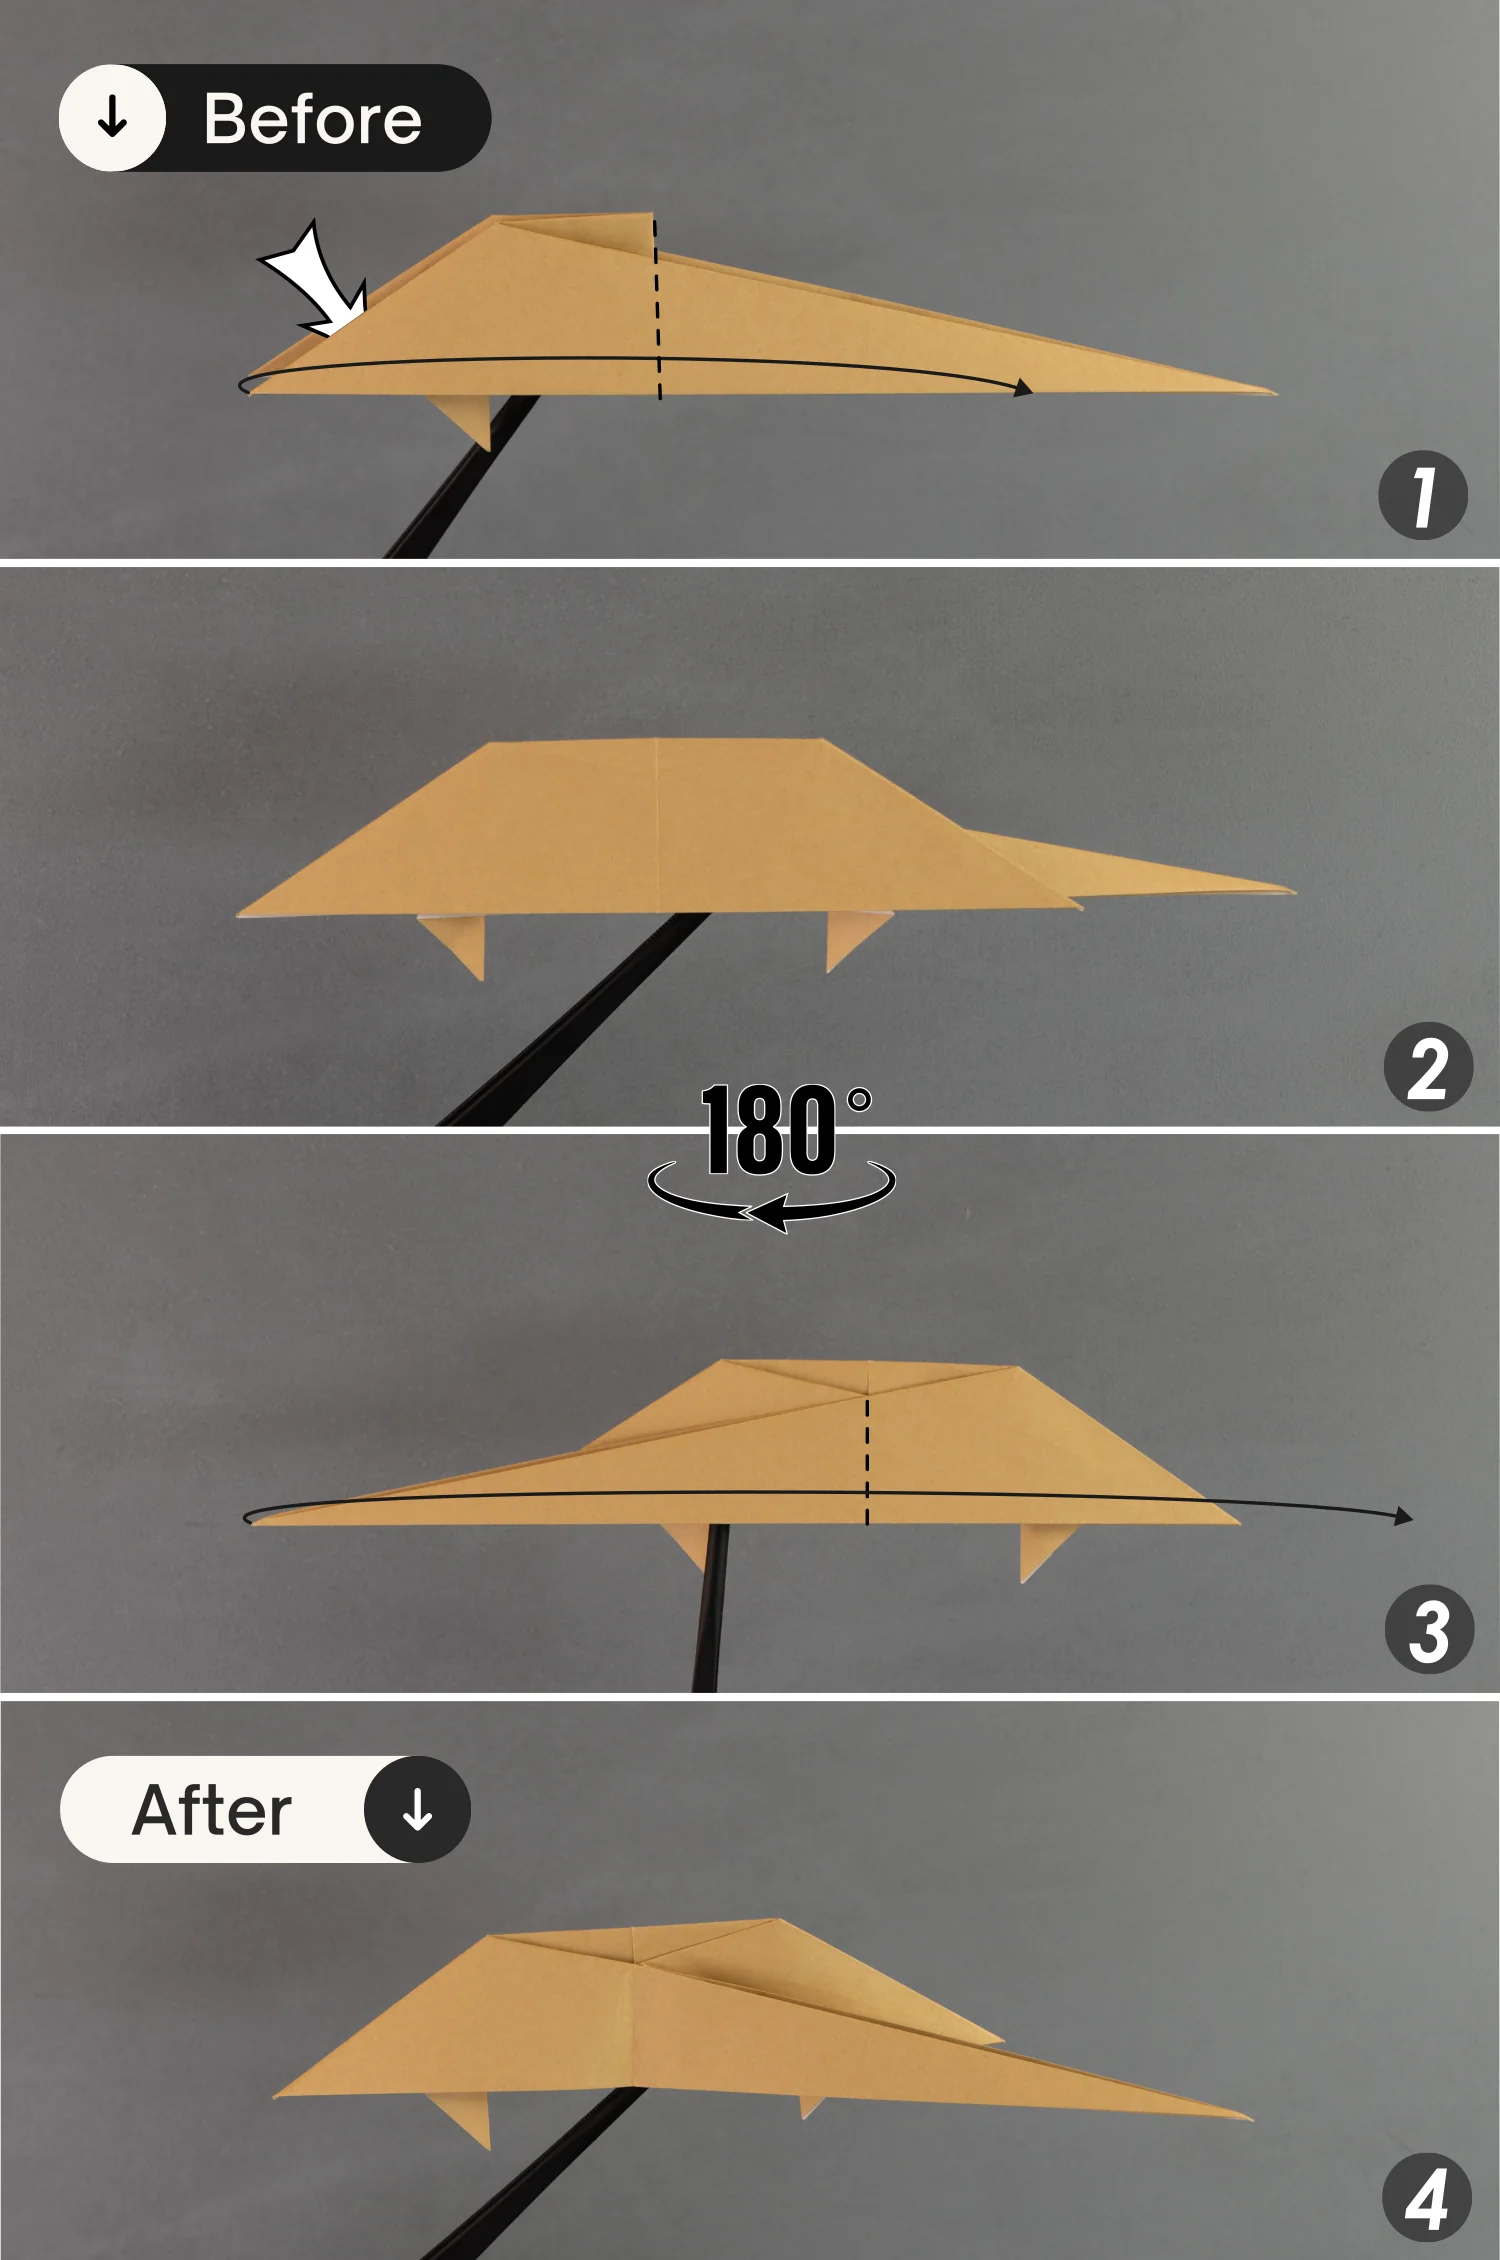
Step 6
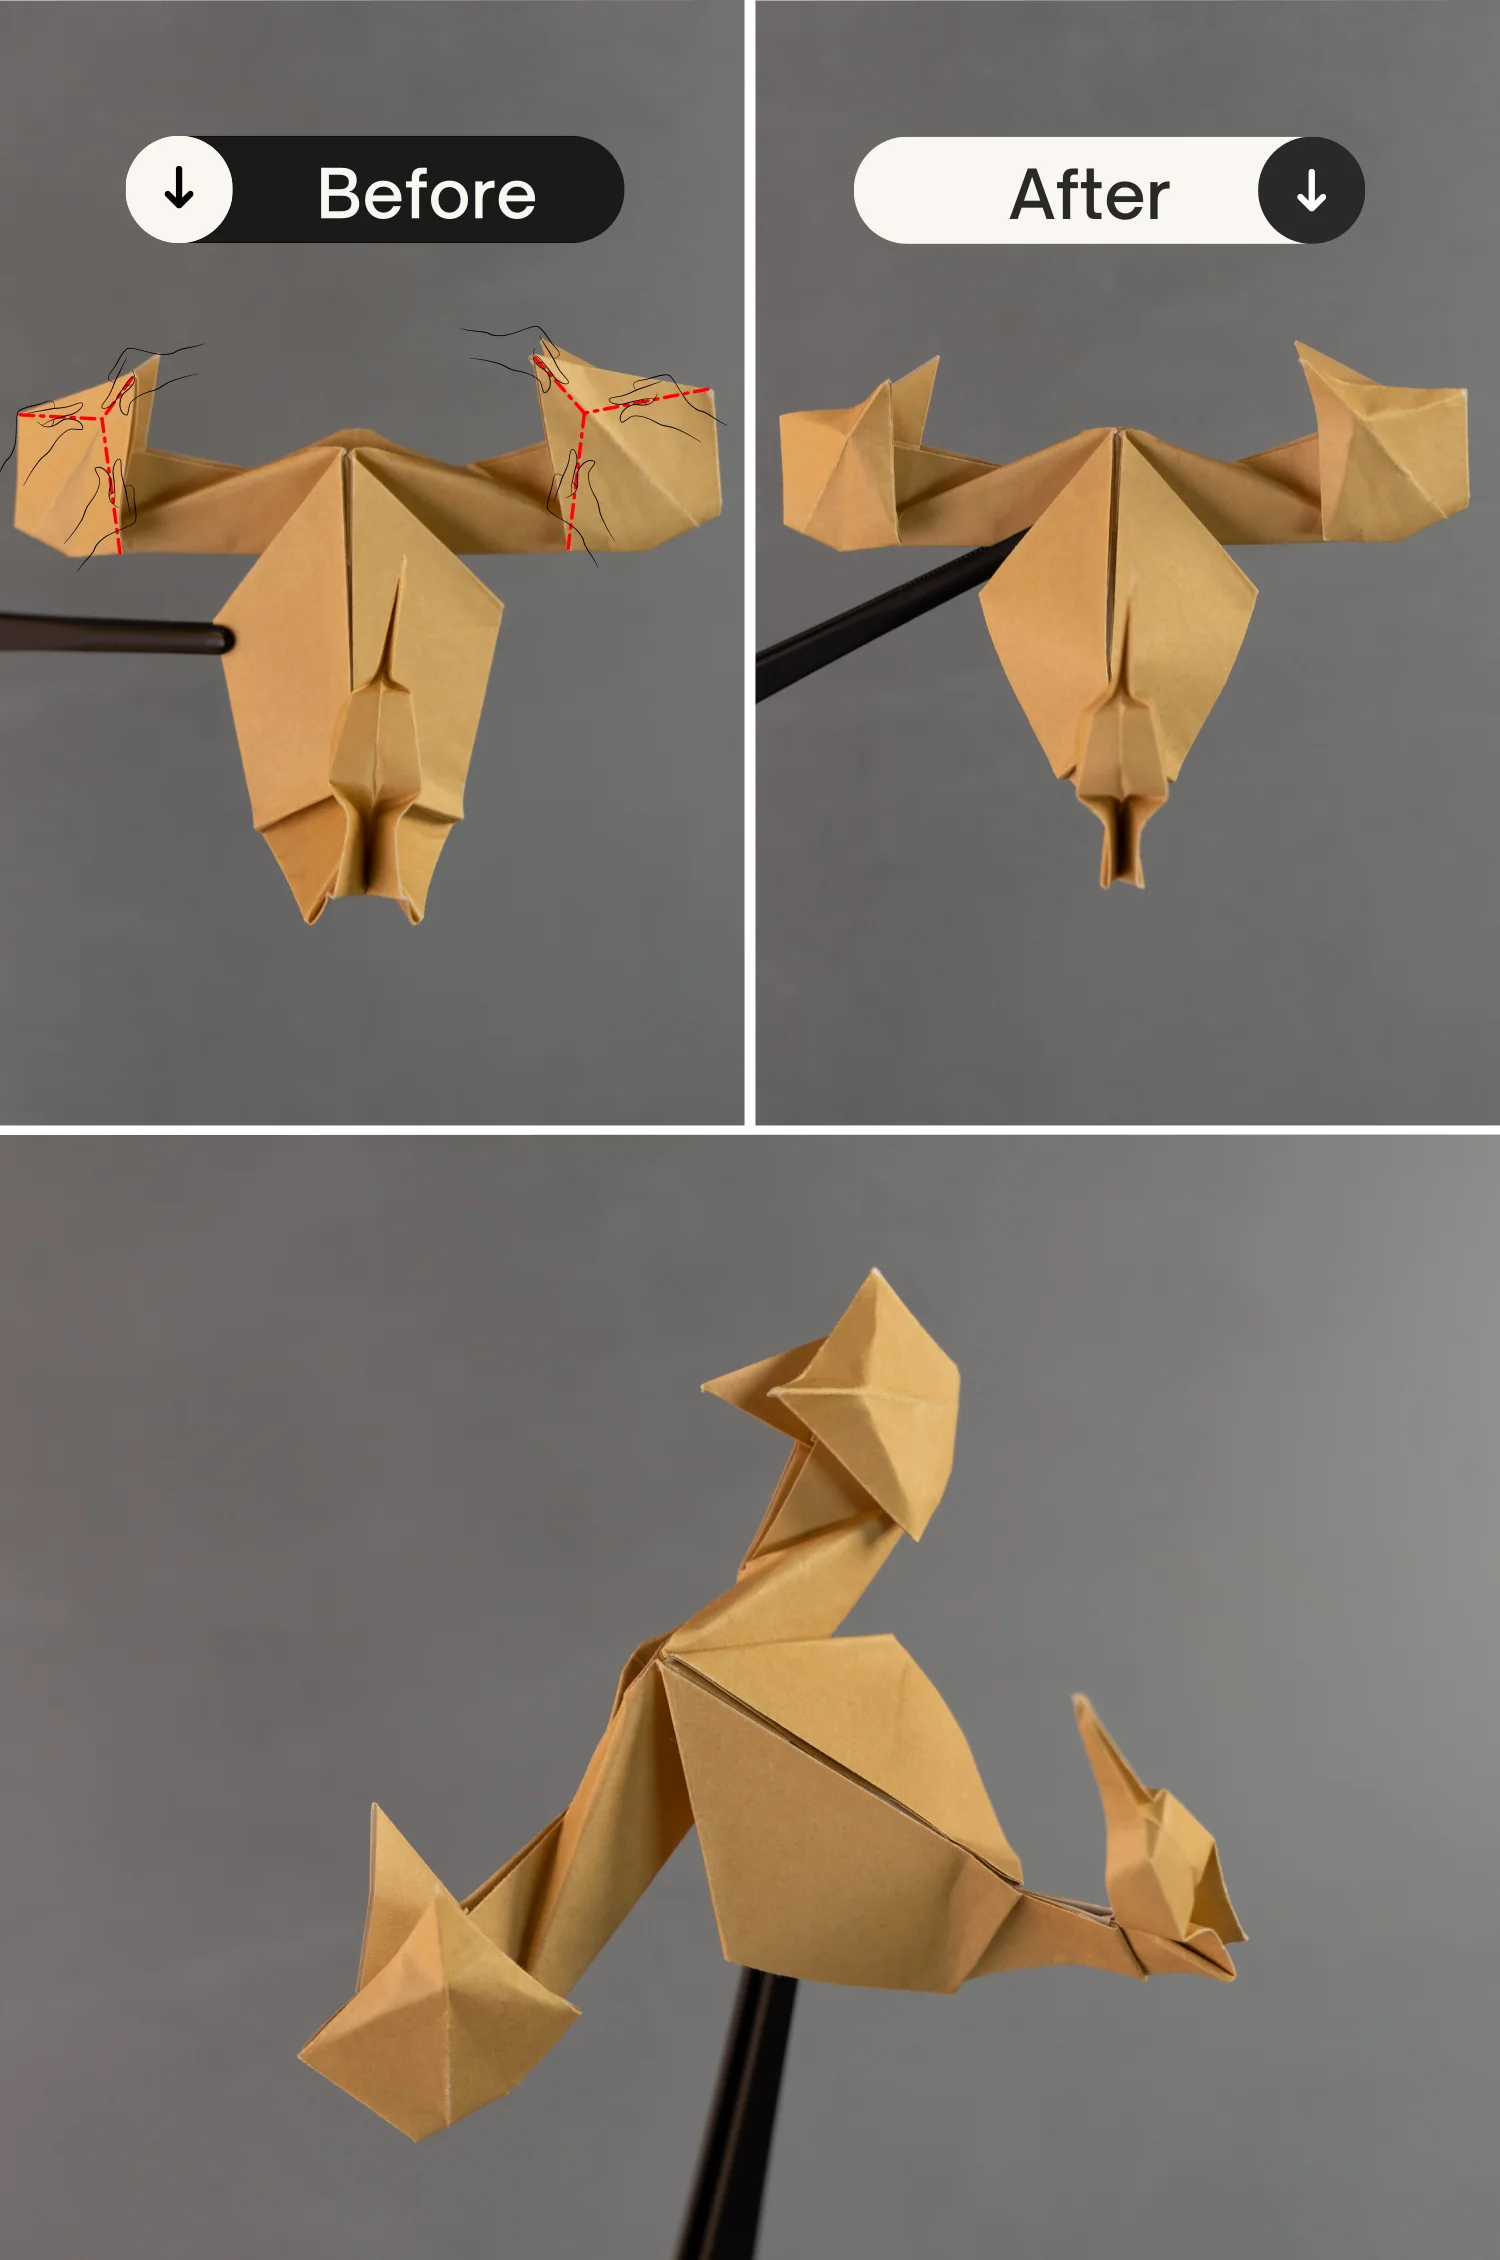
Bring up the bottom and left edges of the top triangle along the creases you made, sharpen the bottom left point to create a flap, and finally, press down this flap toward the top point of this triangle.
Step 7
Similarly, bring up the top and left edges of the bottom triangle along the creases you made, and sharpen the top left point to create a flap. Finally, press down this flap toward the bottom point of this triangle.
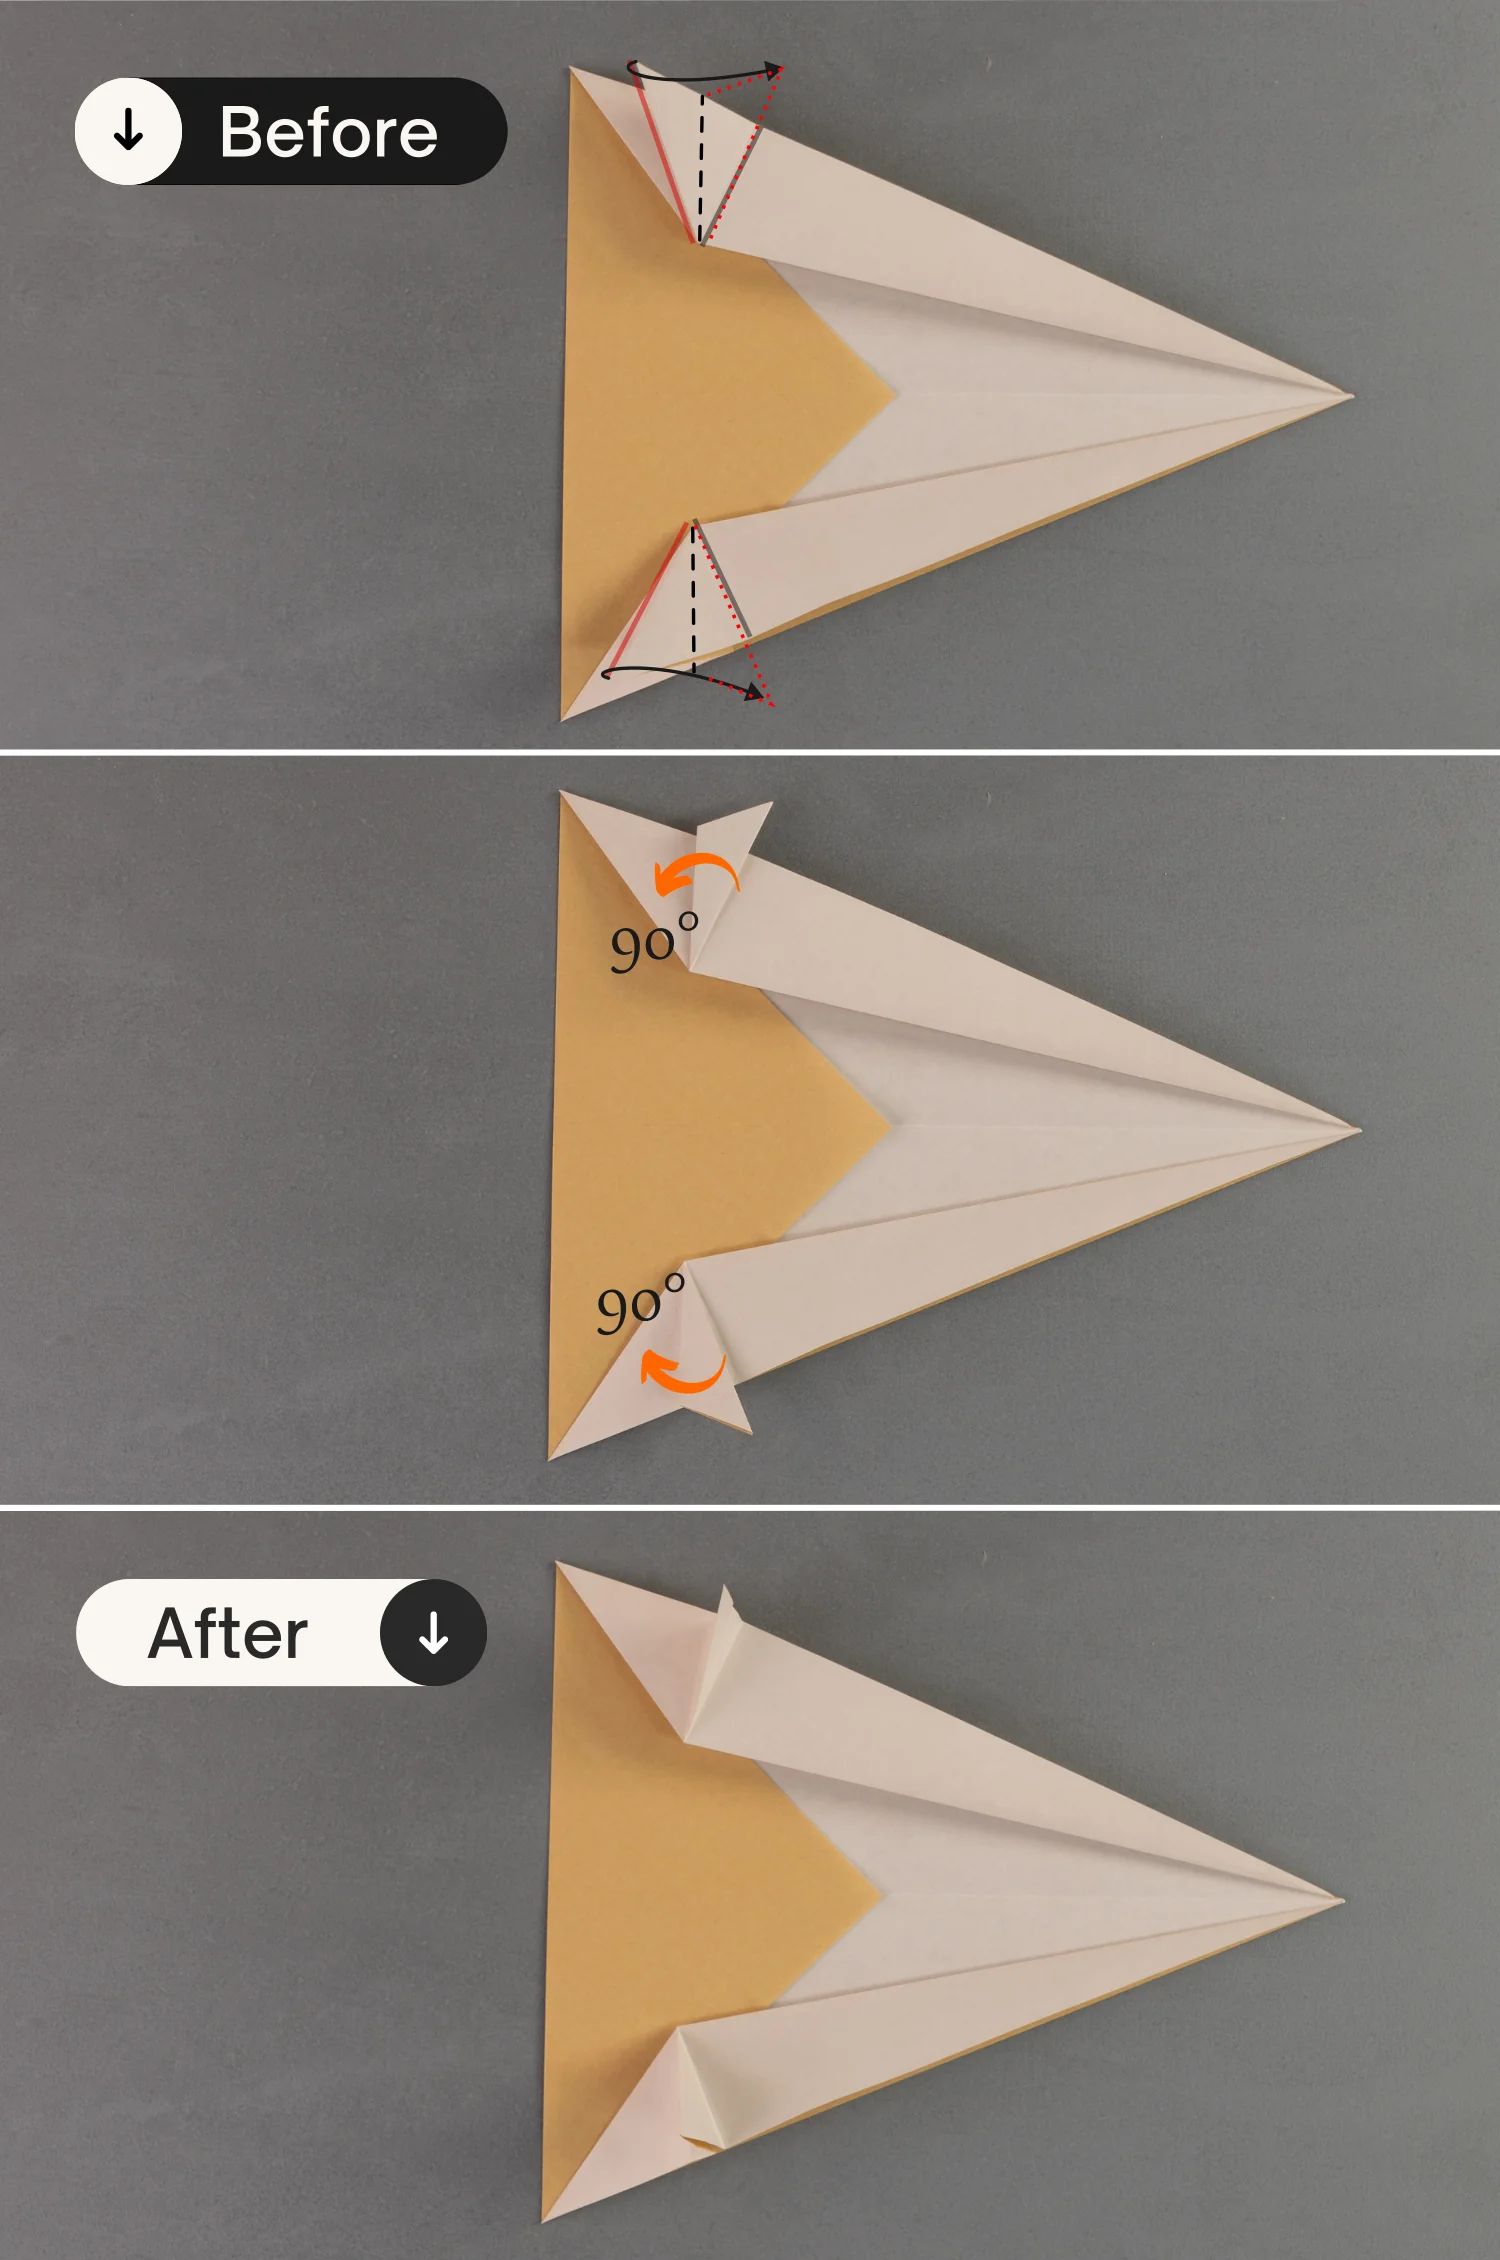
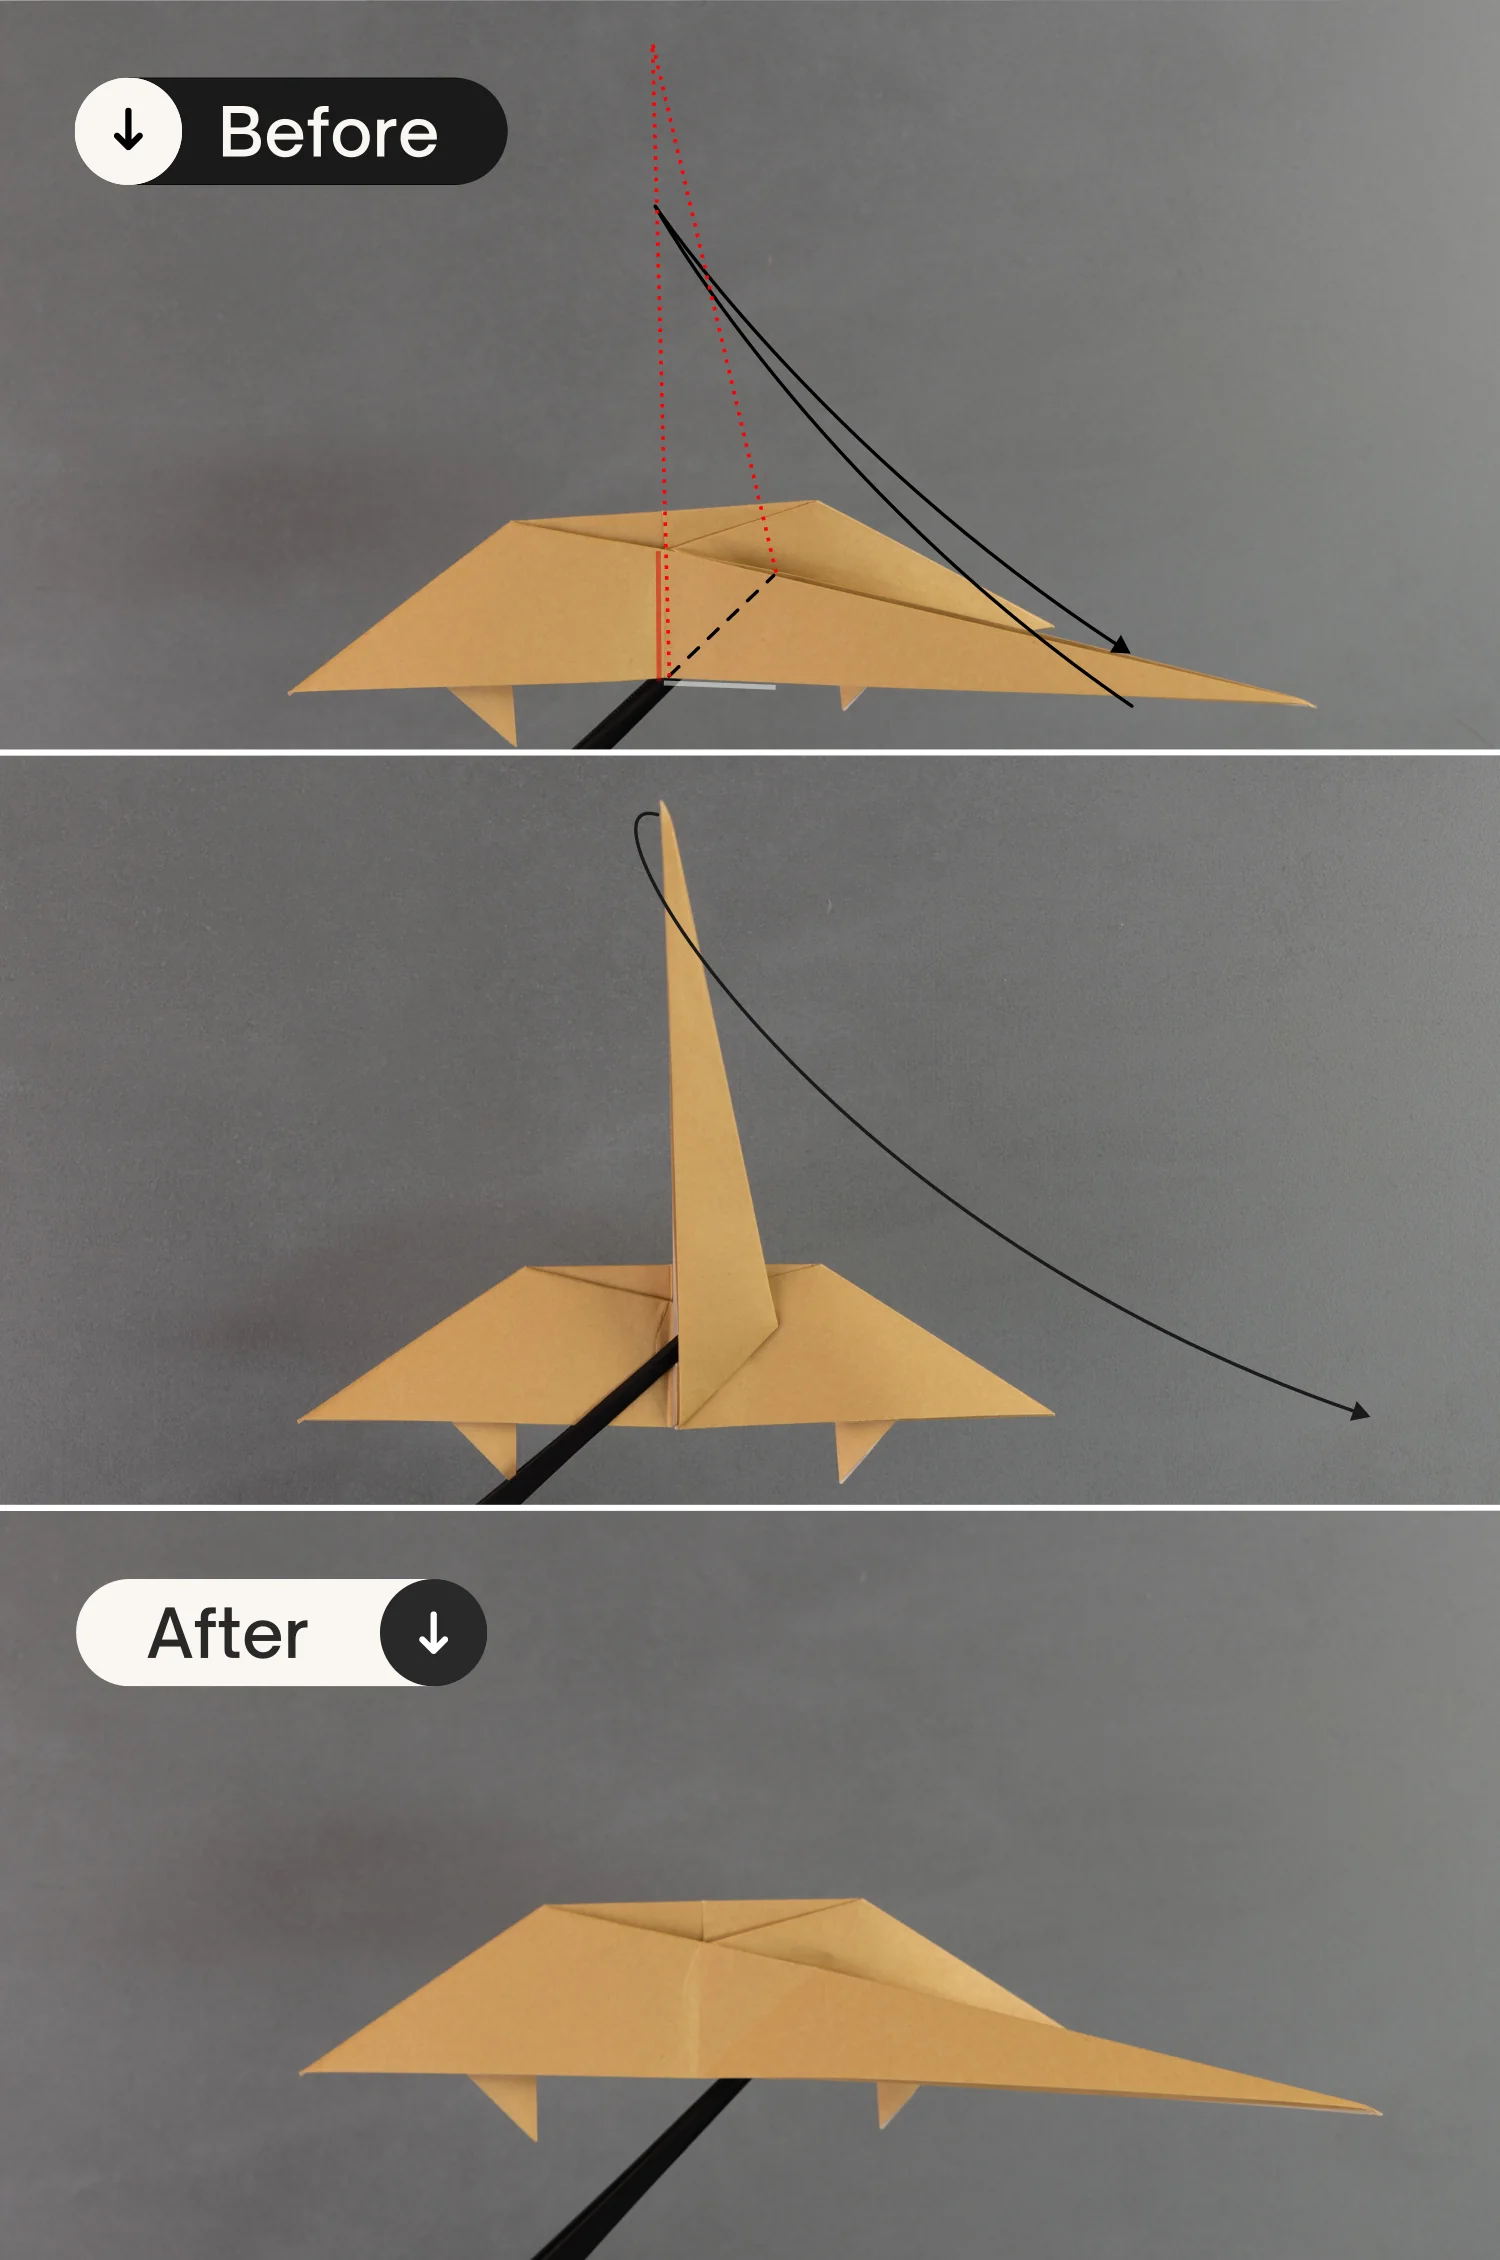
Step 8
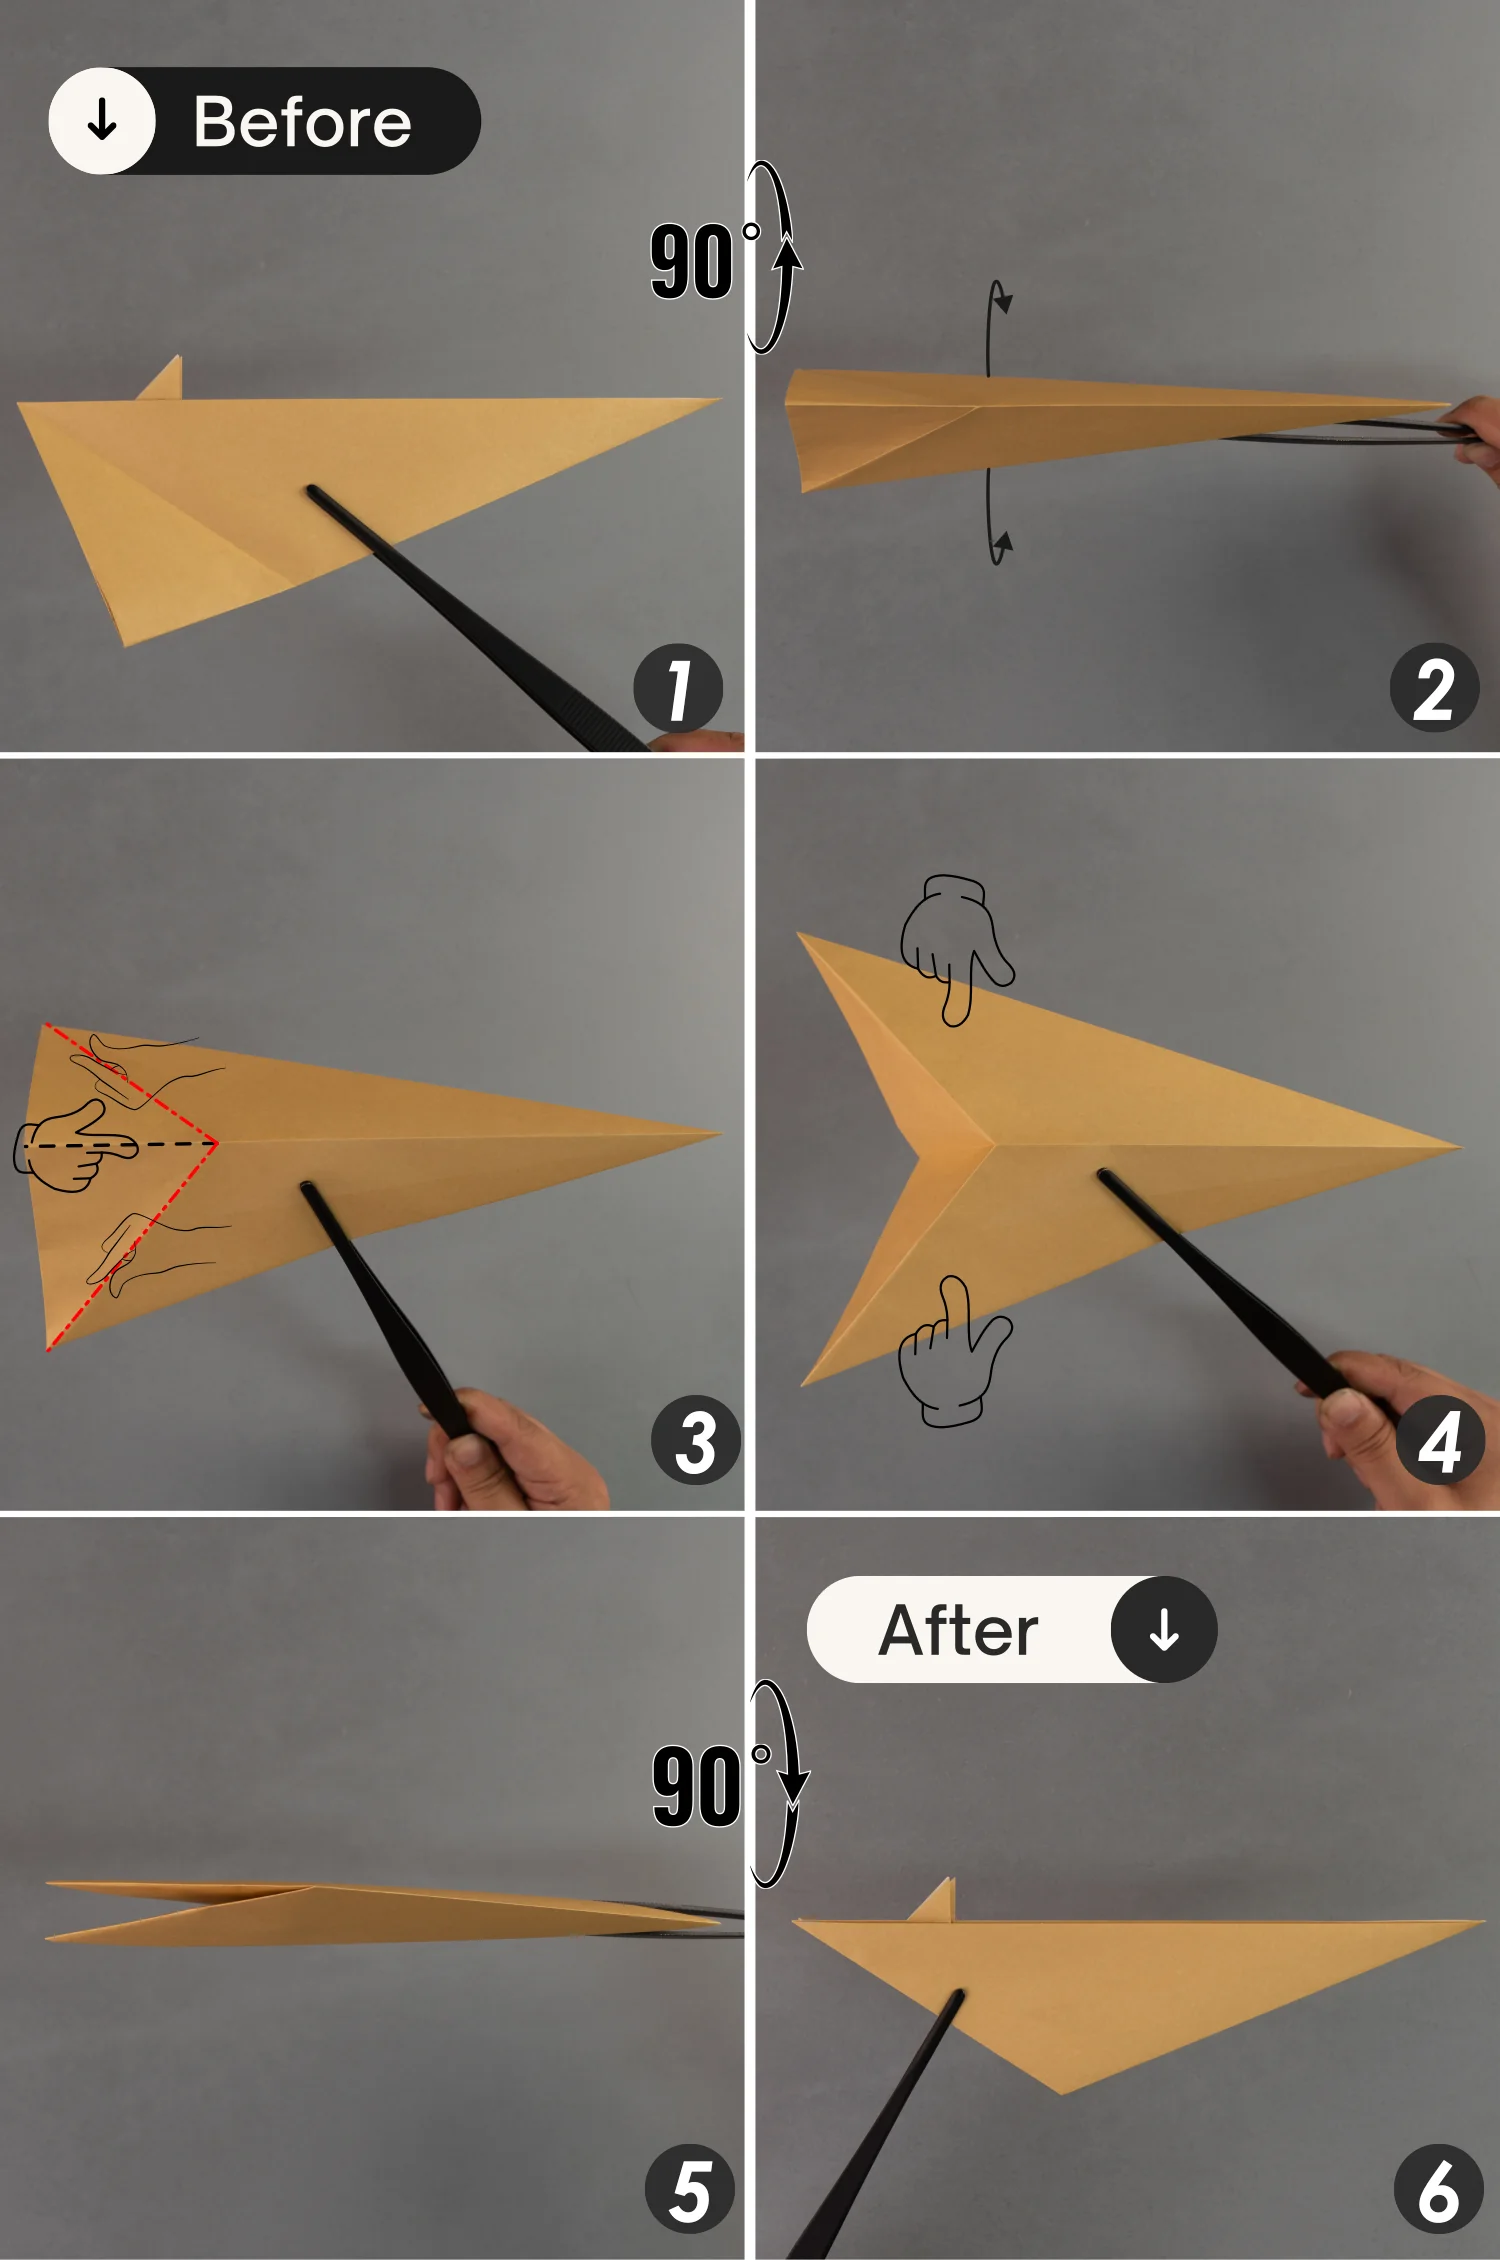
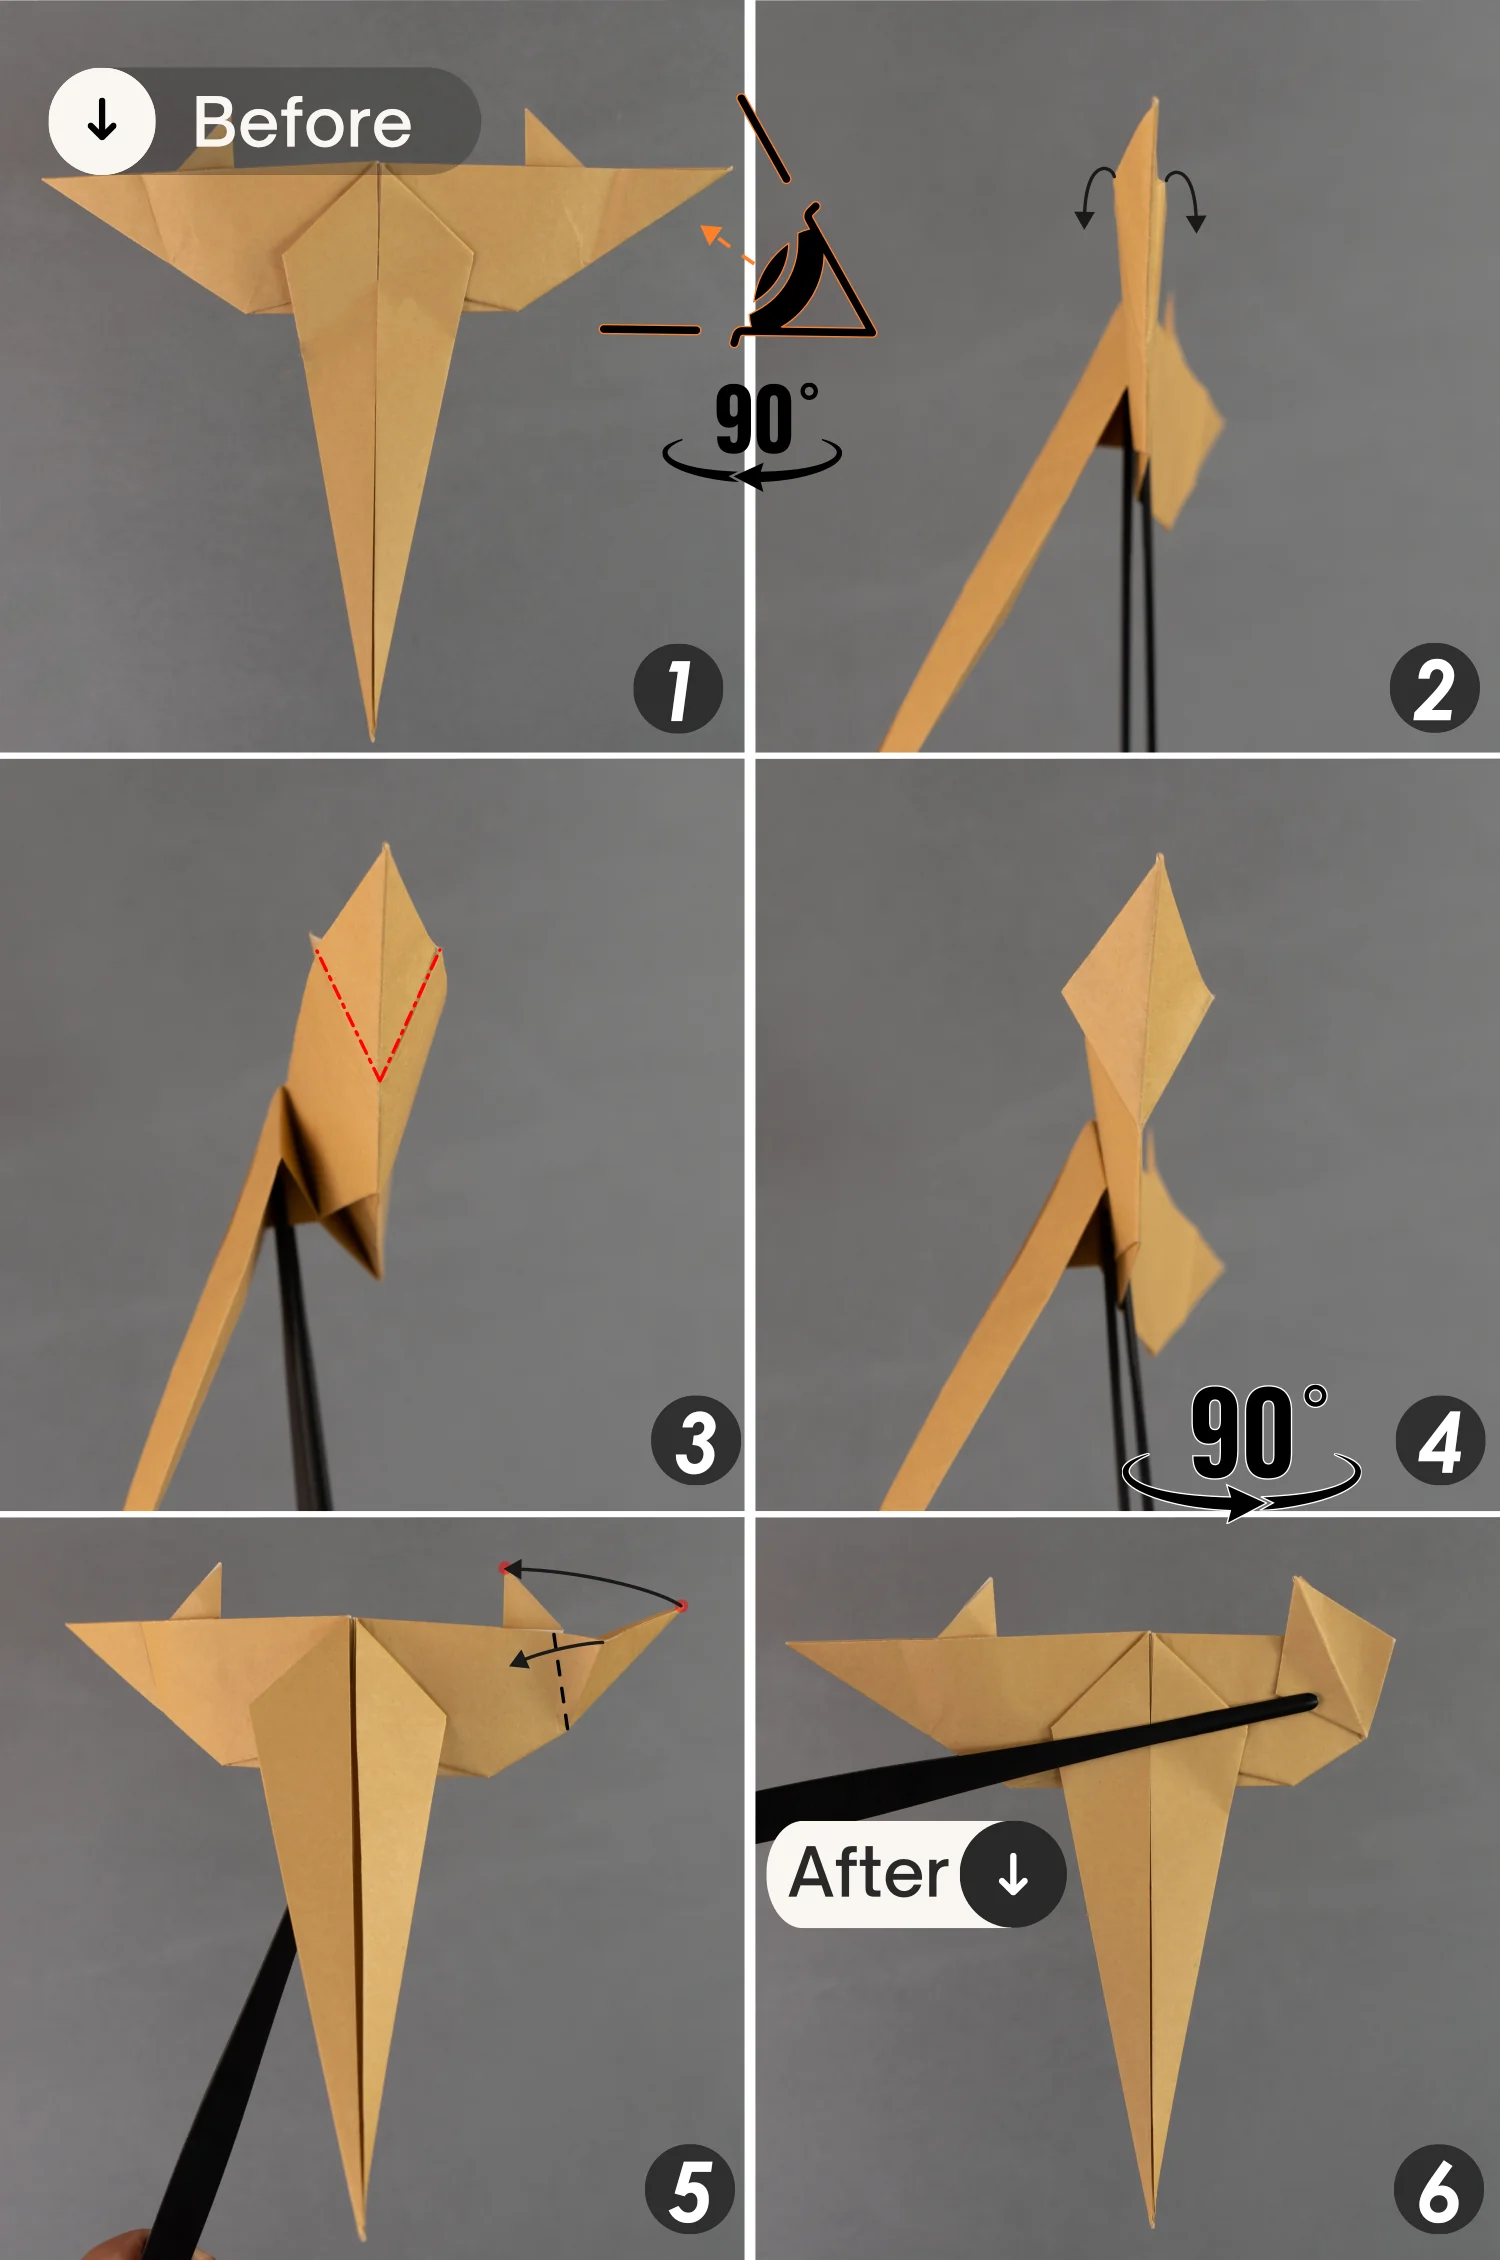
Fold these two flaps to their opposite side, then lift them 90 degrees to make them stand.
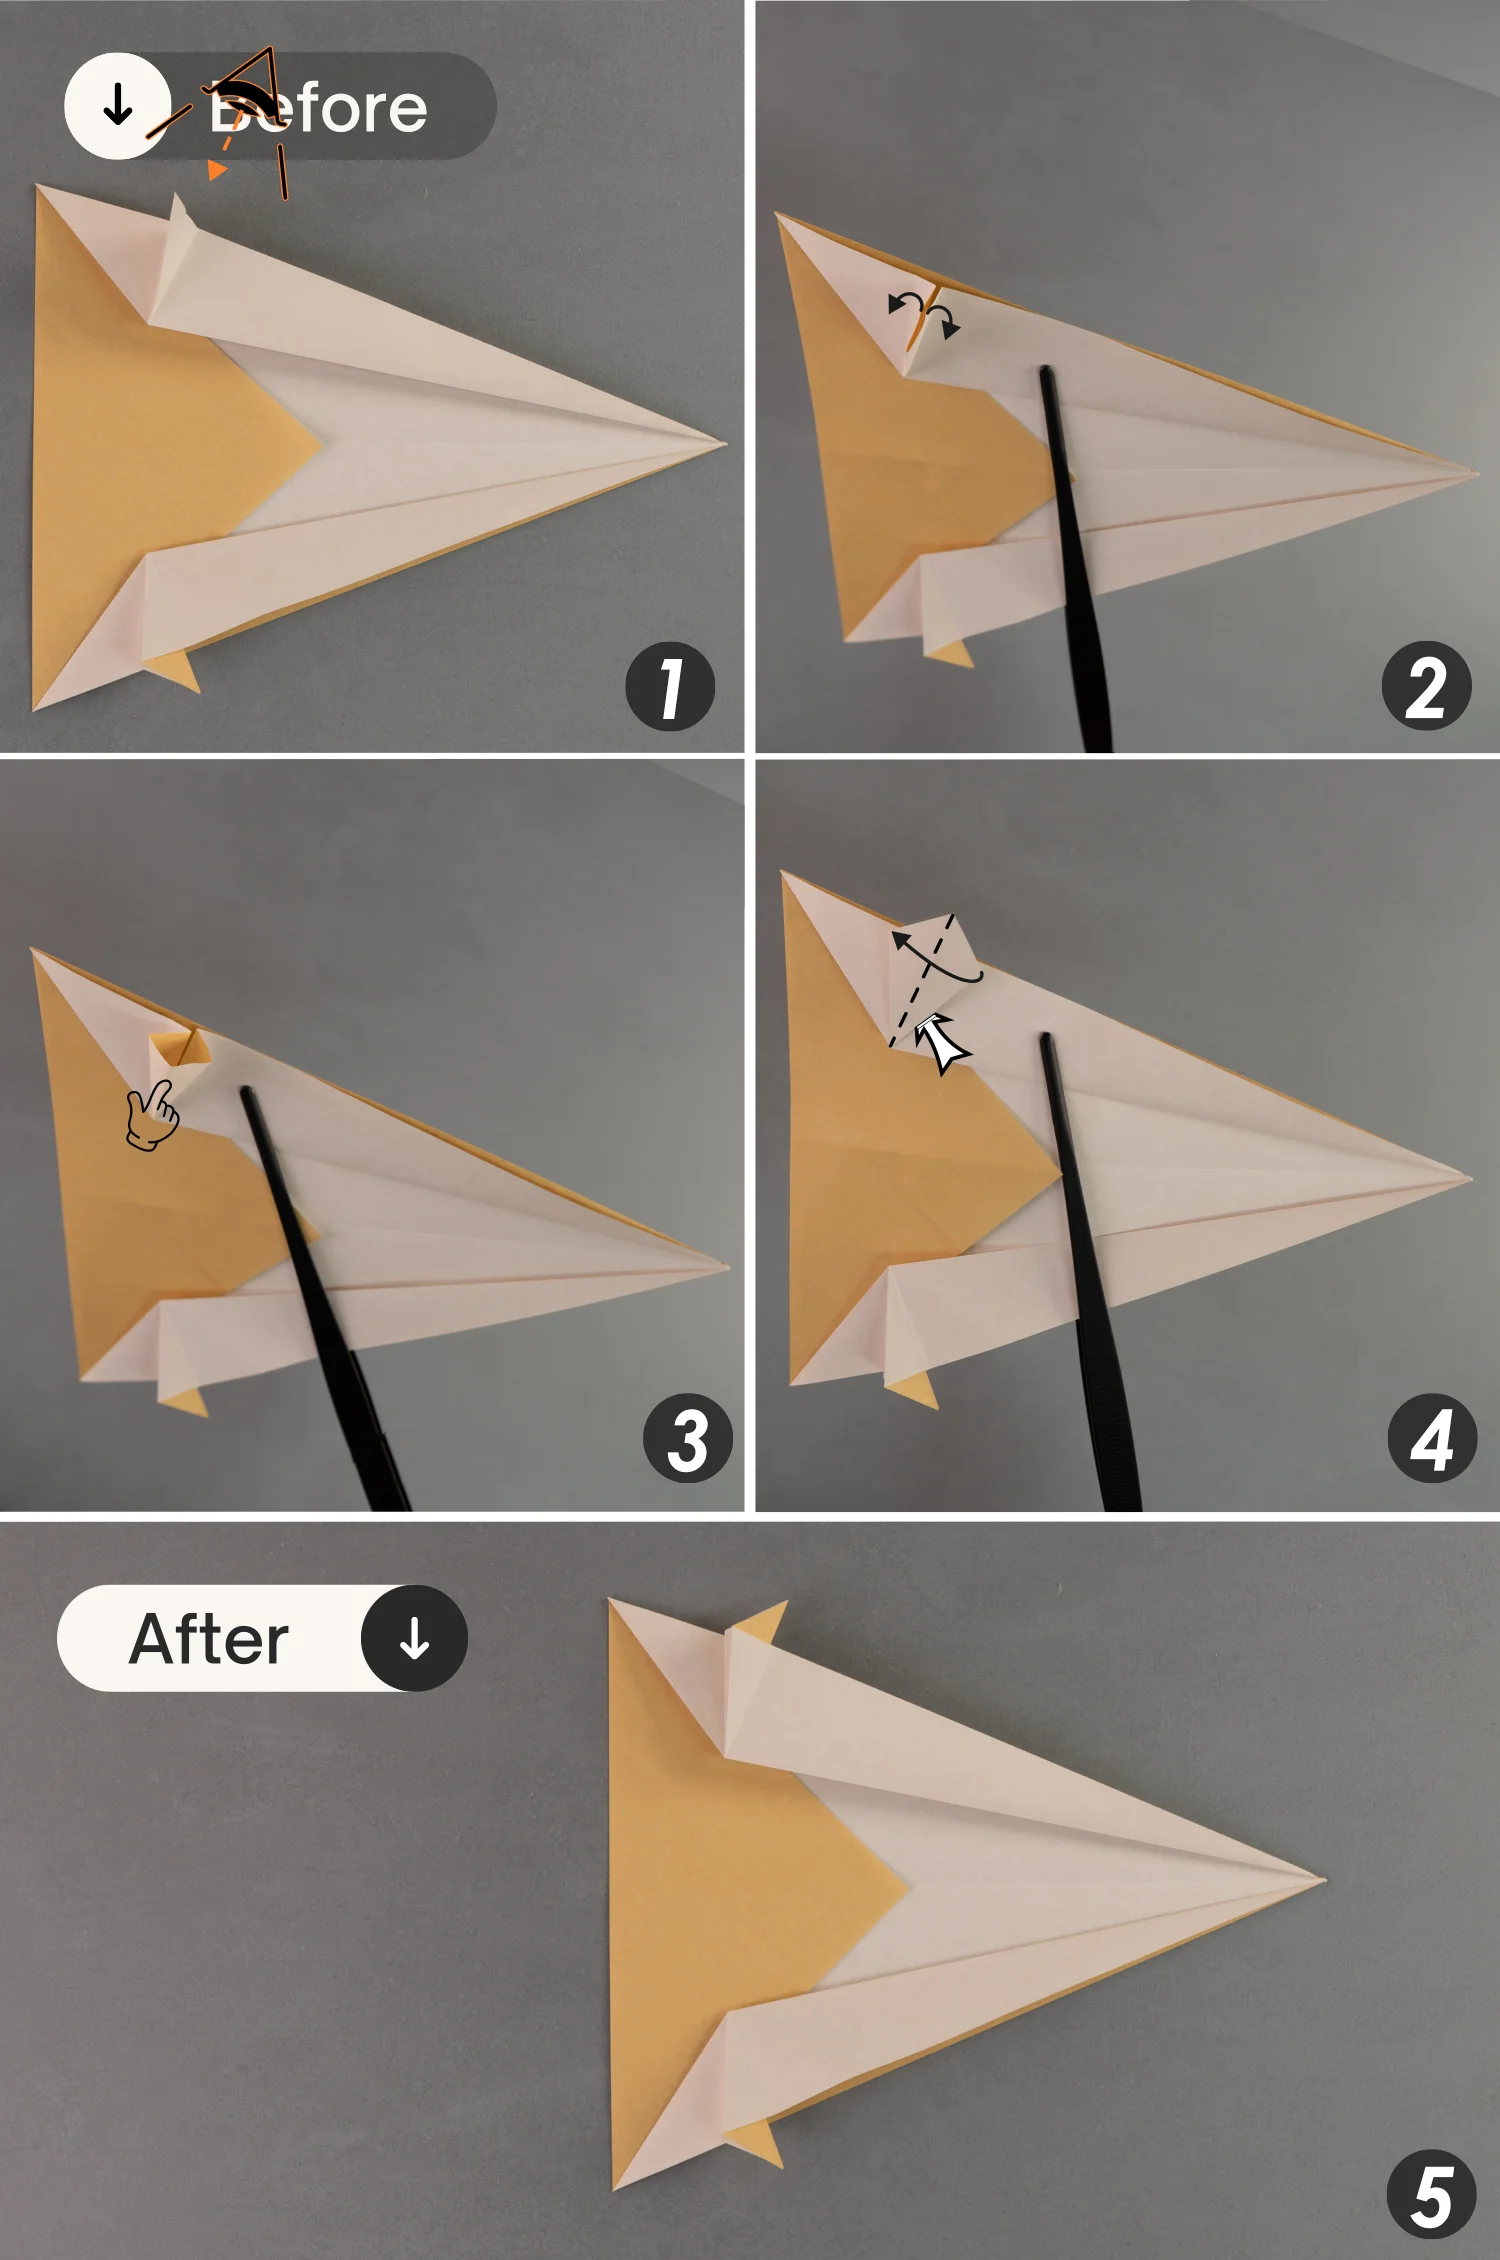
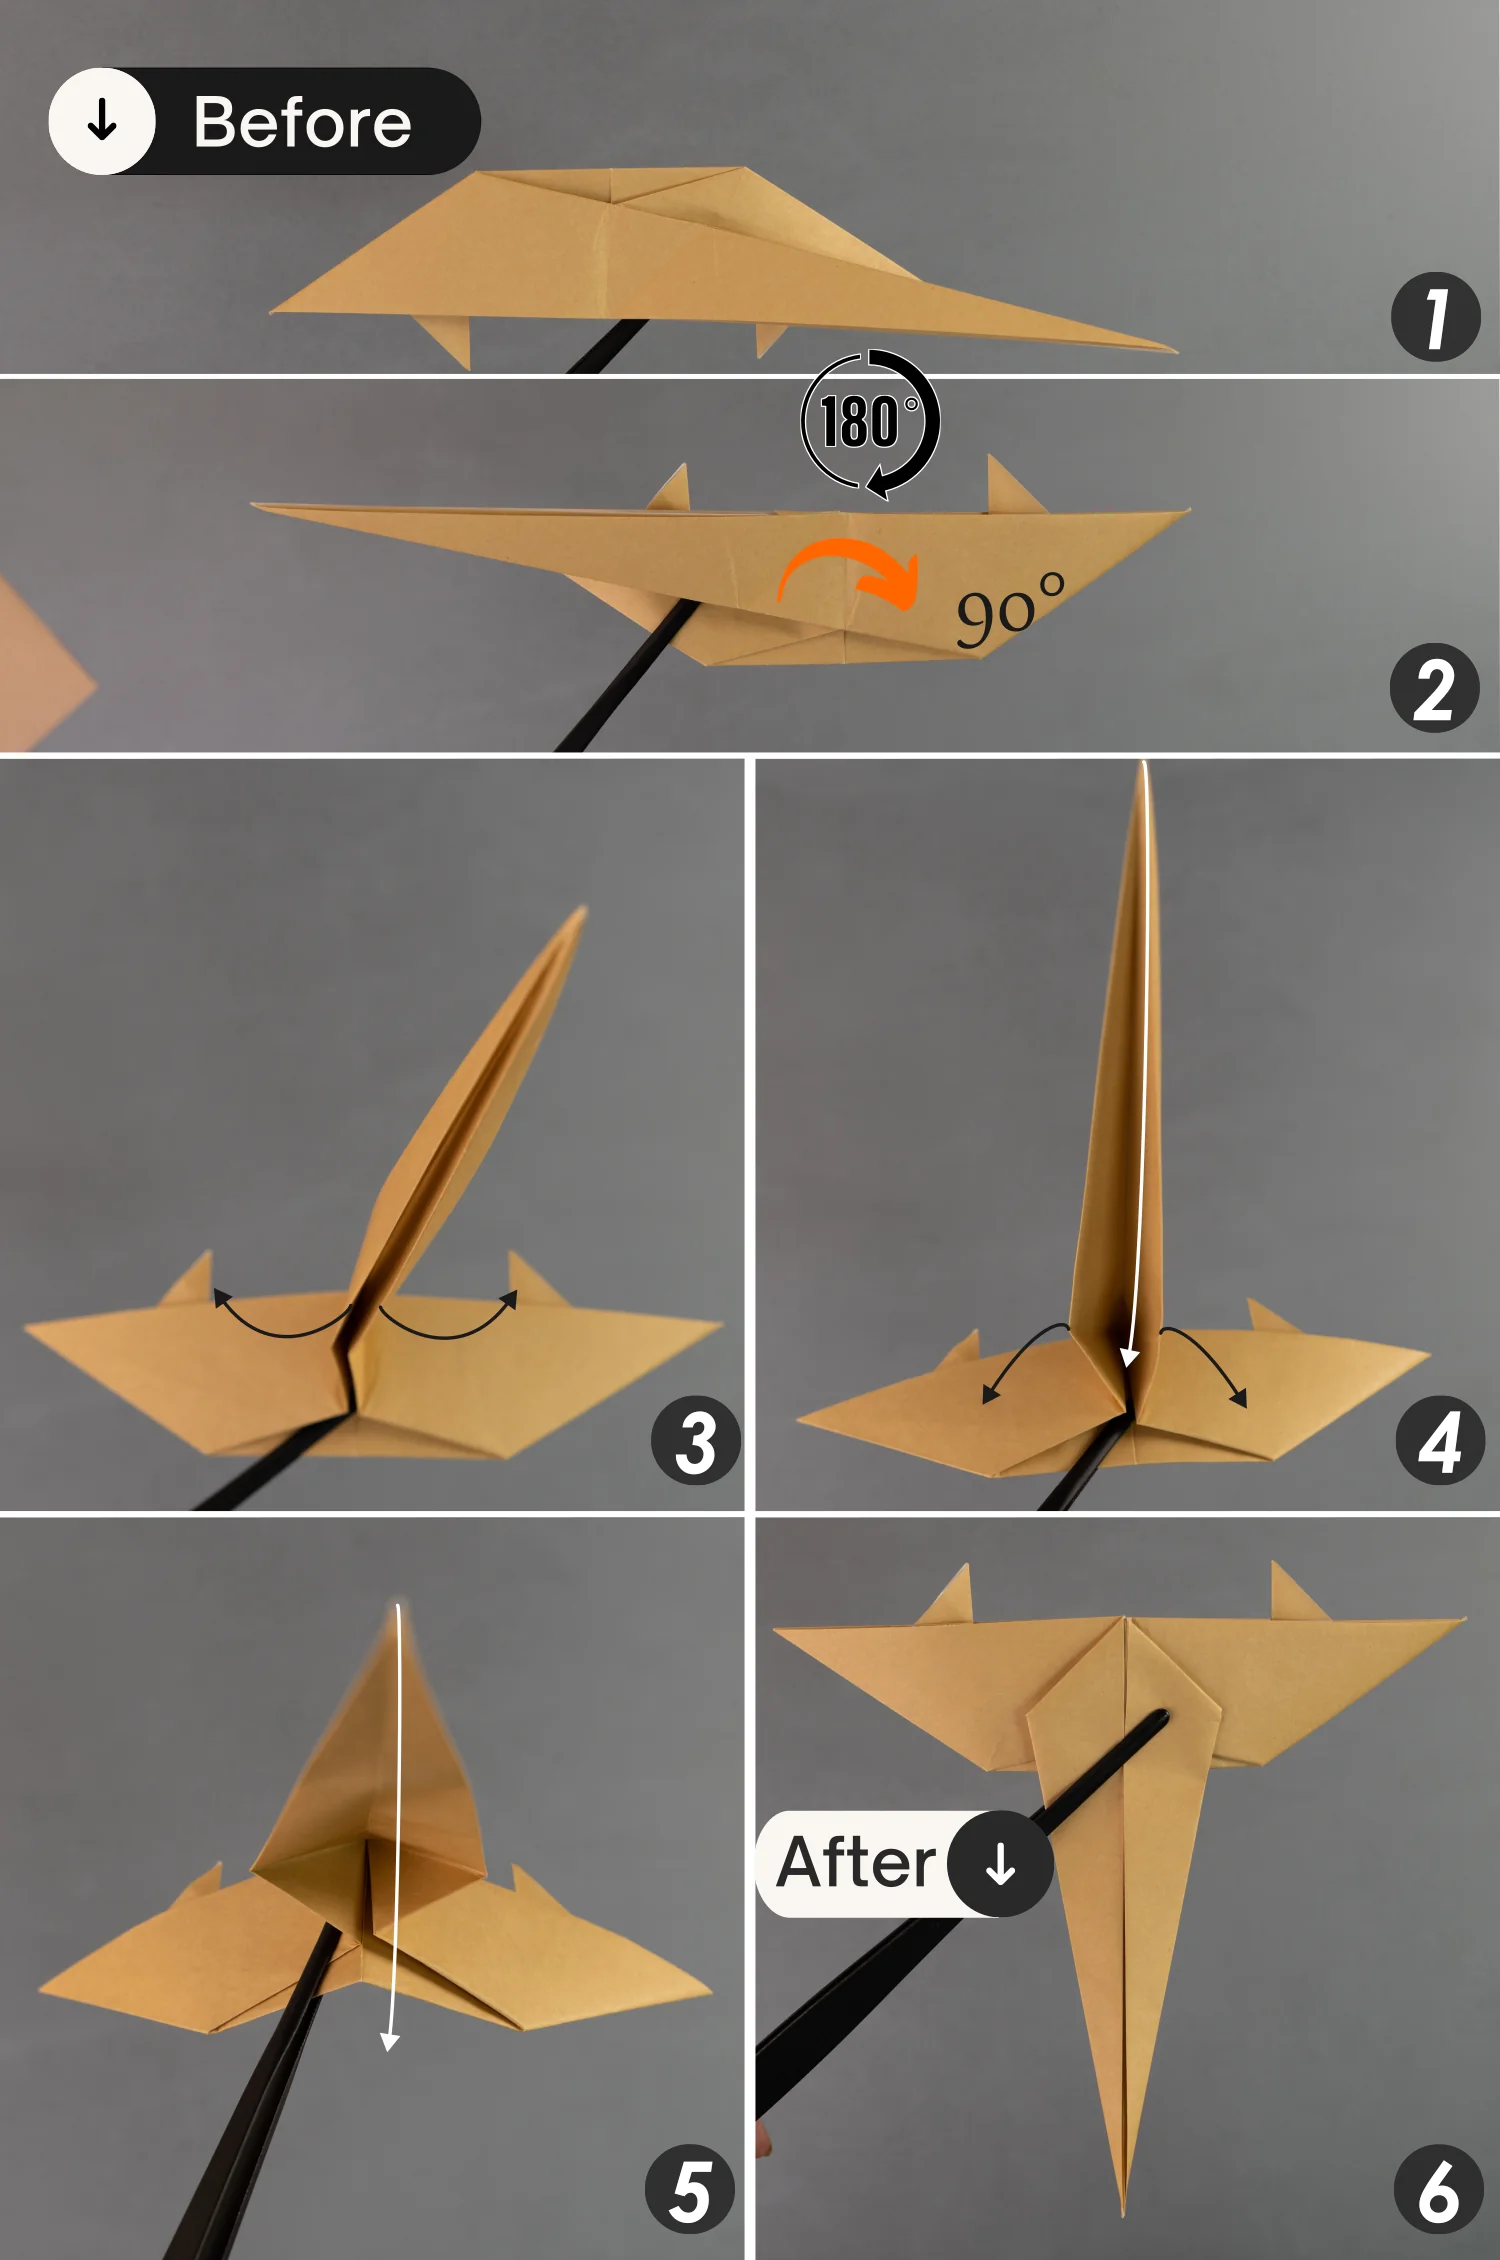
Step 9
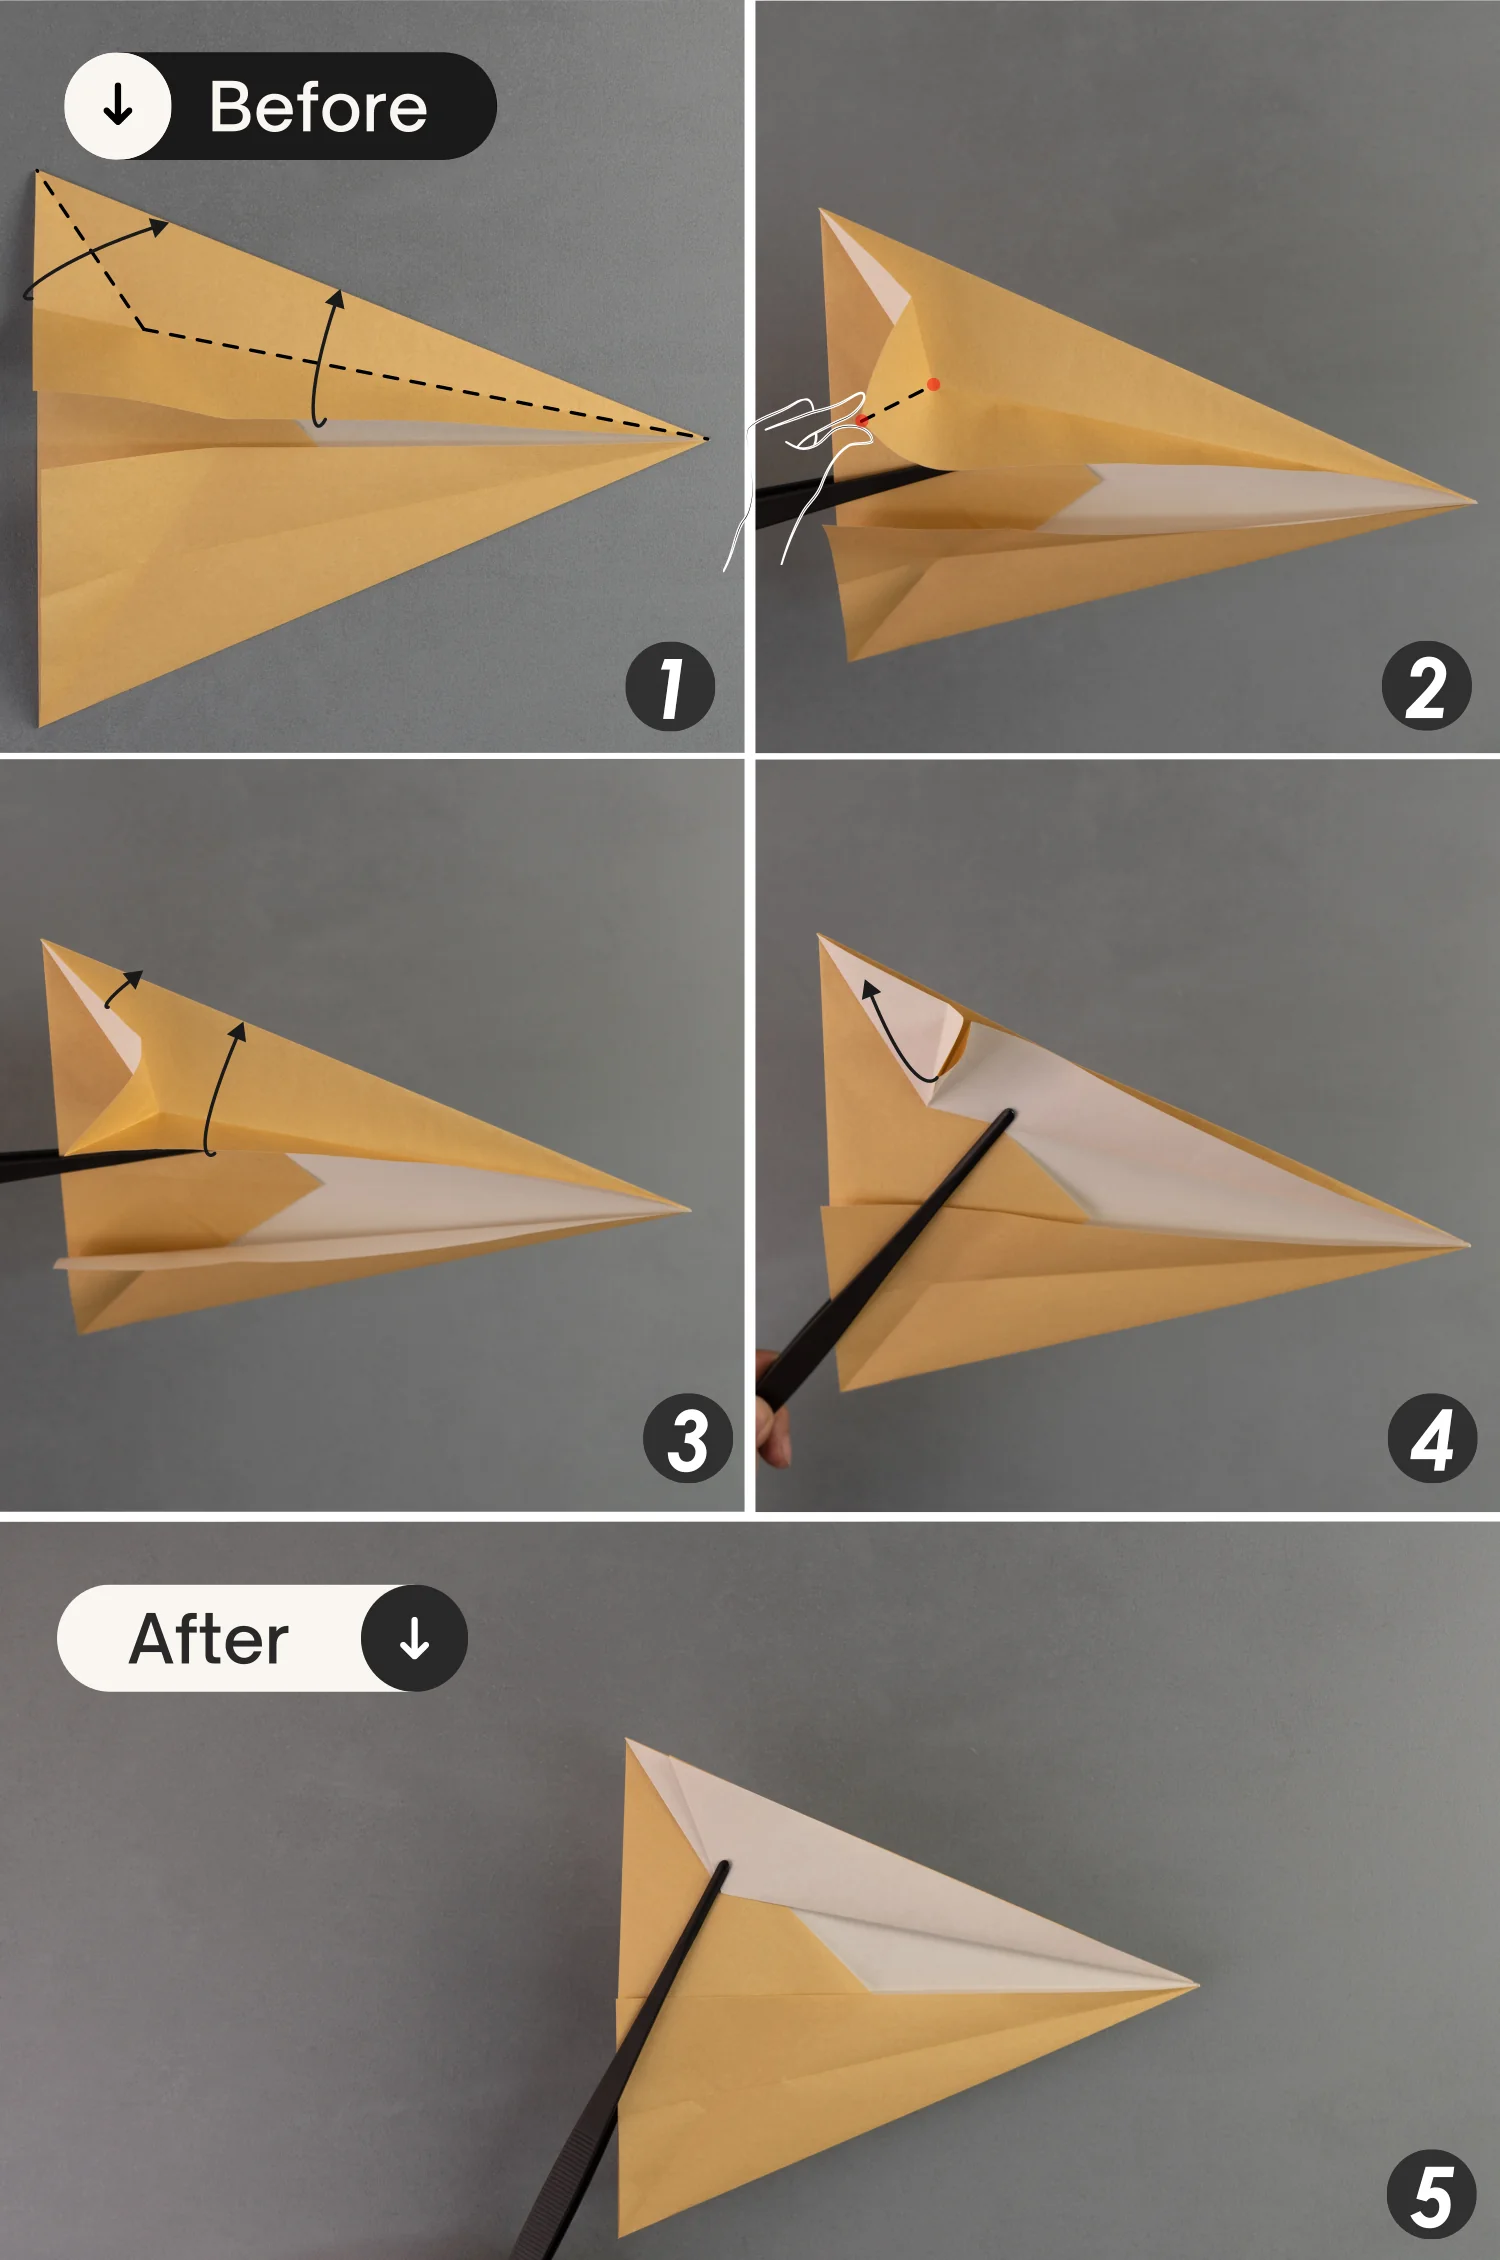
View the paper from the bottom opening of that flap at the bottom, then open and squash it [pictures 1 to 3].
Next, fold the right part to the left side along the middle crease indicated by the black dotted line [pictures 4 and 5].

Step 10
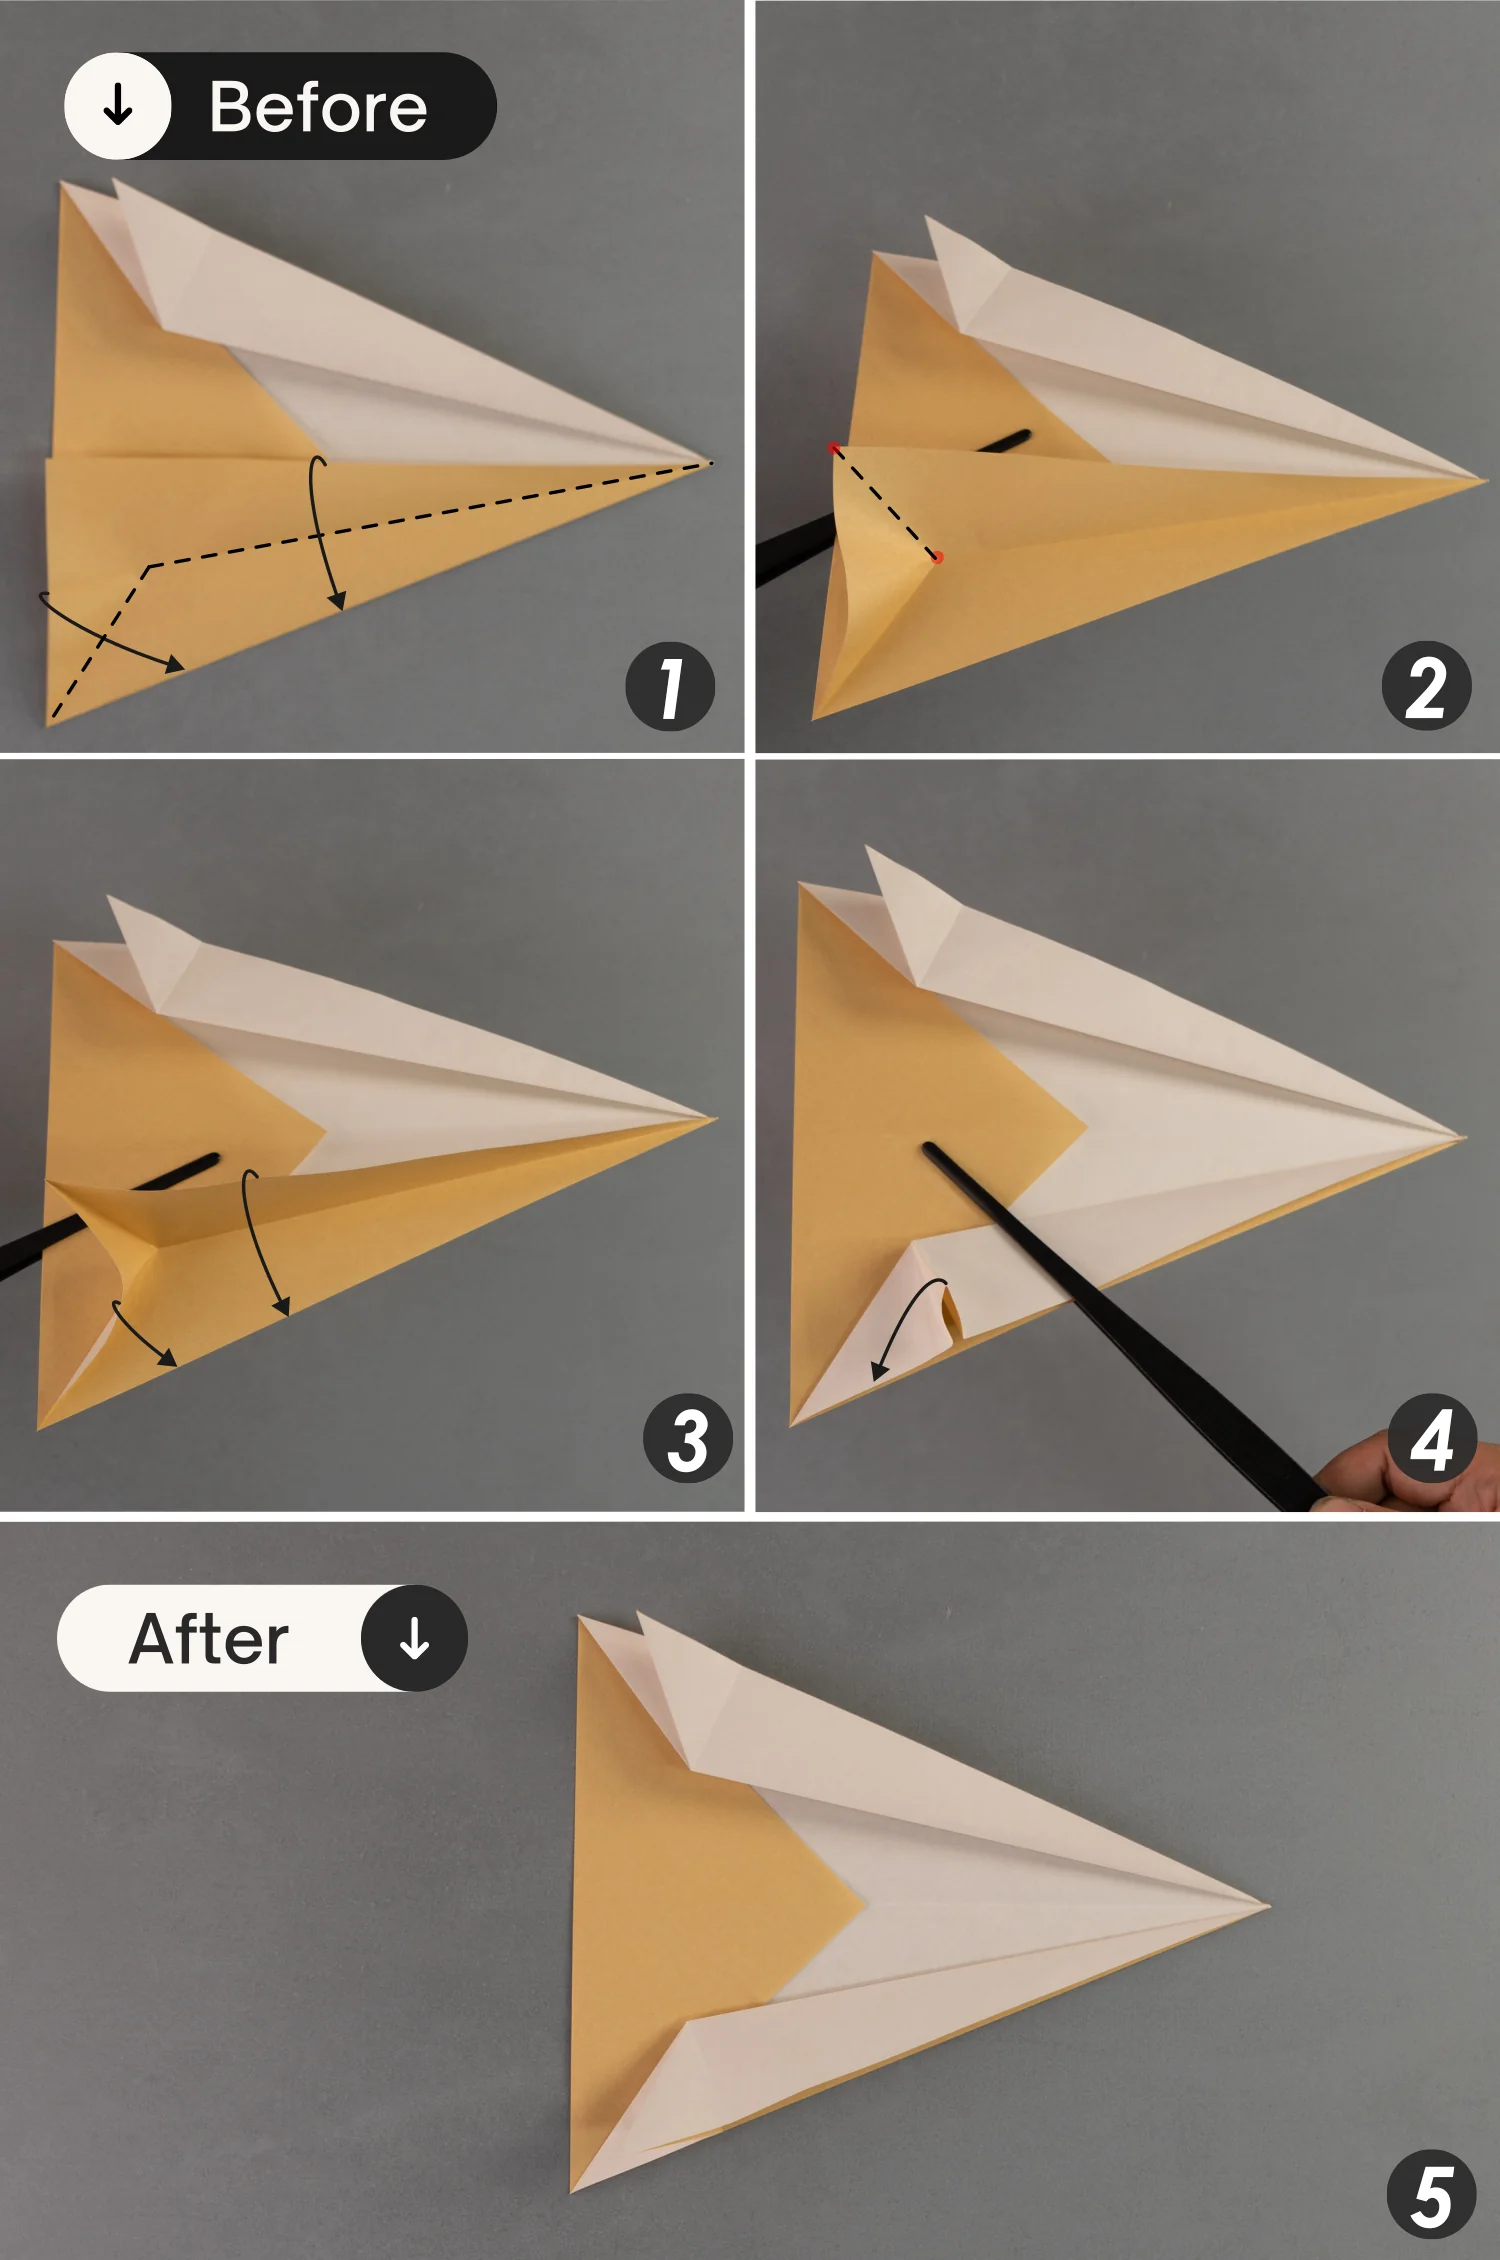
Similarly, view the paper from the top opening of that flap at the top, then open and squash it [pictures 1 to 3].
Next, fold the right part to the left side along the middle crease indicated by the black dotted line [pictures 4 and 5].
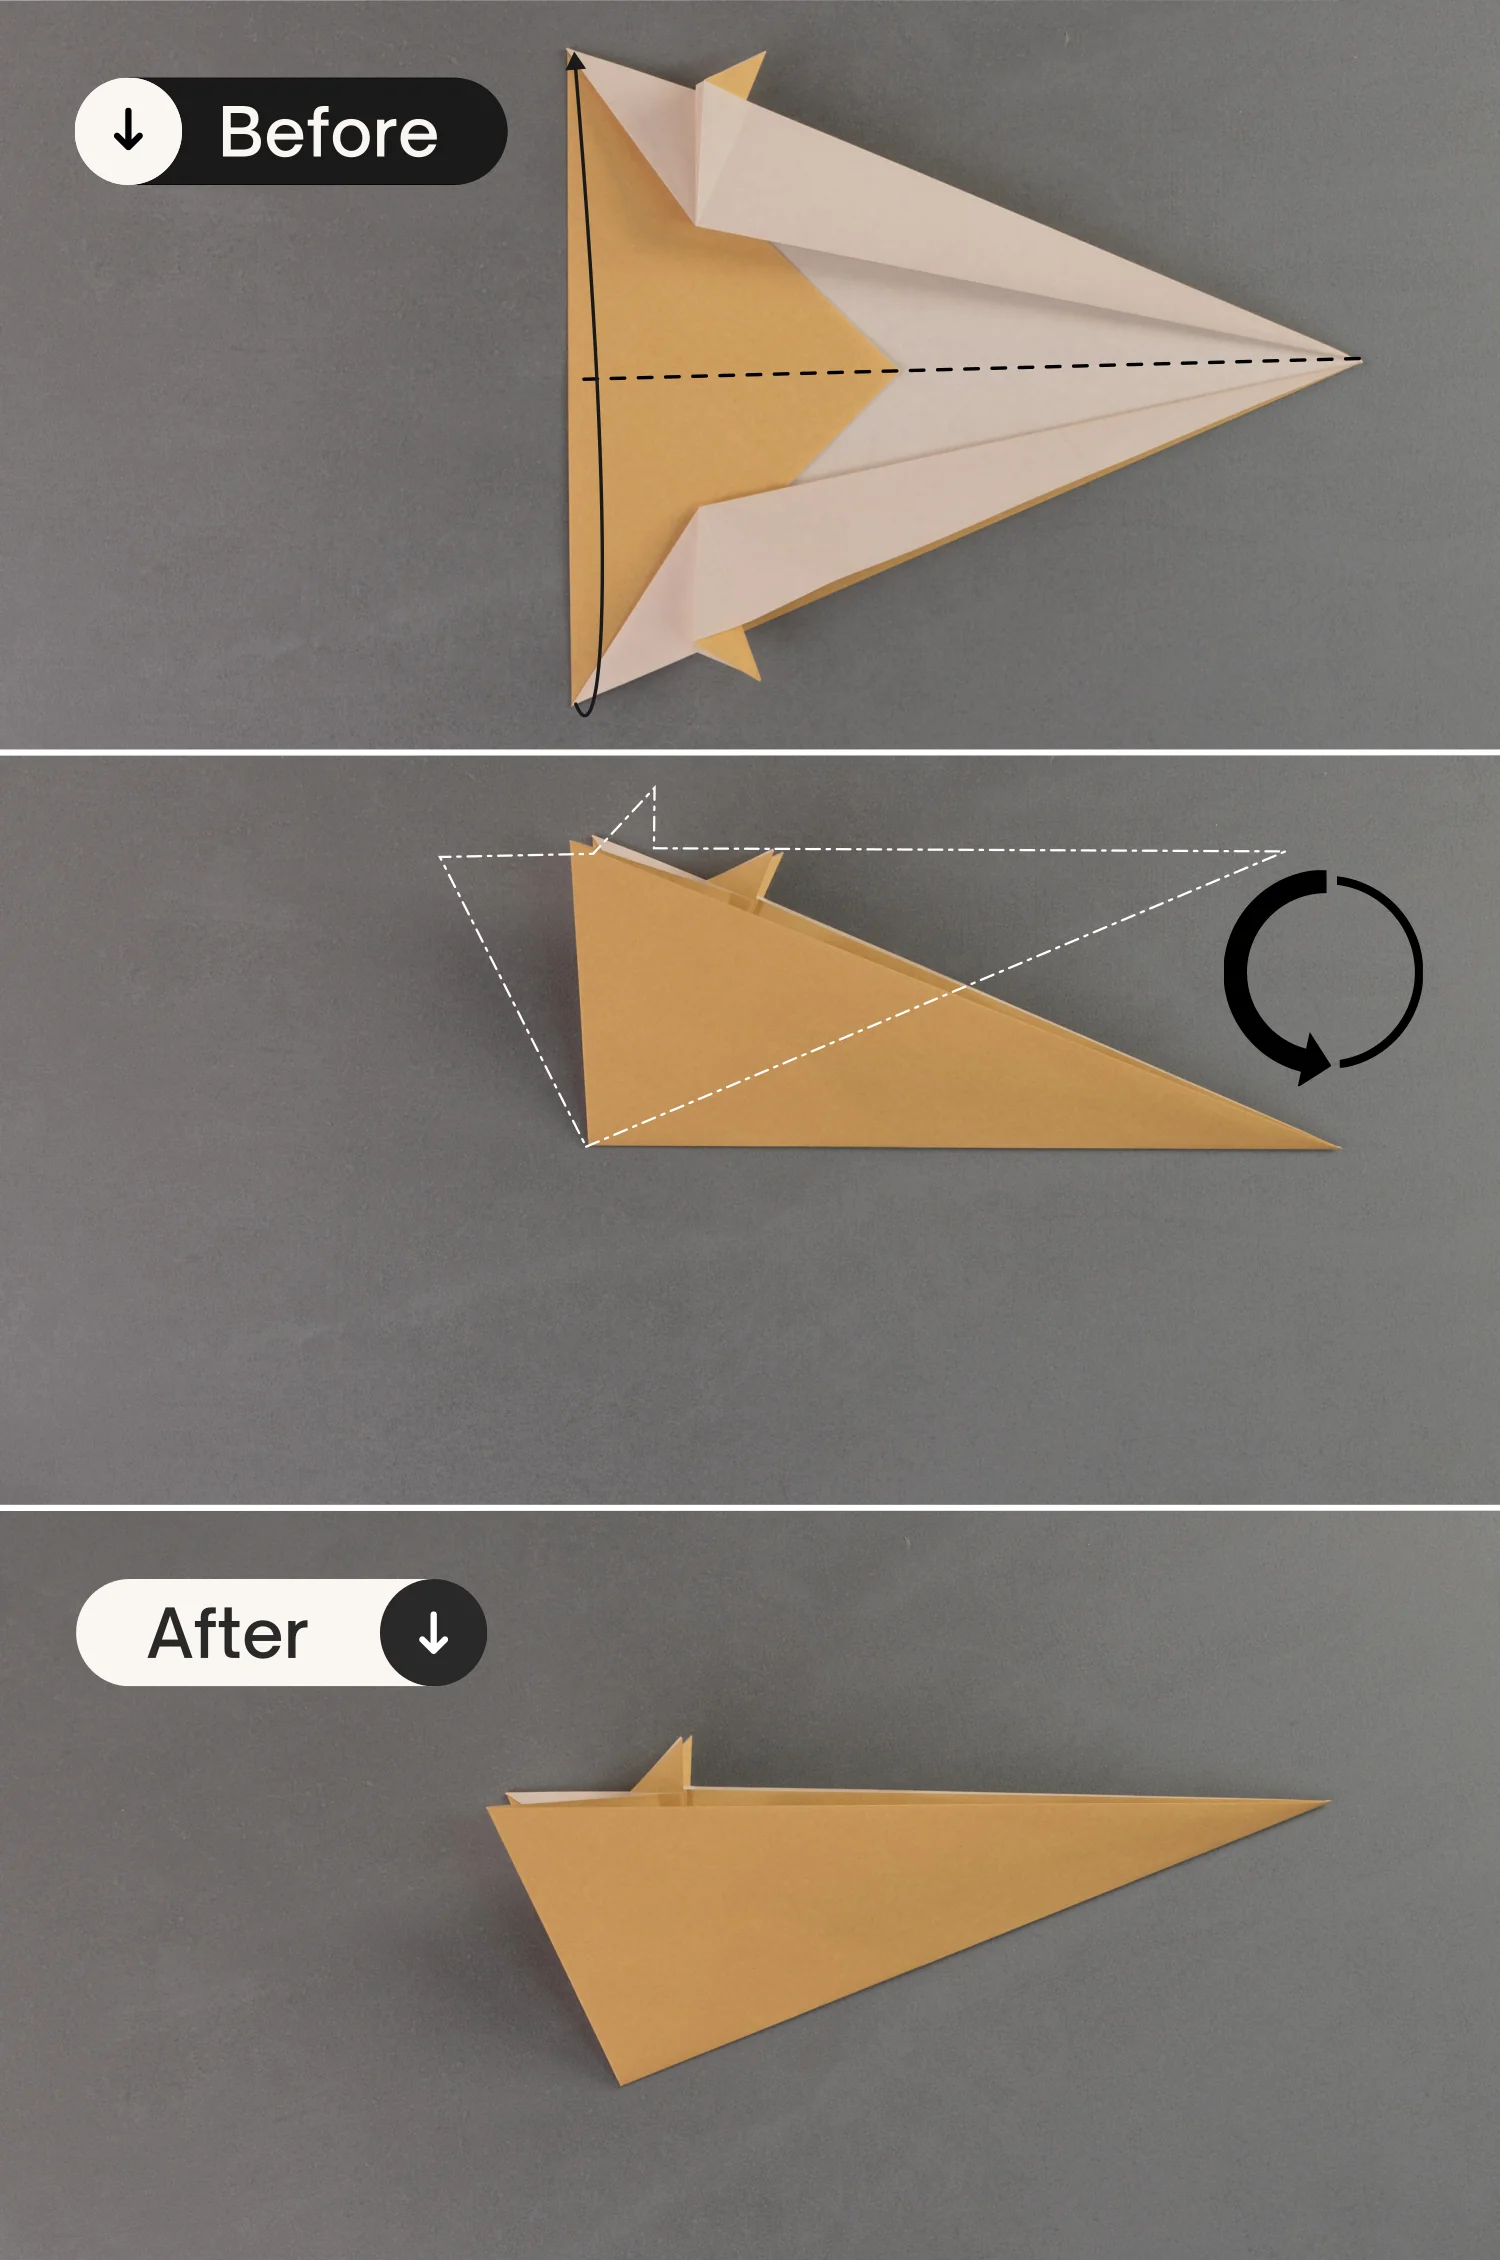
Step 11
Fold up the bottom part of the paper along the middle horizontal crease, then rotate it a little counterclockwise.
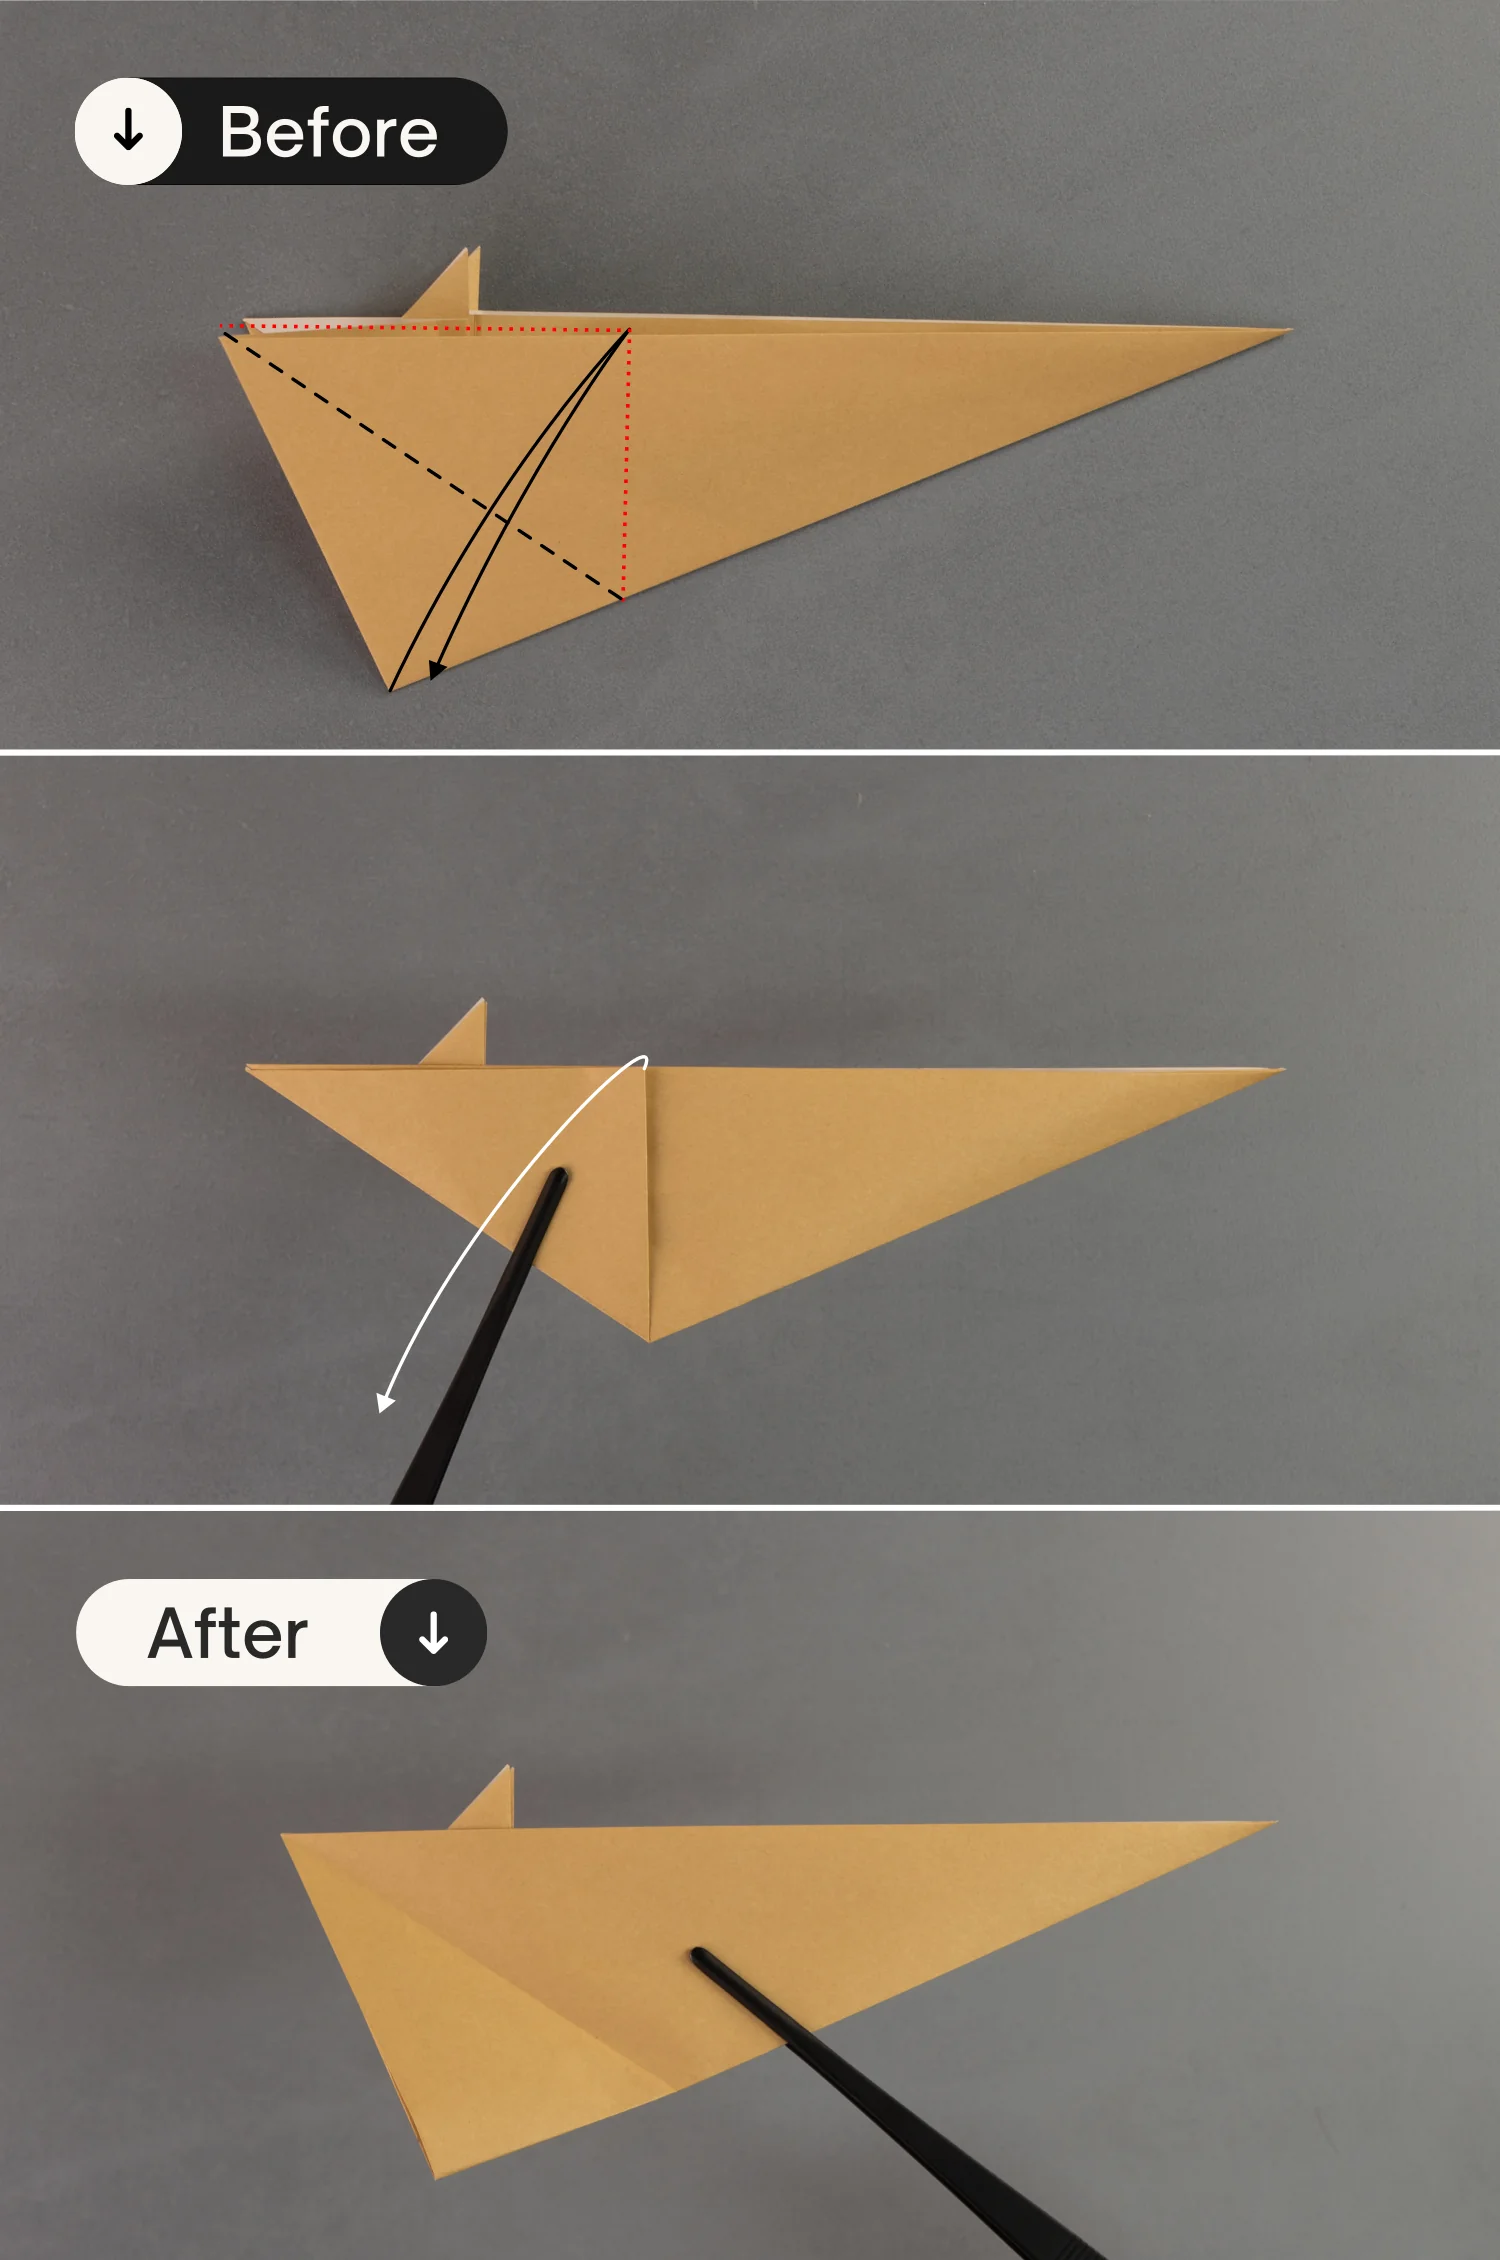
Step 12
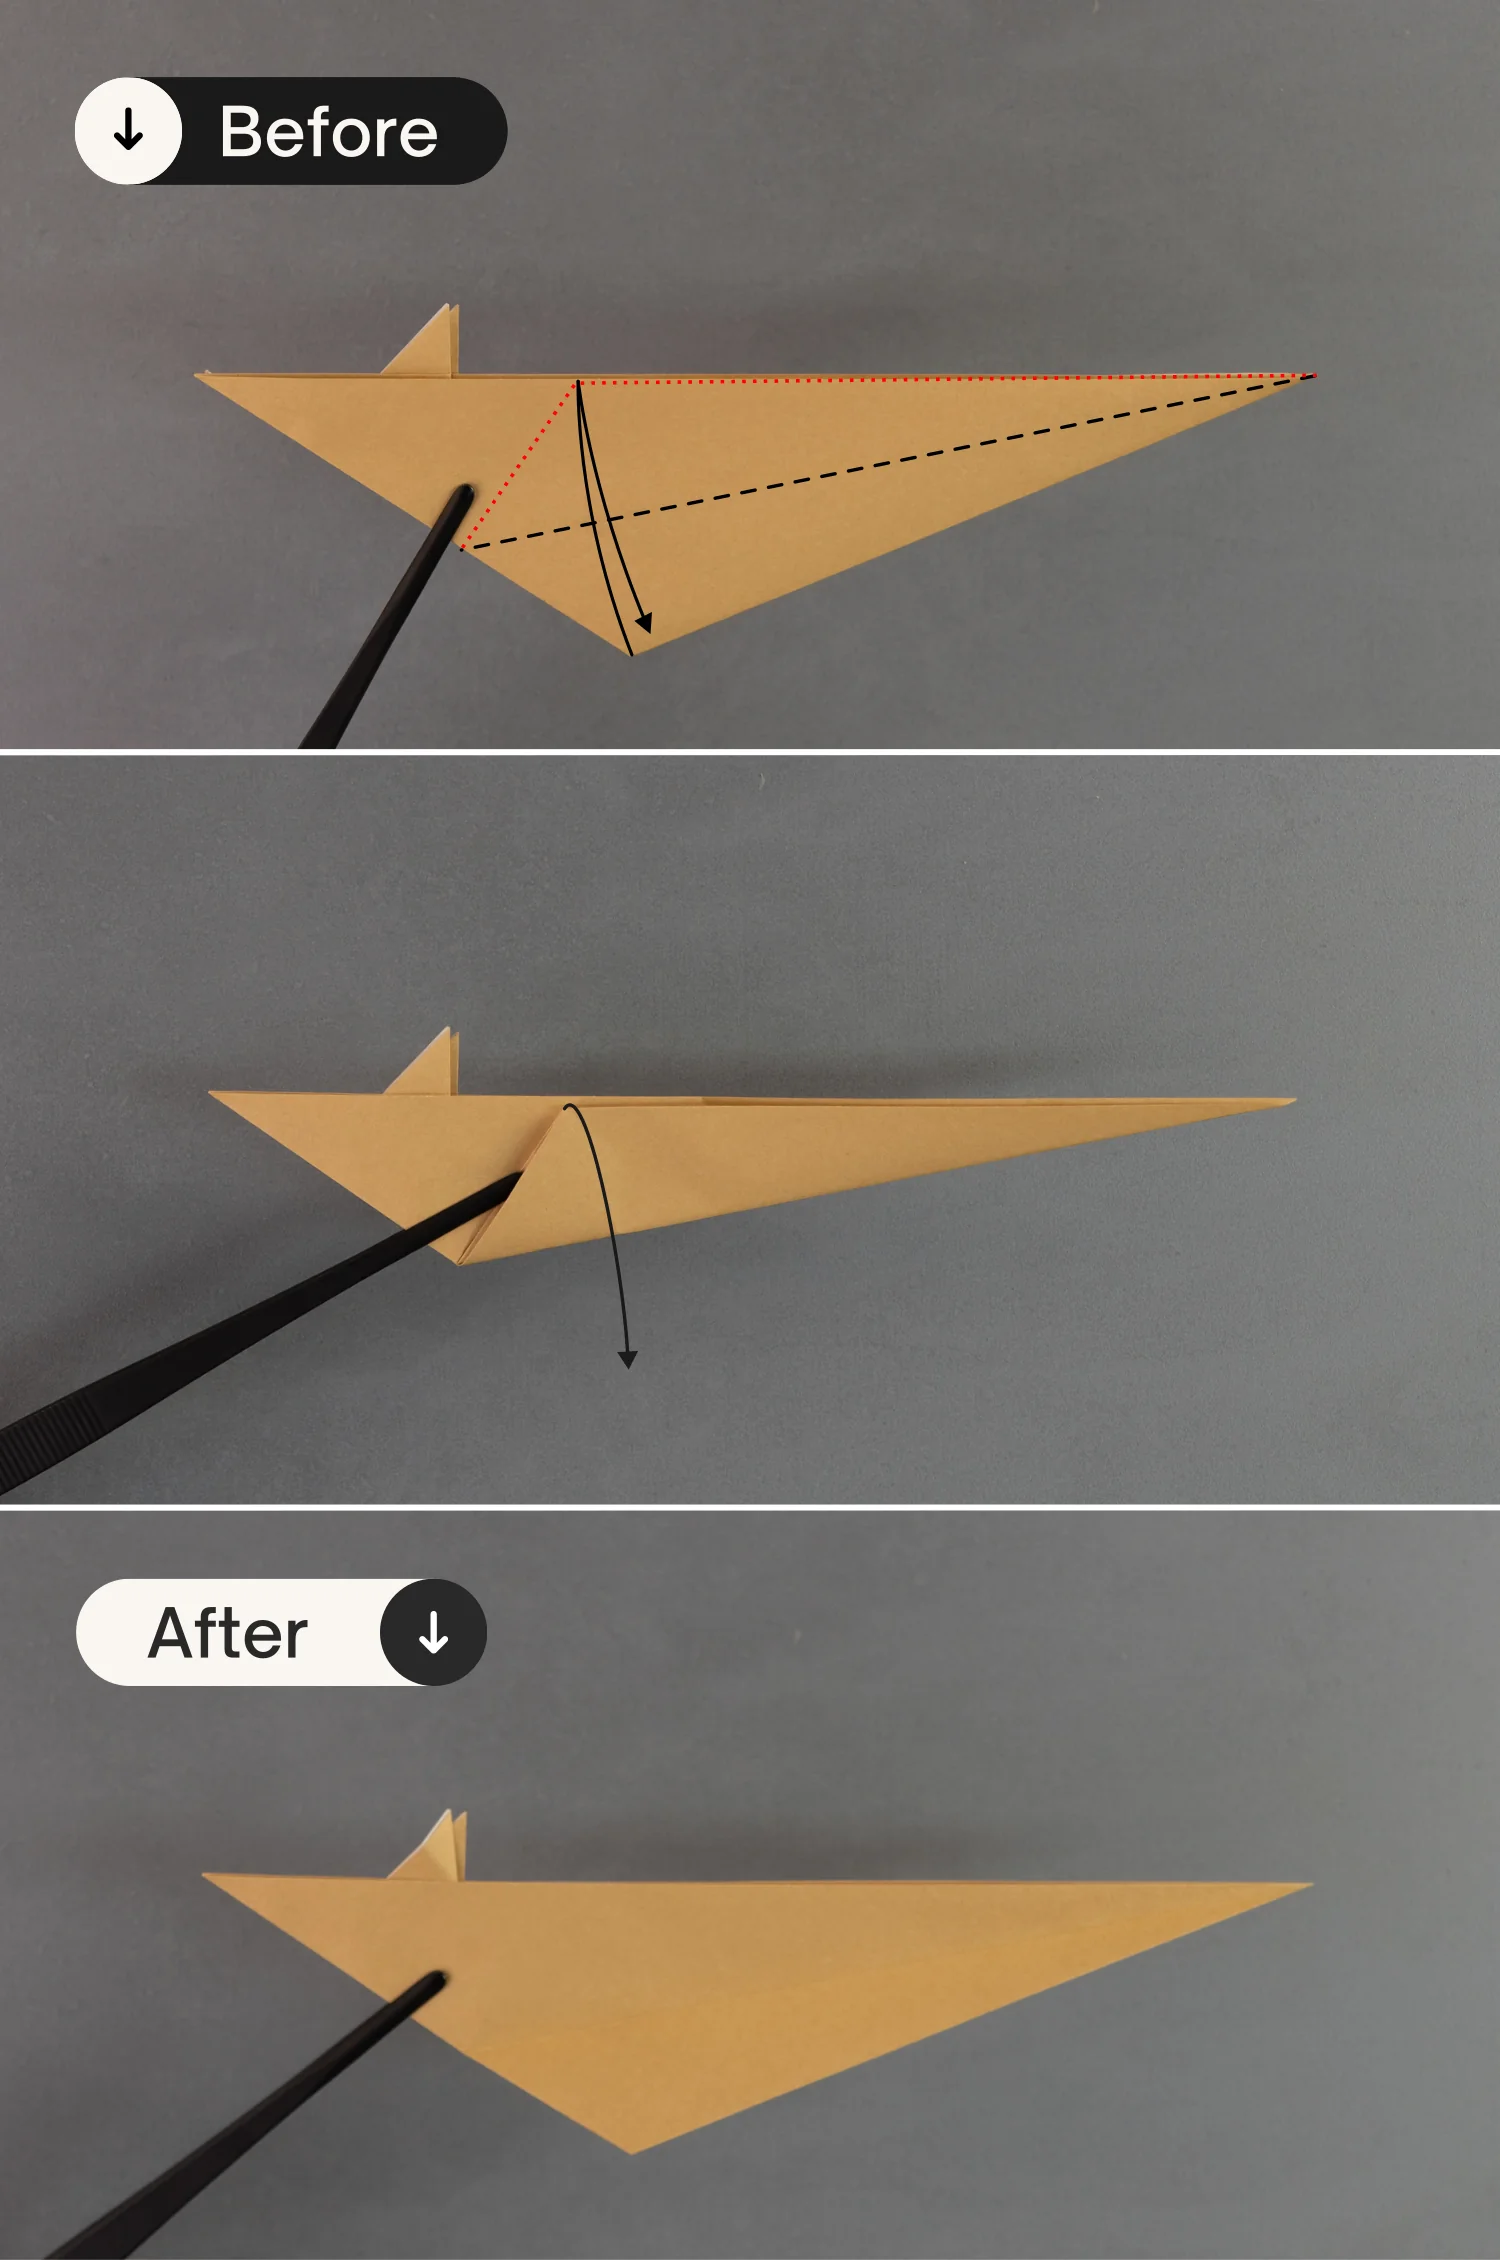
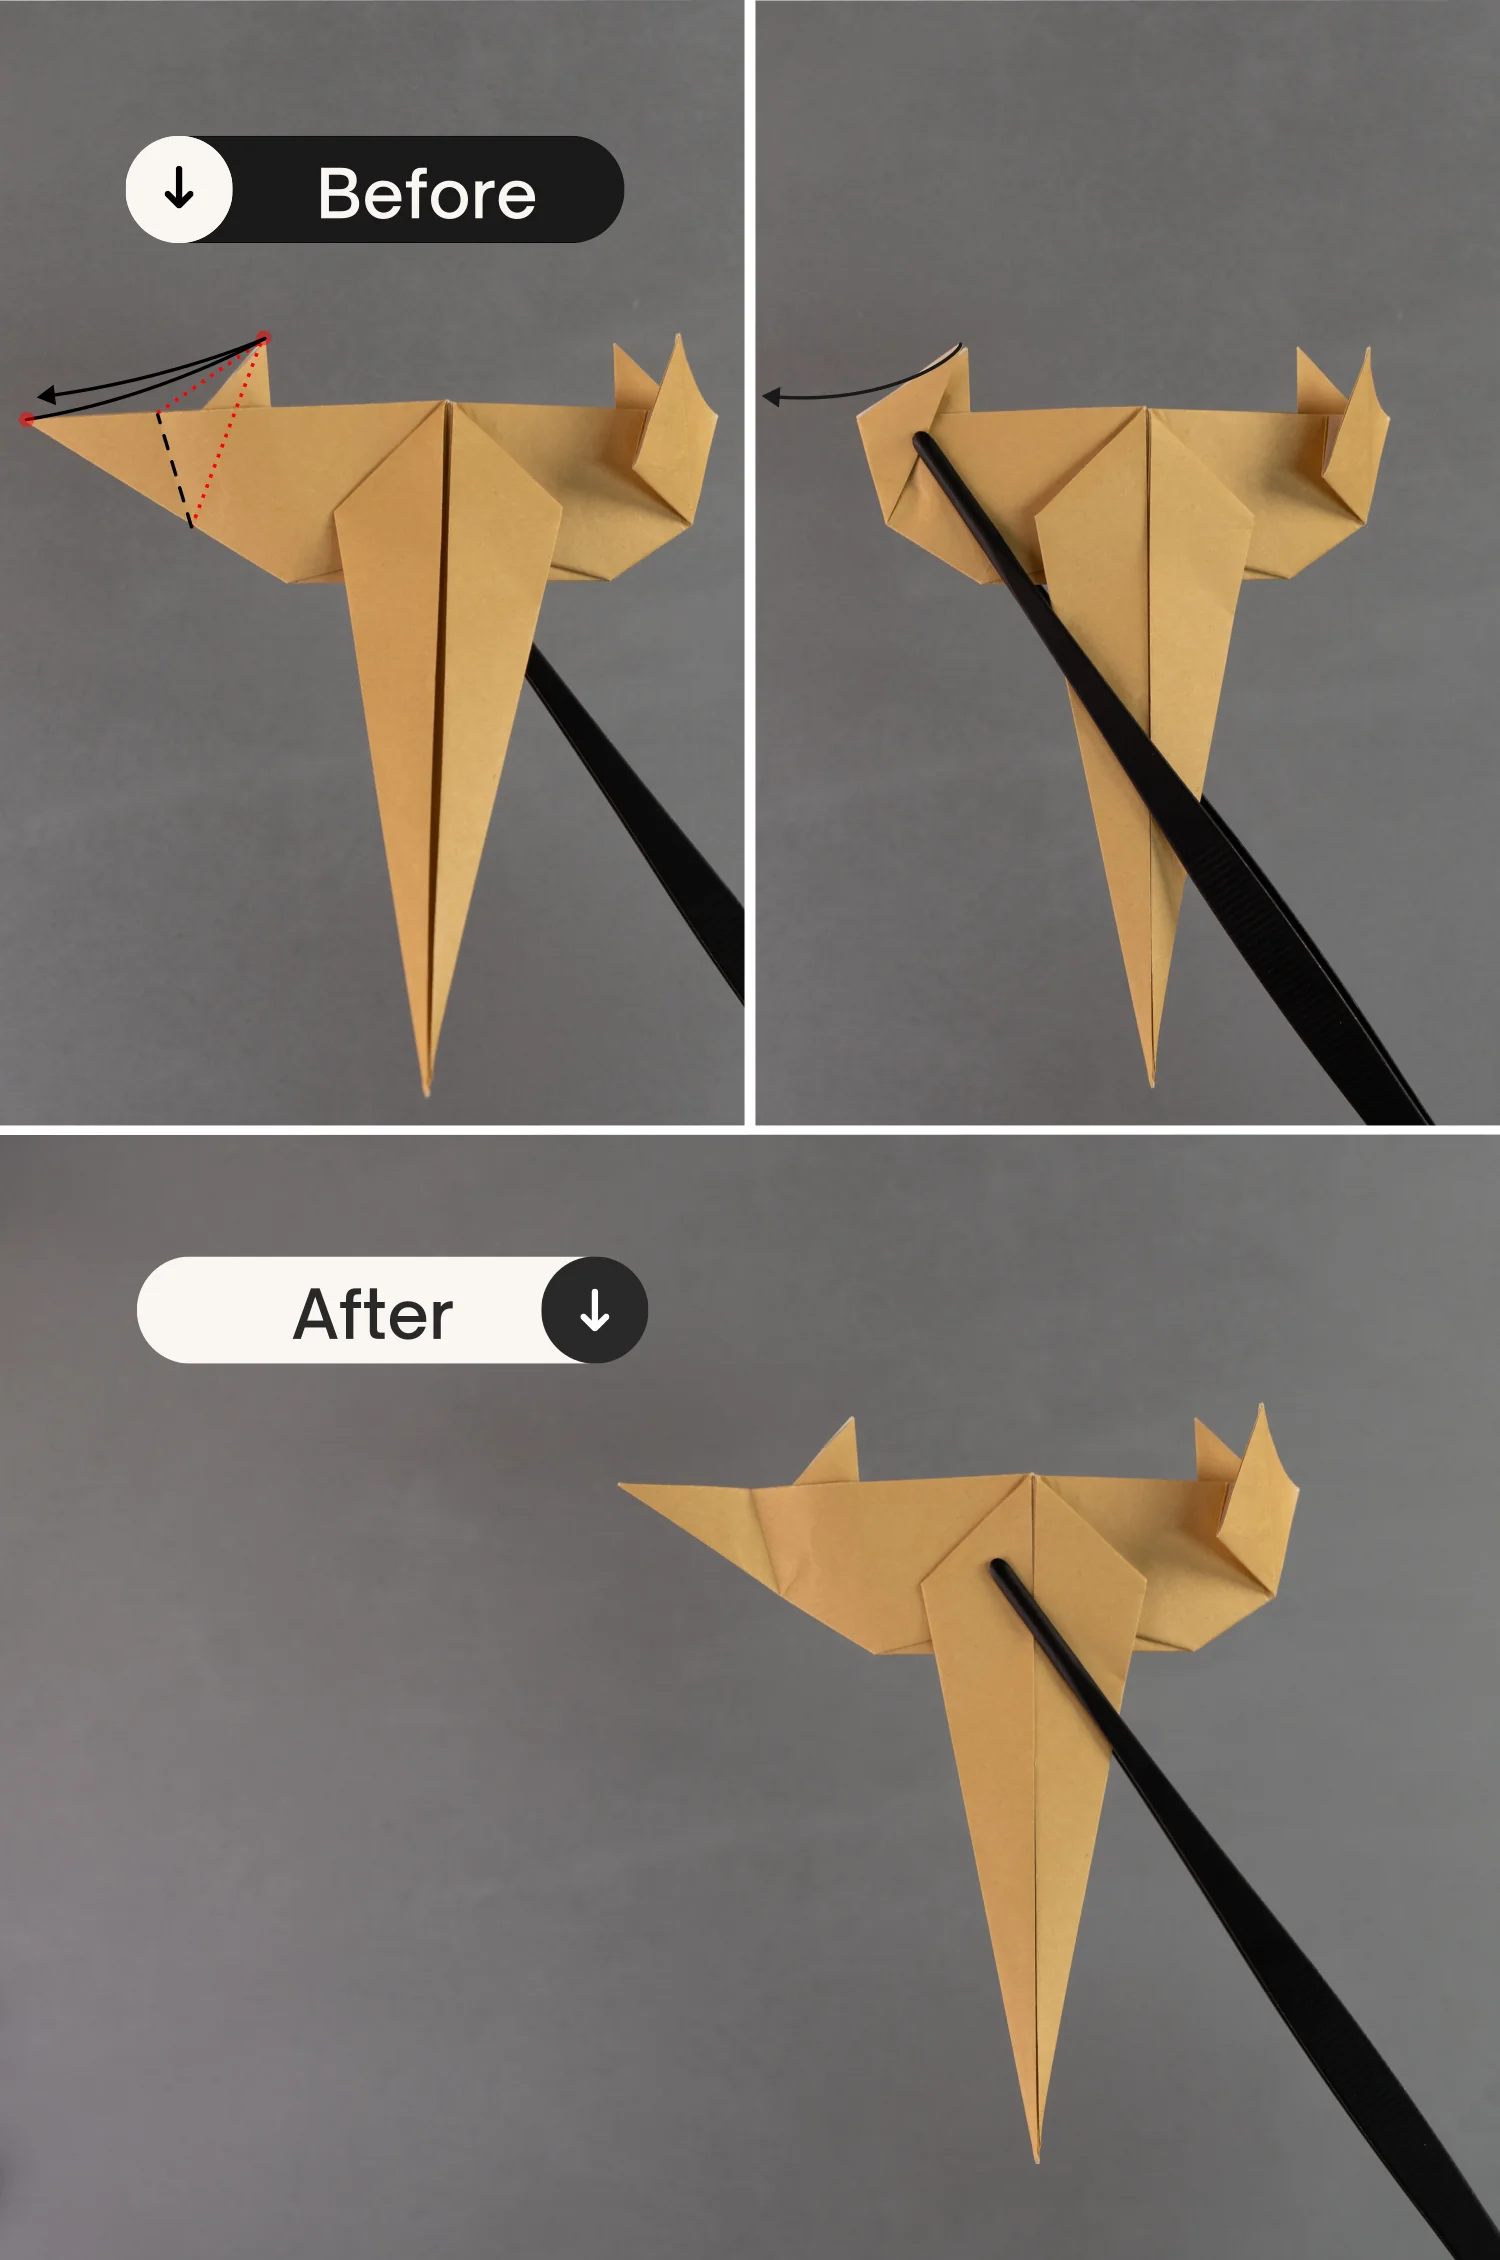
Fold the left edge of the big triangle to align with its top edge, crease it well, and unfold it.
Step 13
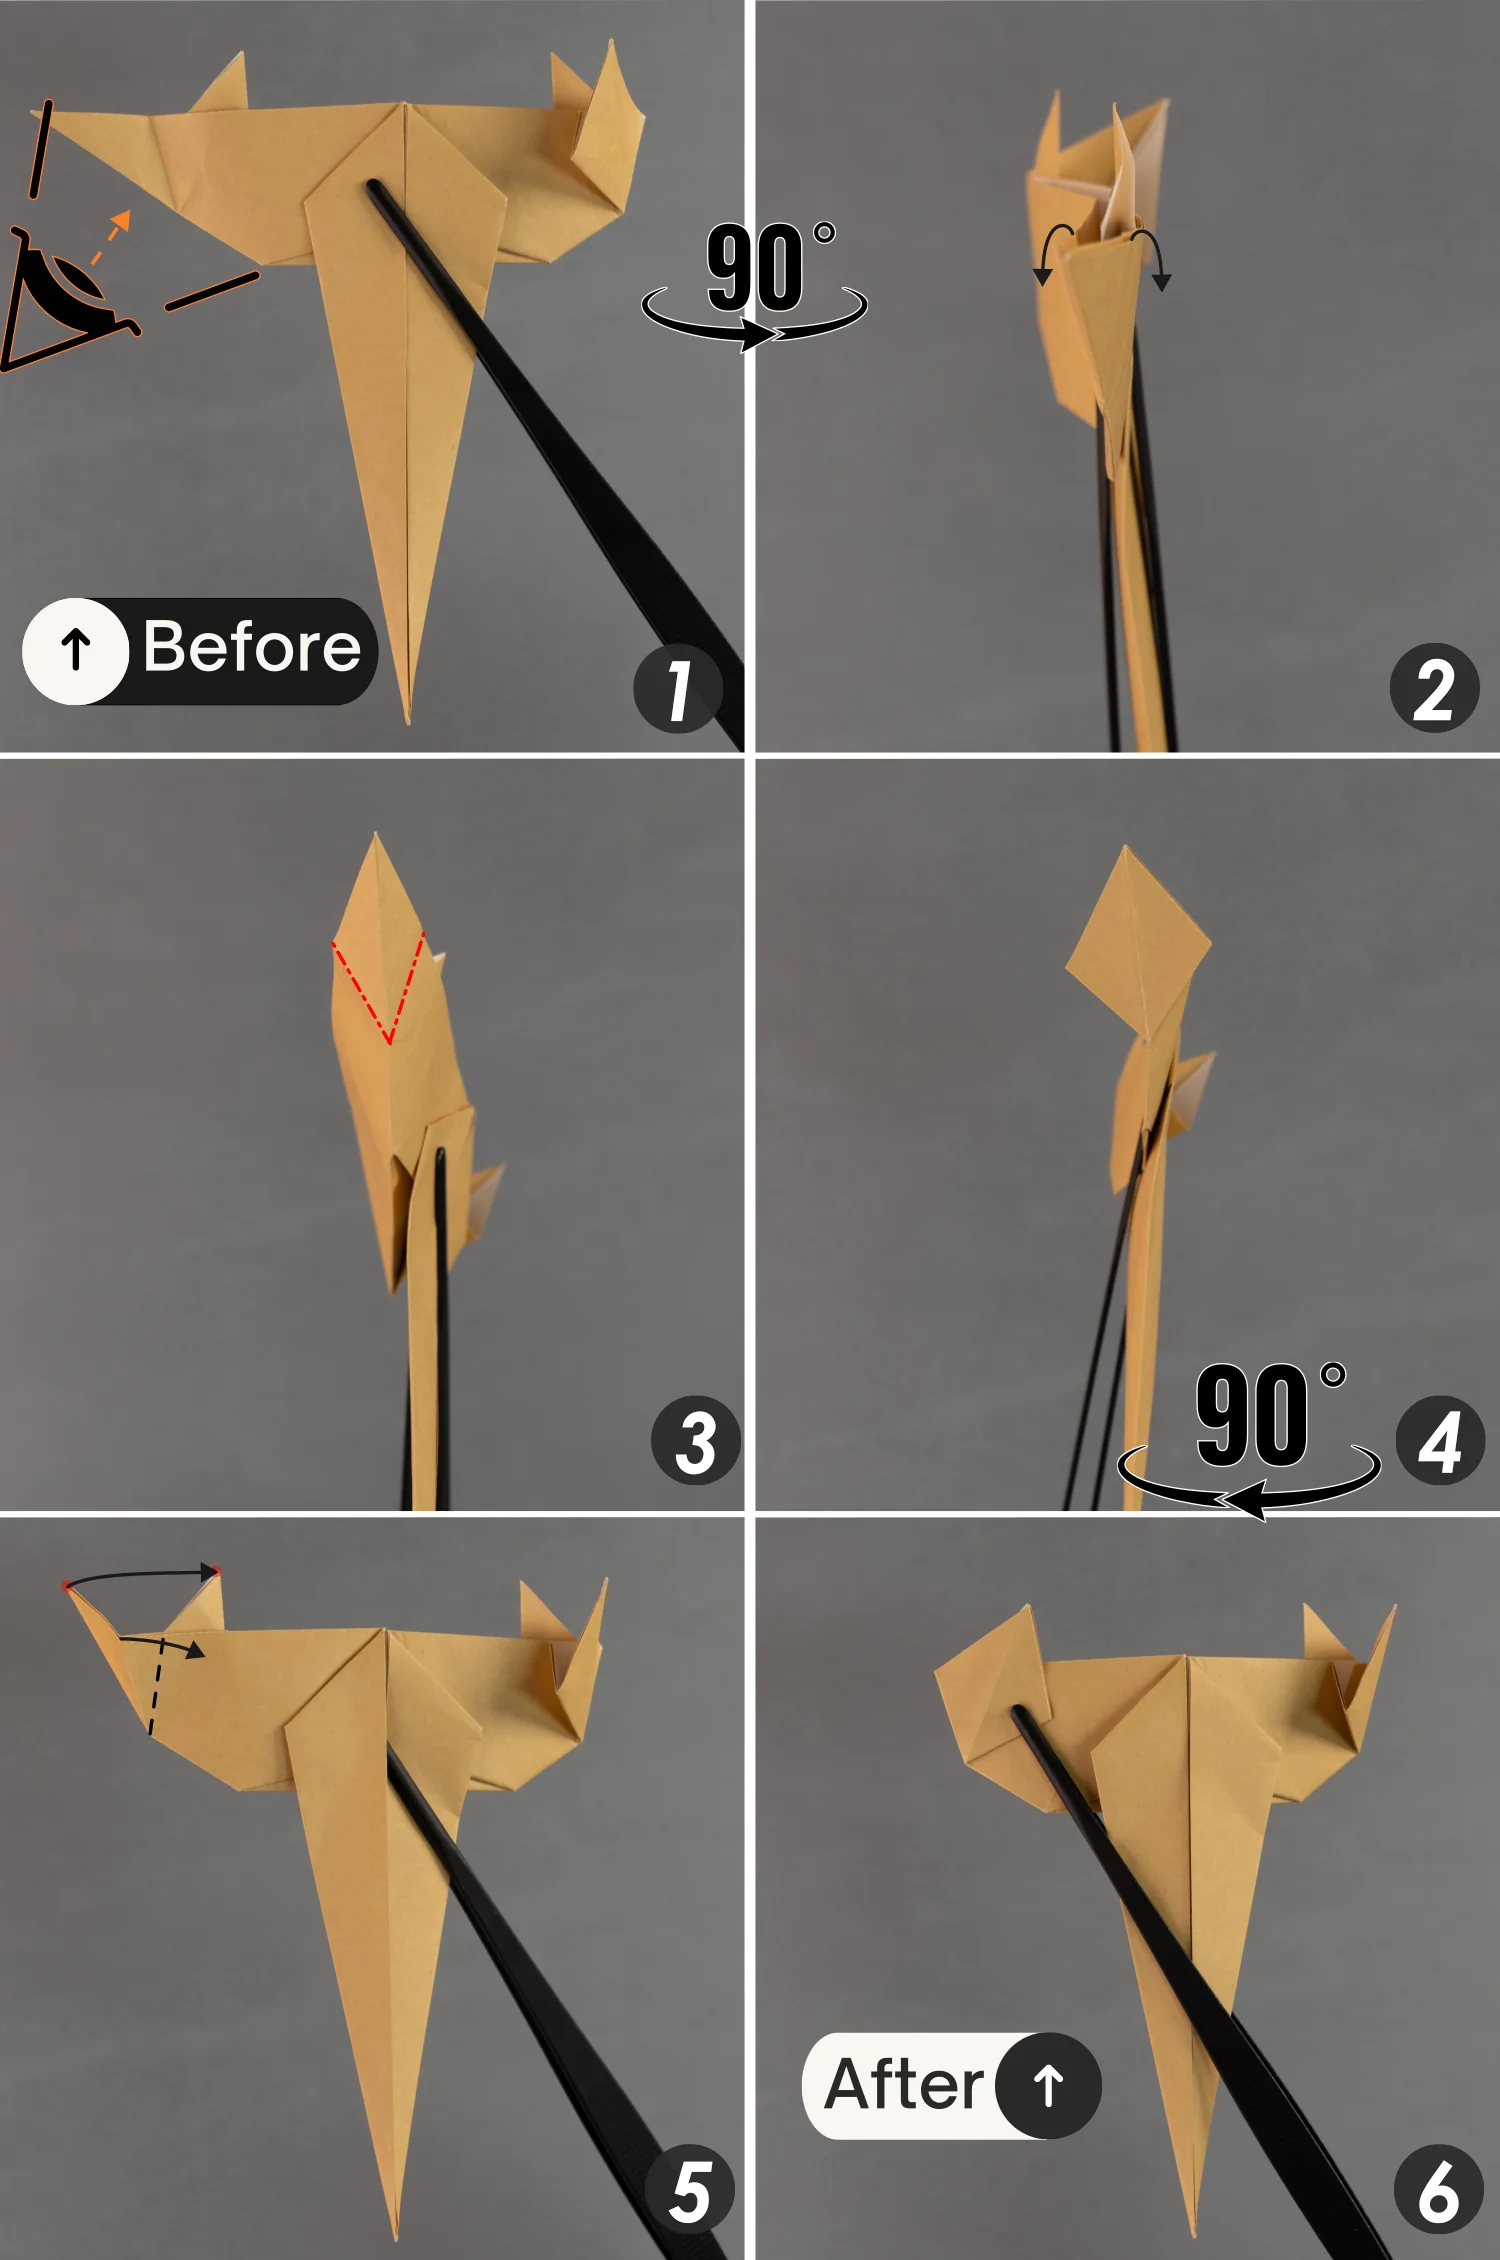
Rotate the paper 90 degrees from back to front, then open the bottom opening [pictures 1 and 2].
Then, mountain fold the creases you made in the previous step, and valley fold the left section of the horizontal crease [picture 3].
Finally, close the opening and rotate the paper 90 degrees from front to back to lay it flat [pictures 4 and 5].
Step 14
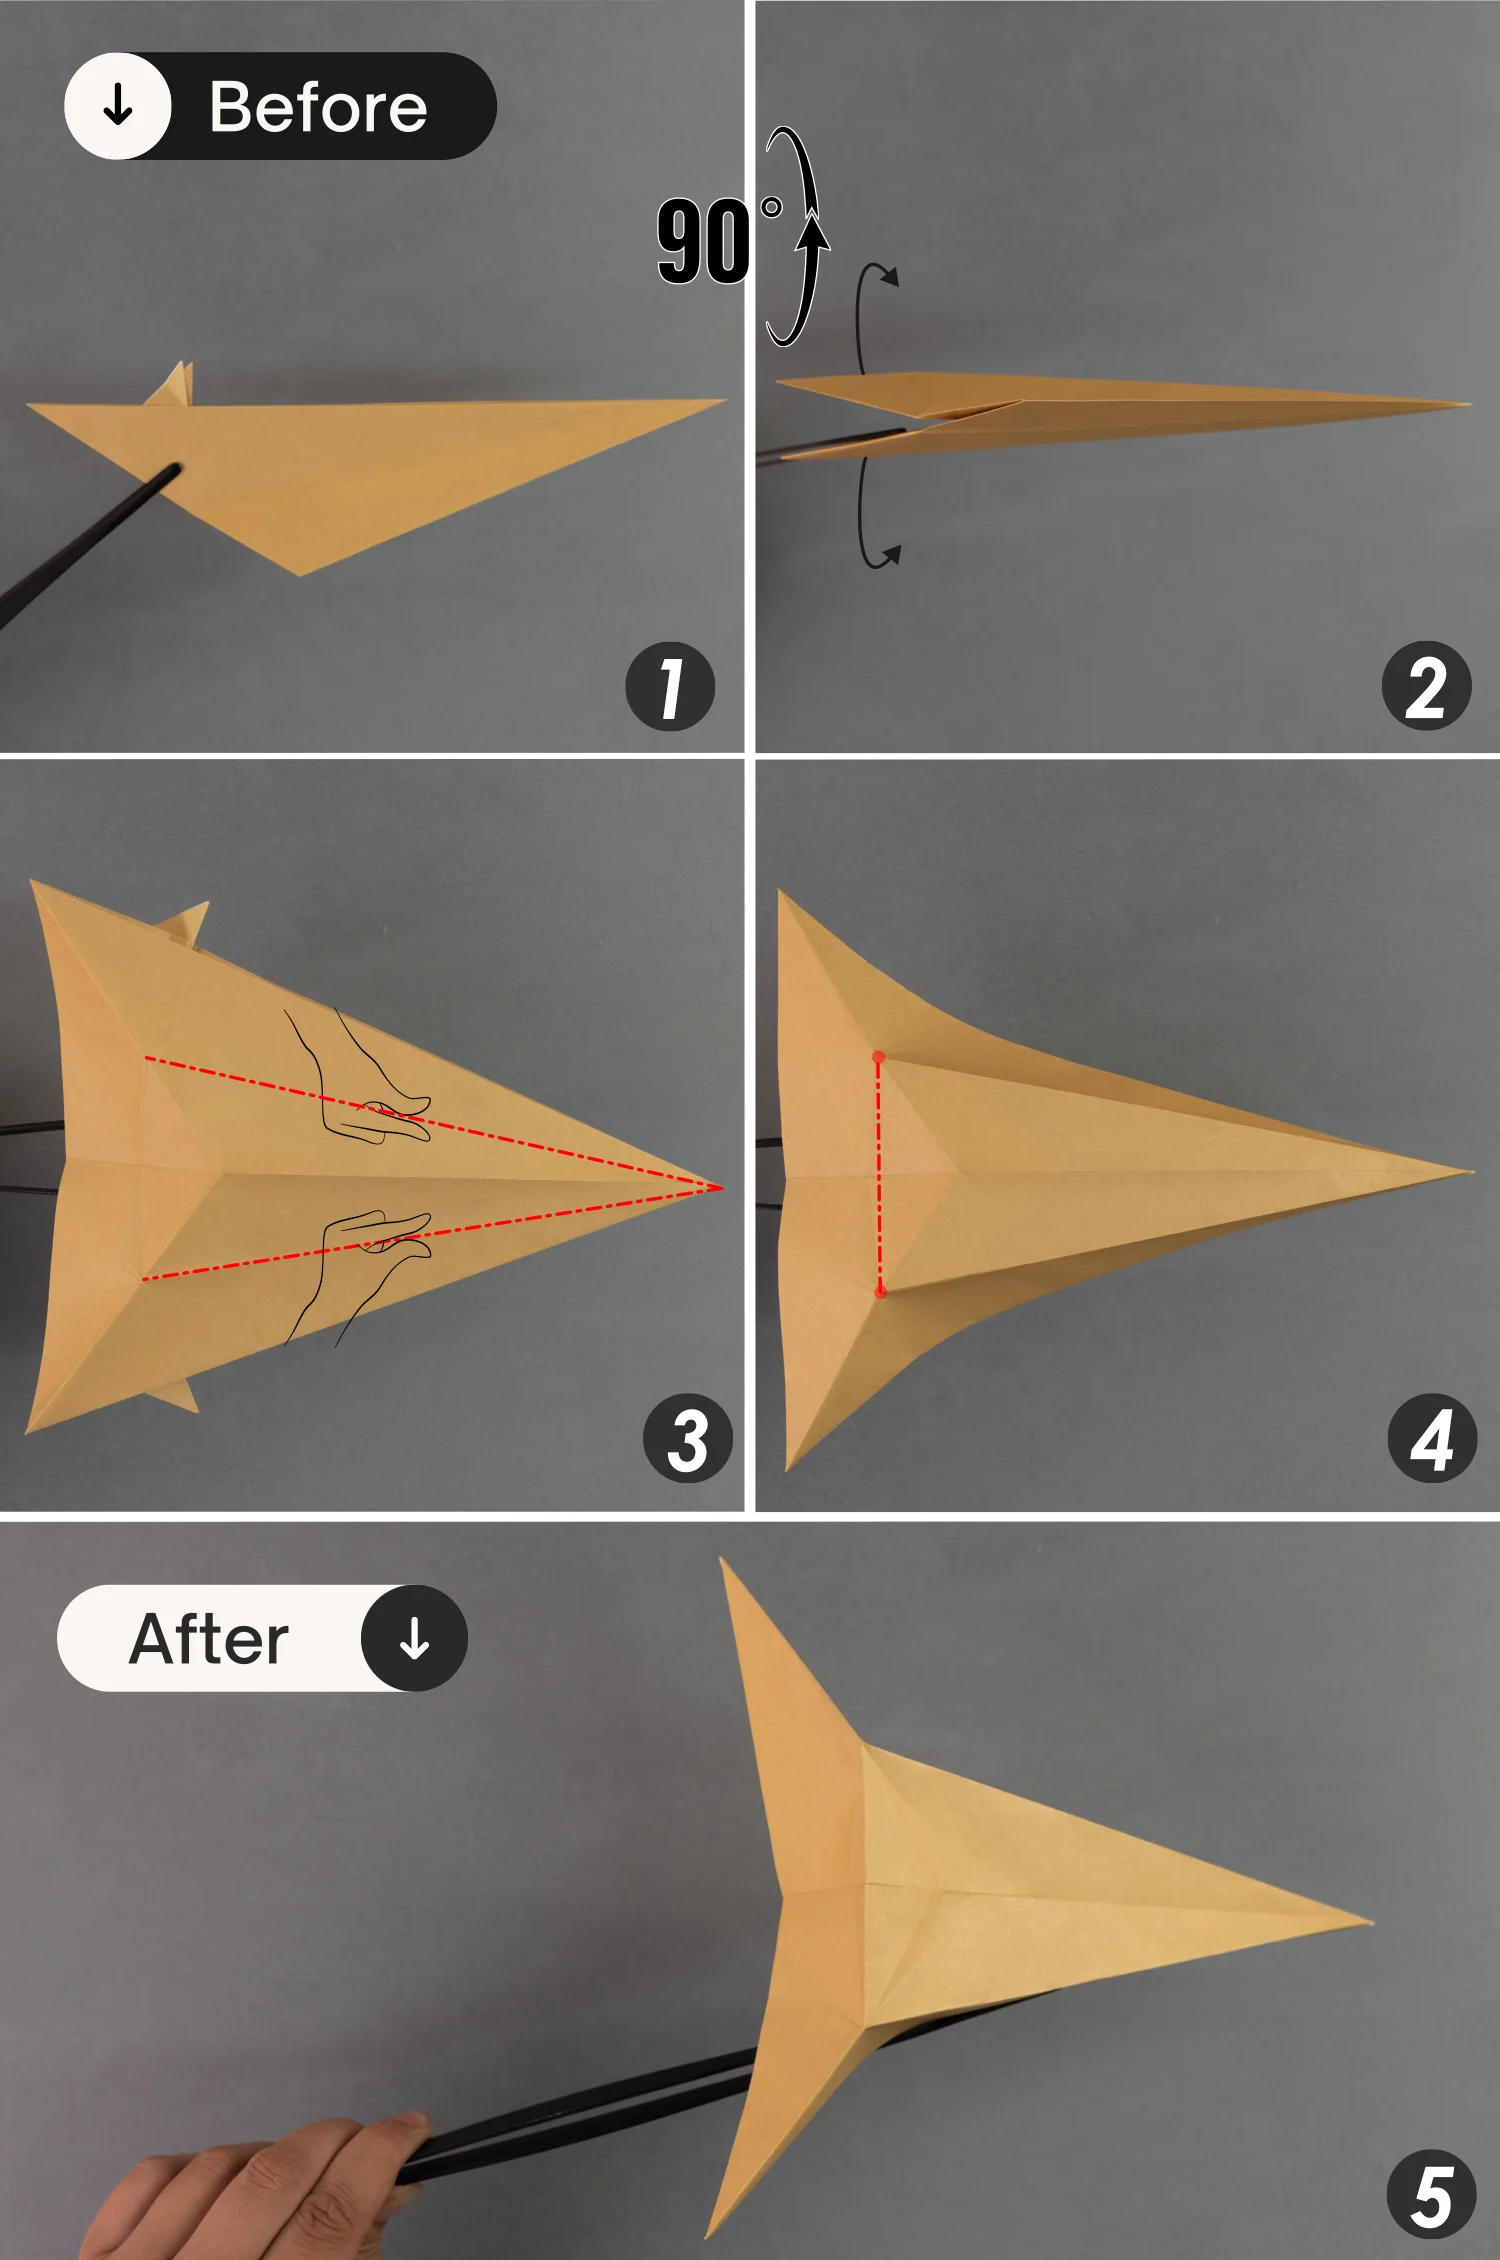
Fold up the bottom corner along the black dotted line, crease it well, and unfold it.
Step 15
Rotate the paper 90 degrees from back to front, then open the paper from the bottom [pictures 1 and 2].
Next, shape the two creases you made in the previous step indicated by the red dotted lines, as well as the other red dotted line connecting the two red spots [pictures 3 and 4].
Step 16
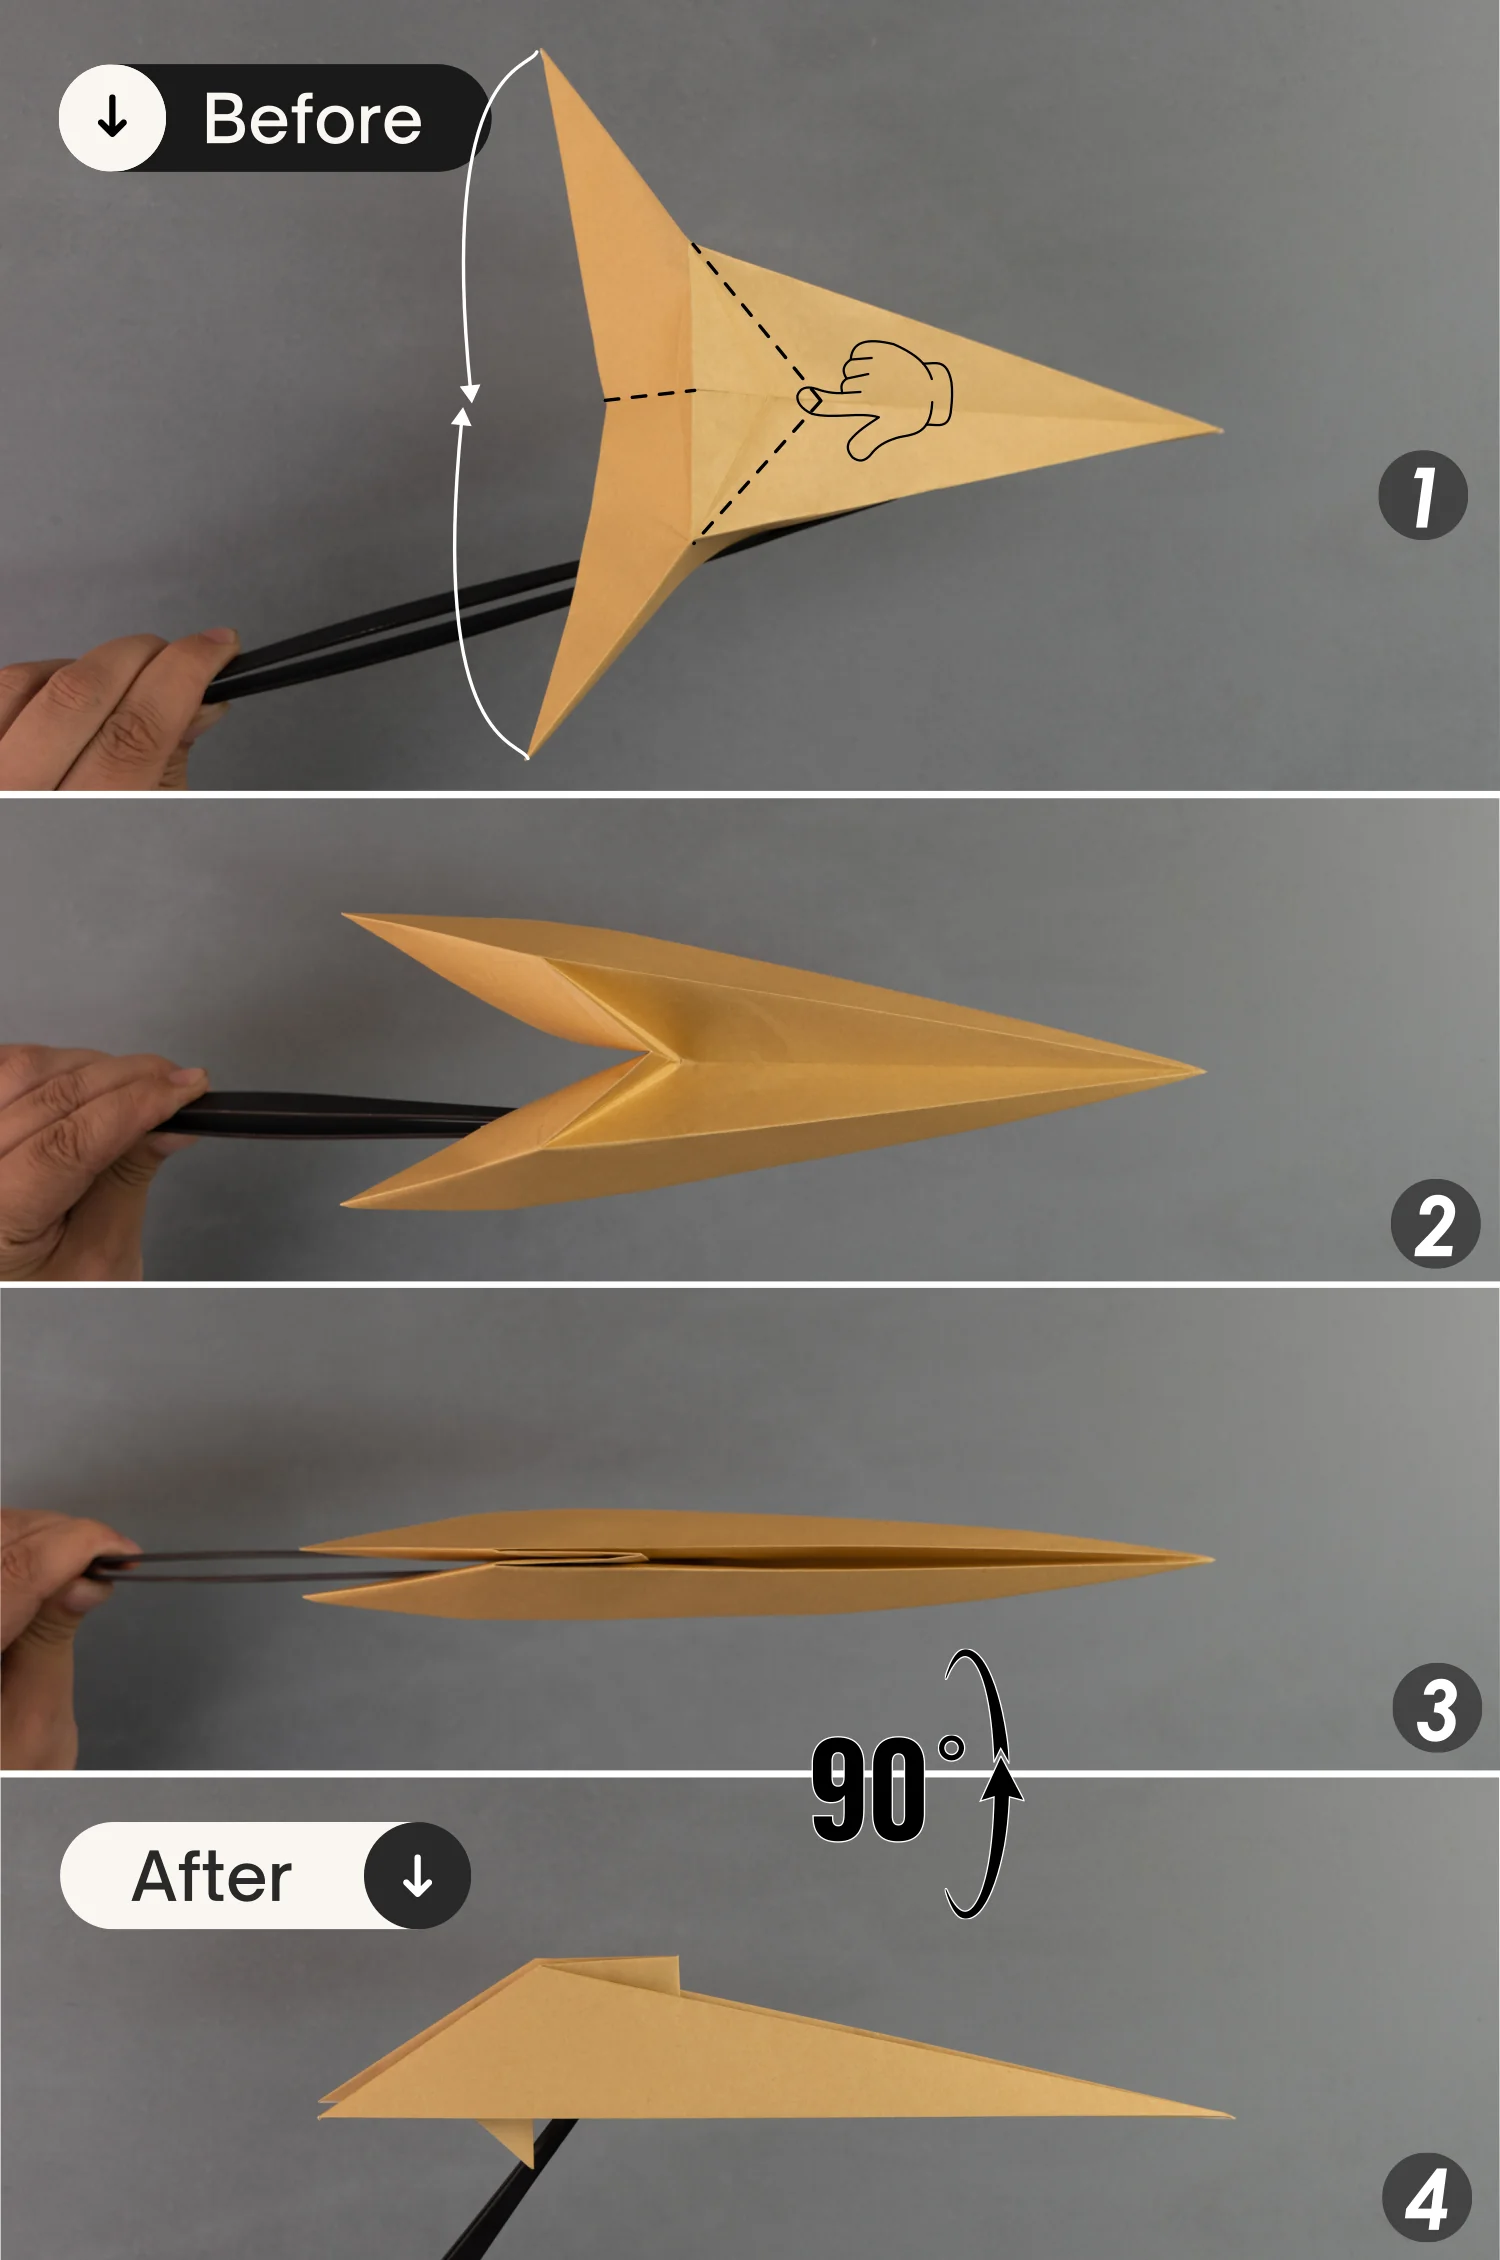
As the first picture shows, press down the top side of the paper to transform the three black dotted lines into valley folds, then flatten the fold and rotate the paper 90 degrees from back to front.
[note that the point you press down is on the right side of the intersection point formed by the existing creases and should be slightly far away from the intersection point]
Step 17
Fold the top layer on the left side to the right side, then rotate the paper 180 degrees from right to left, and fold the left flap to the right side.
Step 18
Fold up this flap, making its bottom edge and the middle vertical crease of the paper align, leaving a crease, and unfold it.
Step 19
Rotate the paper 180 degrees clockwise, then bring up the flap to make it stand [pictures 1 and 2].
Next, open this flap and press down its top point along the creases you made in the previous step [pictures 3 to 5].
Step 20
Fold up the right corners along the black dotted line, making the two red spots meet, leaving a crease, and unfold it.
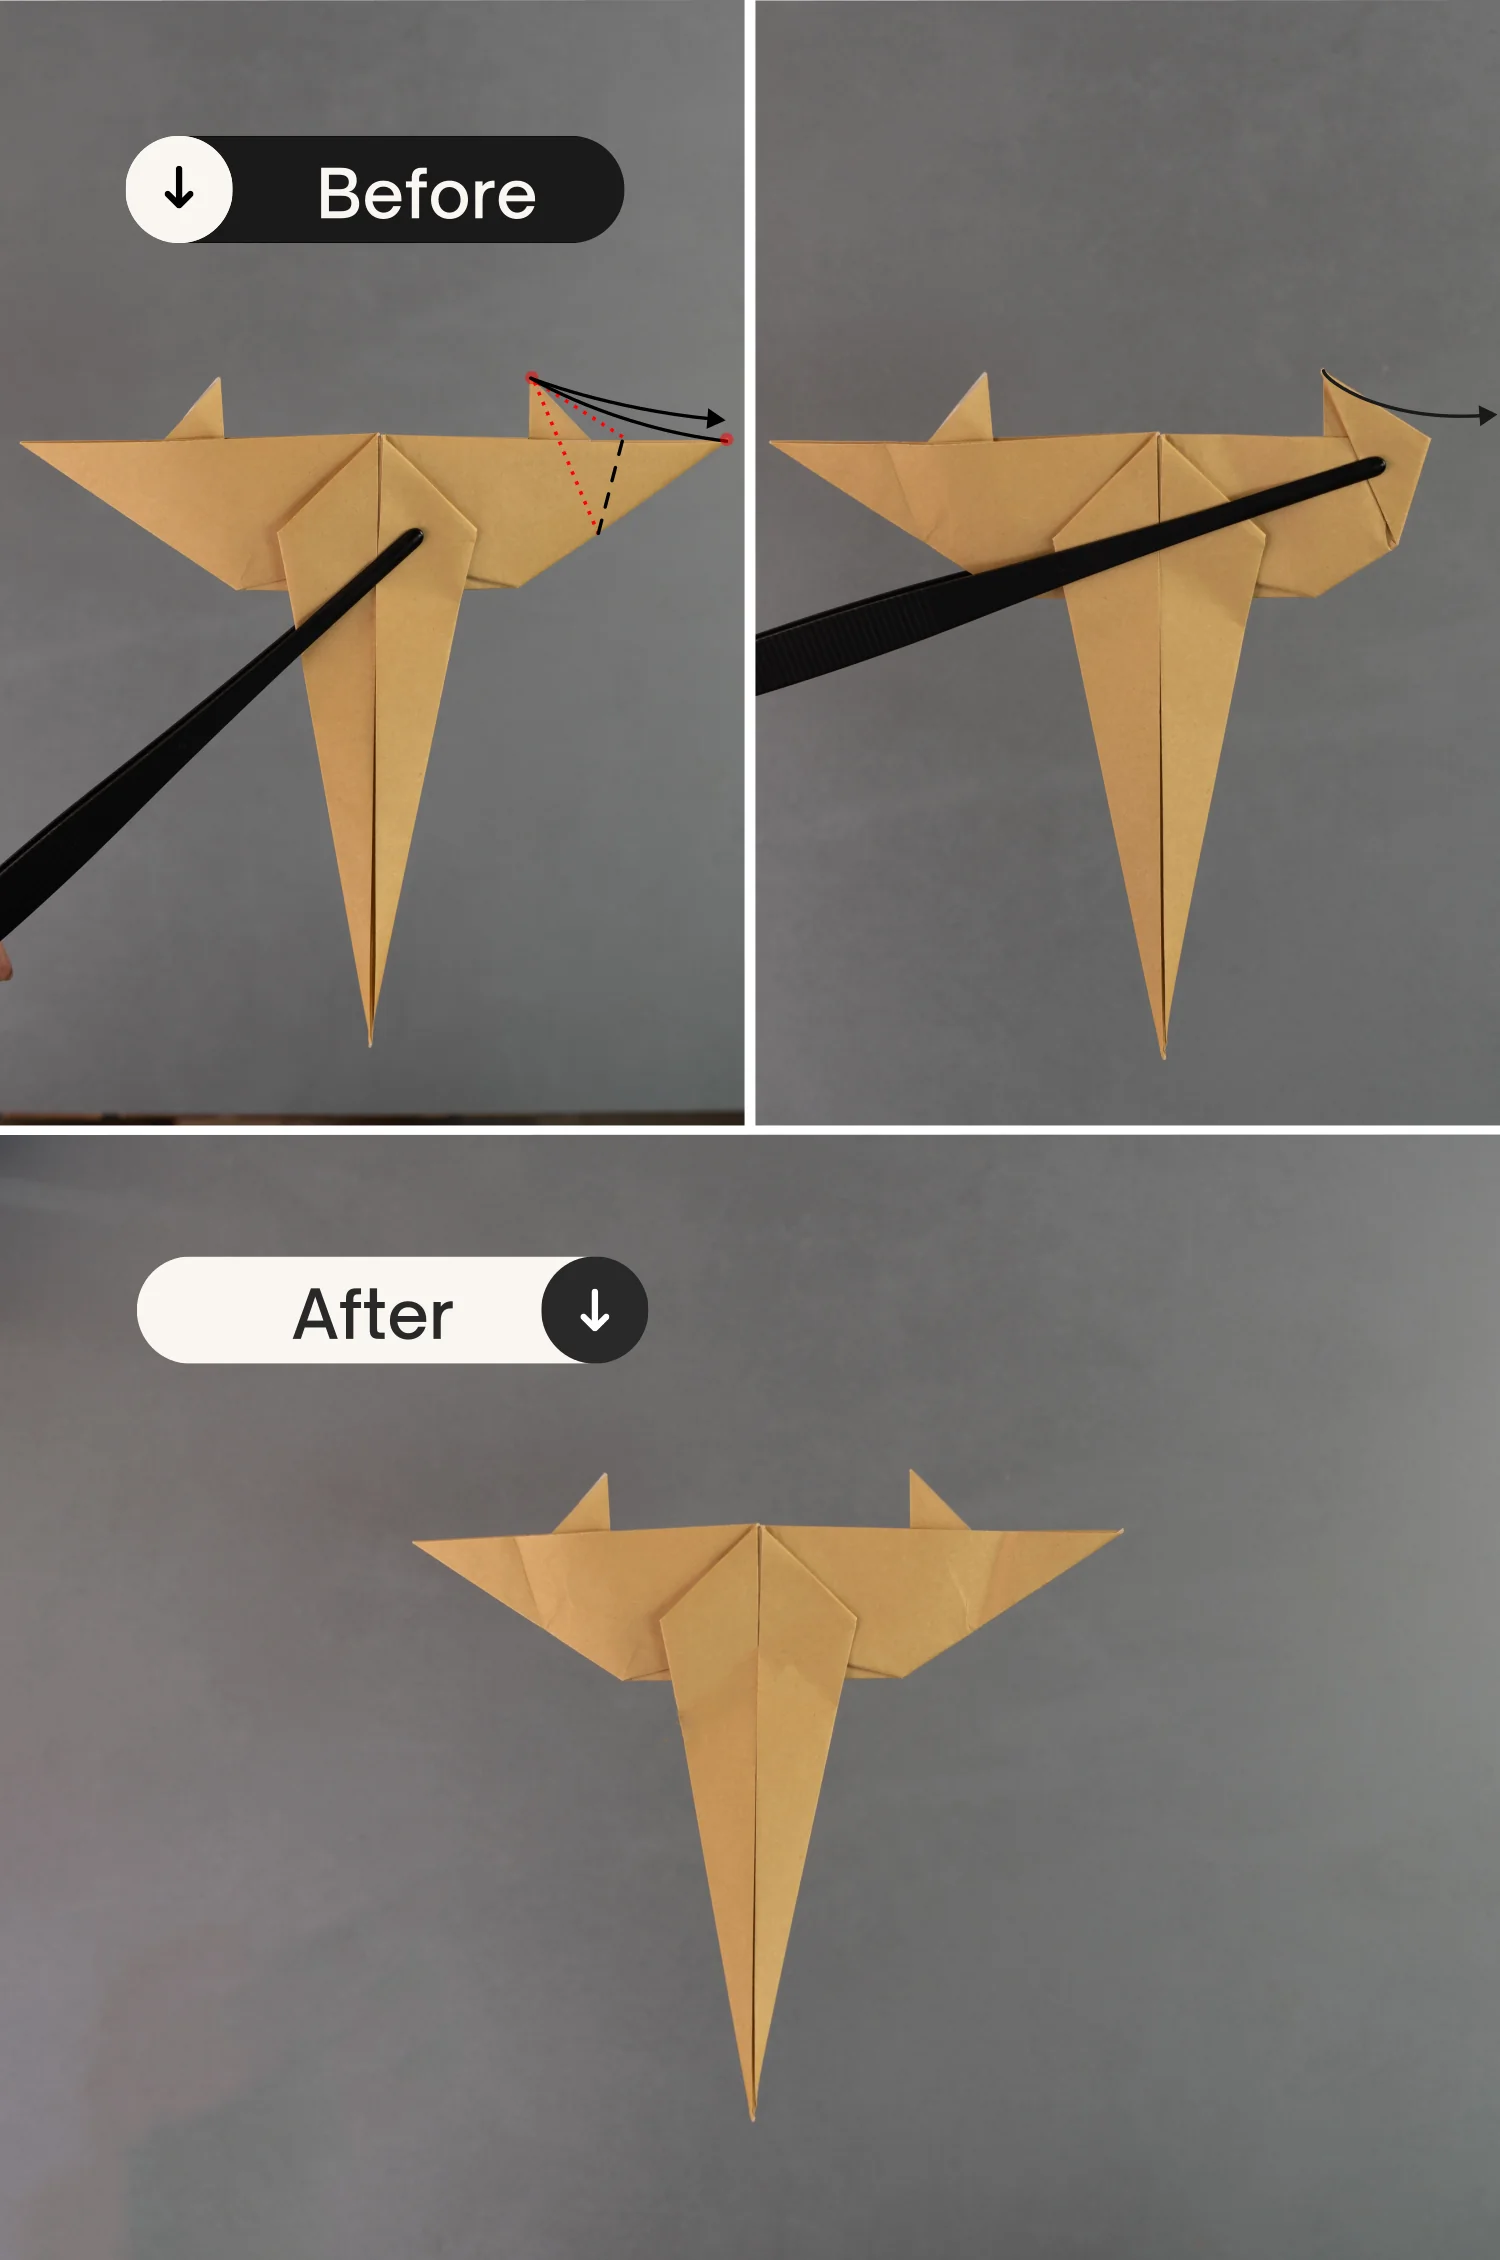
Step 21
Rotate the paper 90 degrees from right to left and focus on the corner you folded in the previous step, then open it and shape the creases you made in the previous step [pictures 1 to 3].
Next, rotate the paper 90 degrees from left to right to lay it flap, and flatten the right layer you just created forward, making the two red spots overlap [pictures 4 to 6].
Step 22
Similarly, fold up the left corner, making the two points indicated by the red spots overlap. Crease it well to leave a crease and unfold it.
Step 23
As you did in step 21, rotate the paper 90 degrees from left to right and focus on the corner you folded in the previous step, then open it and shape the creases you made in the previous step [pictures 1 to 3].
Next, rotate the paper 90 degrees from right to left to lay it flap, and flatten the right layer you just created forward, making the two red spots overlap [pictures 4 to 6].
Step 24
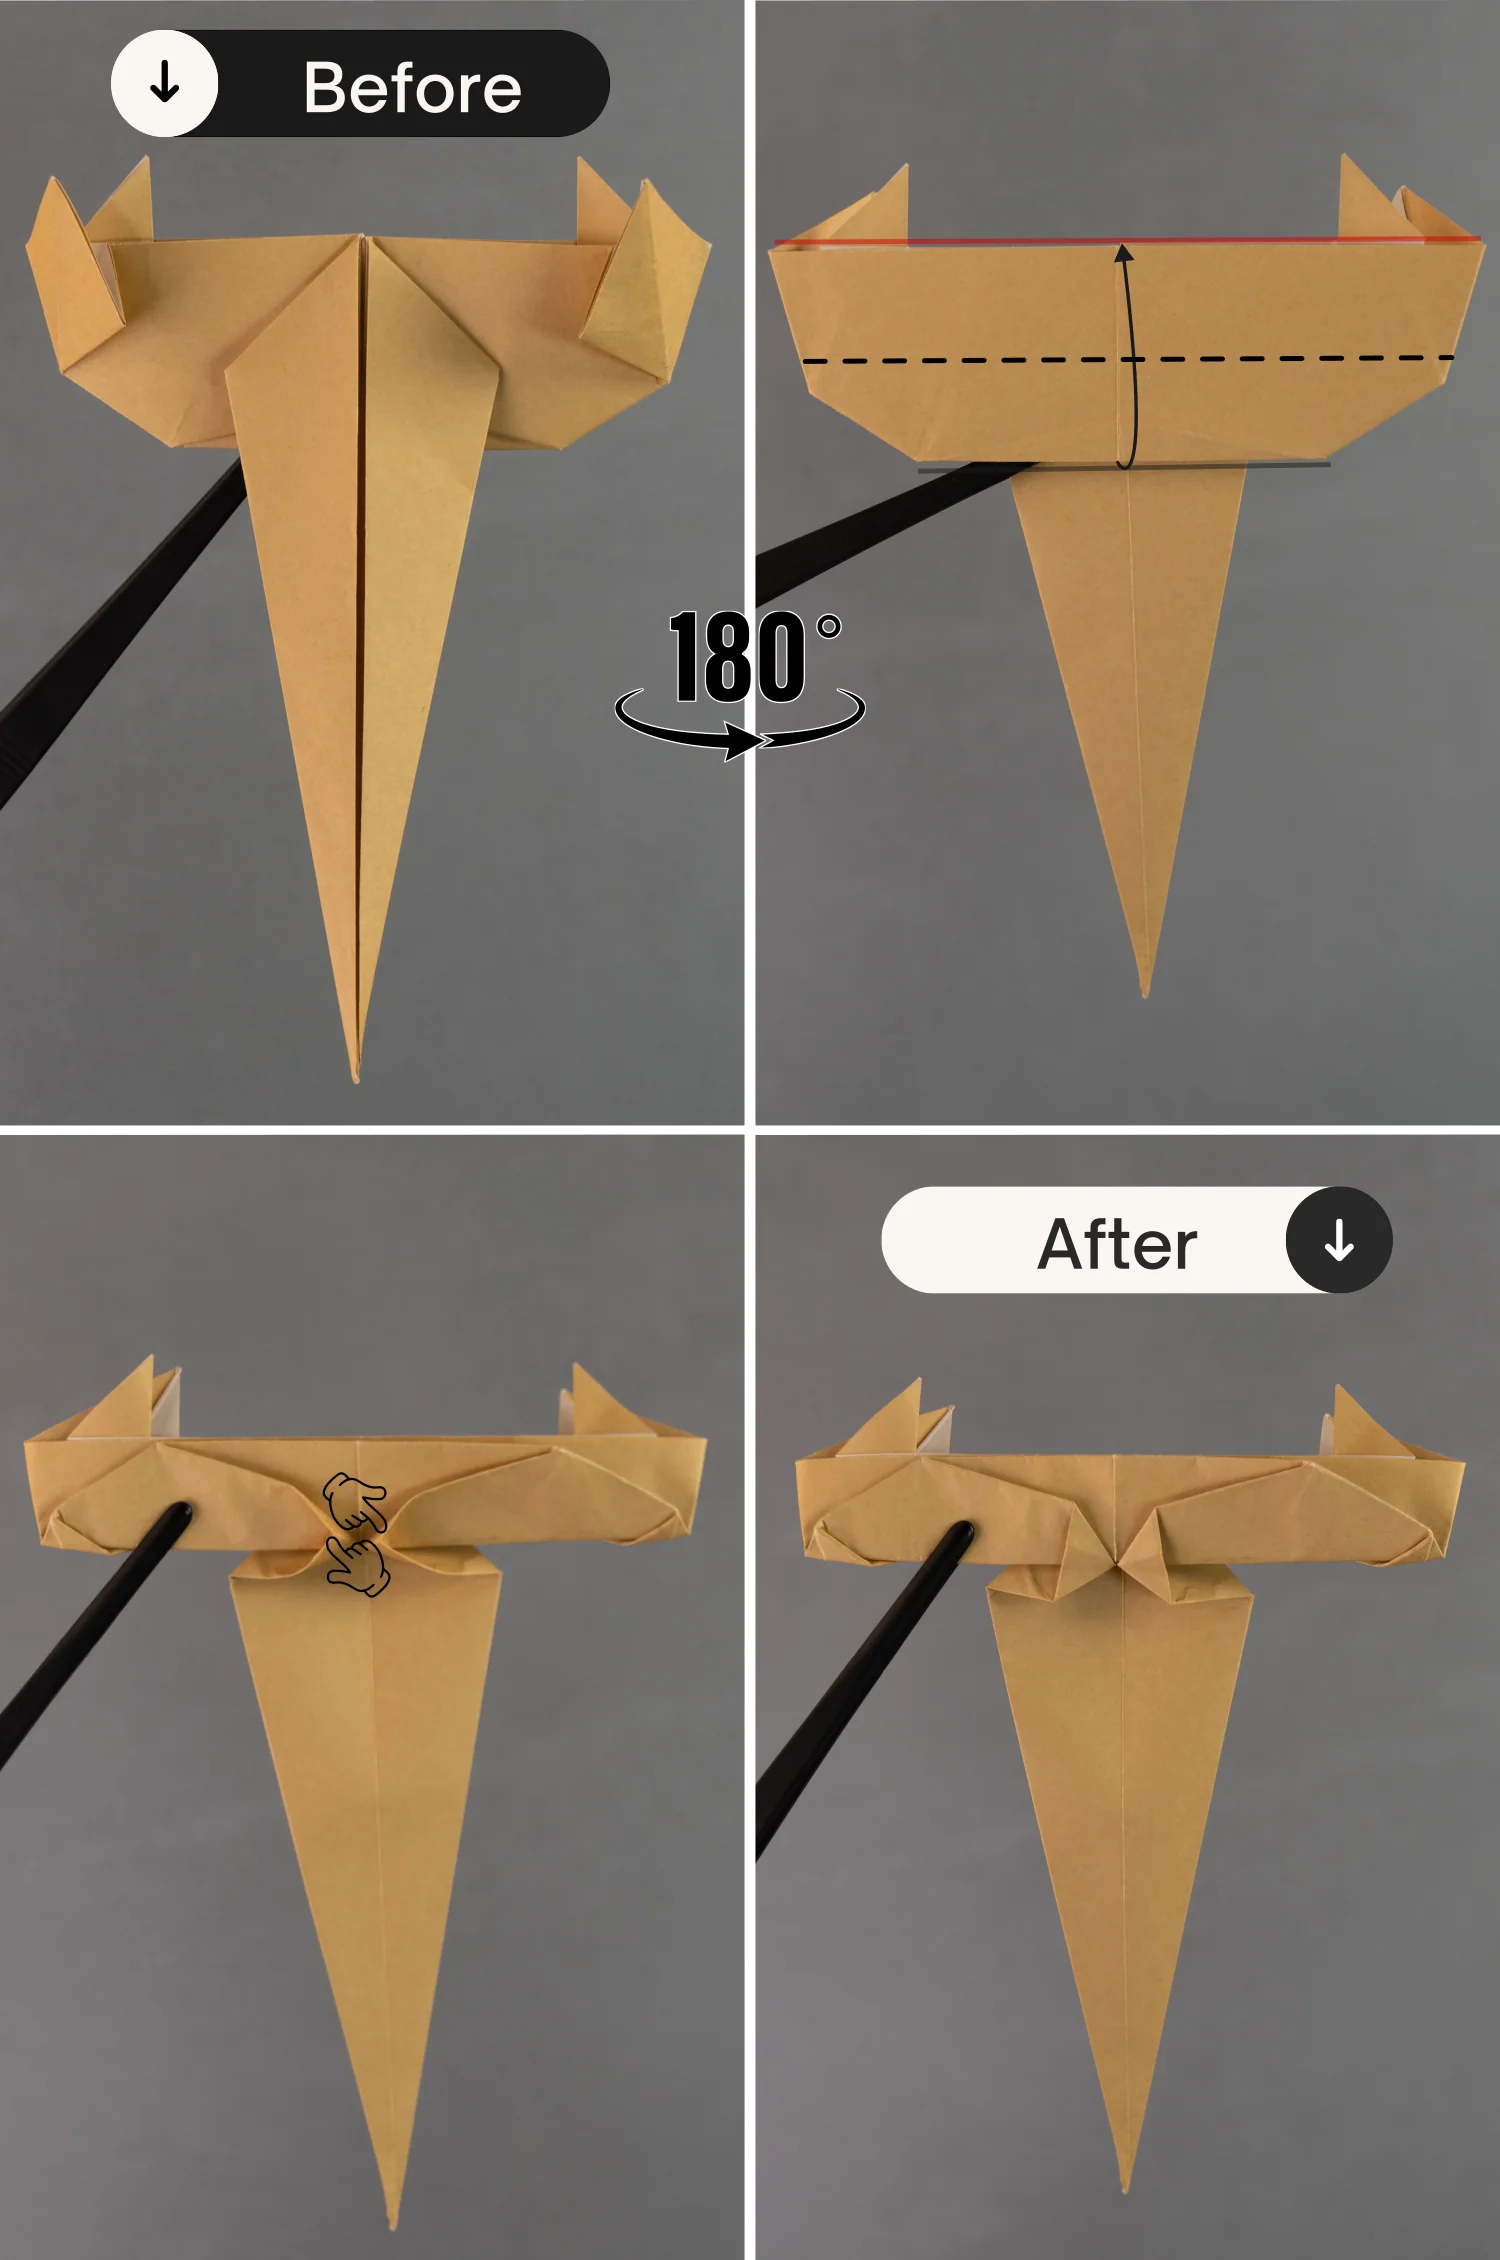
Turn over the paper from left to right, then fold up the bottom edge of the top part to align with the top edge [pictures 1 and 2].
Then, squash these two small corners in the middle.
Step 25
Fold down the top left and right parts along the dotted lines that connect two red spots.
Step 26
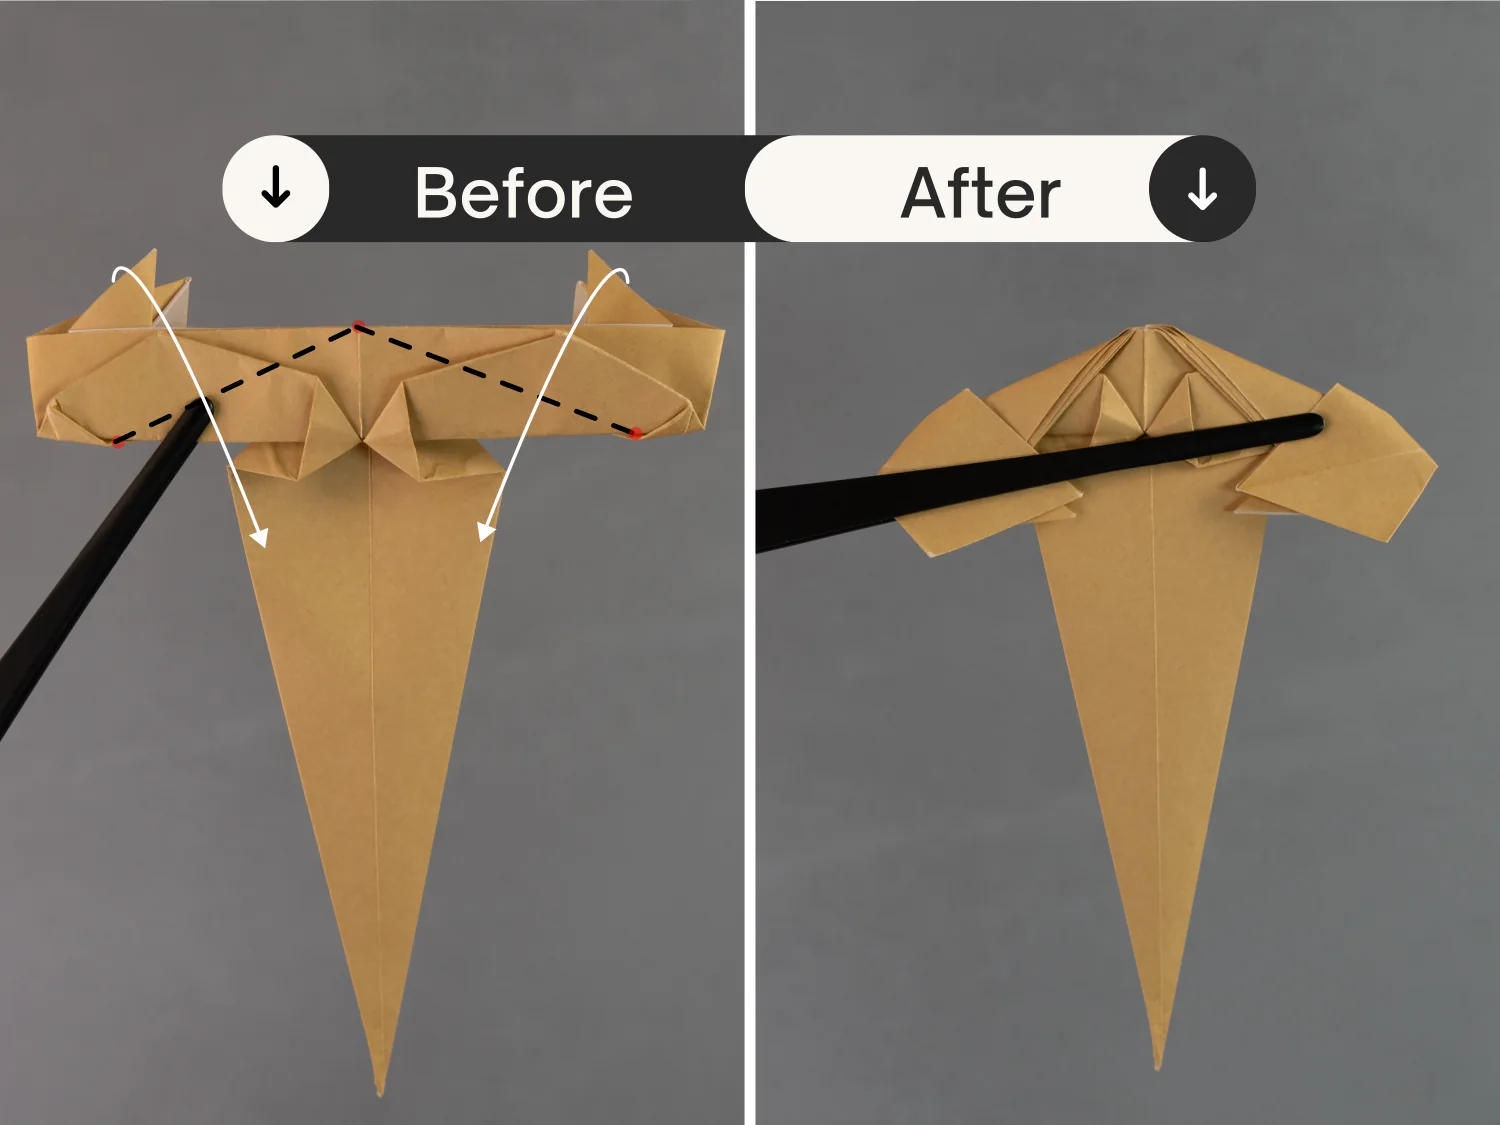
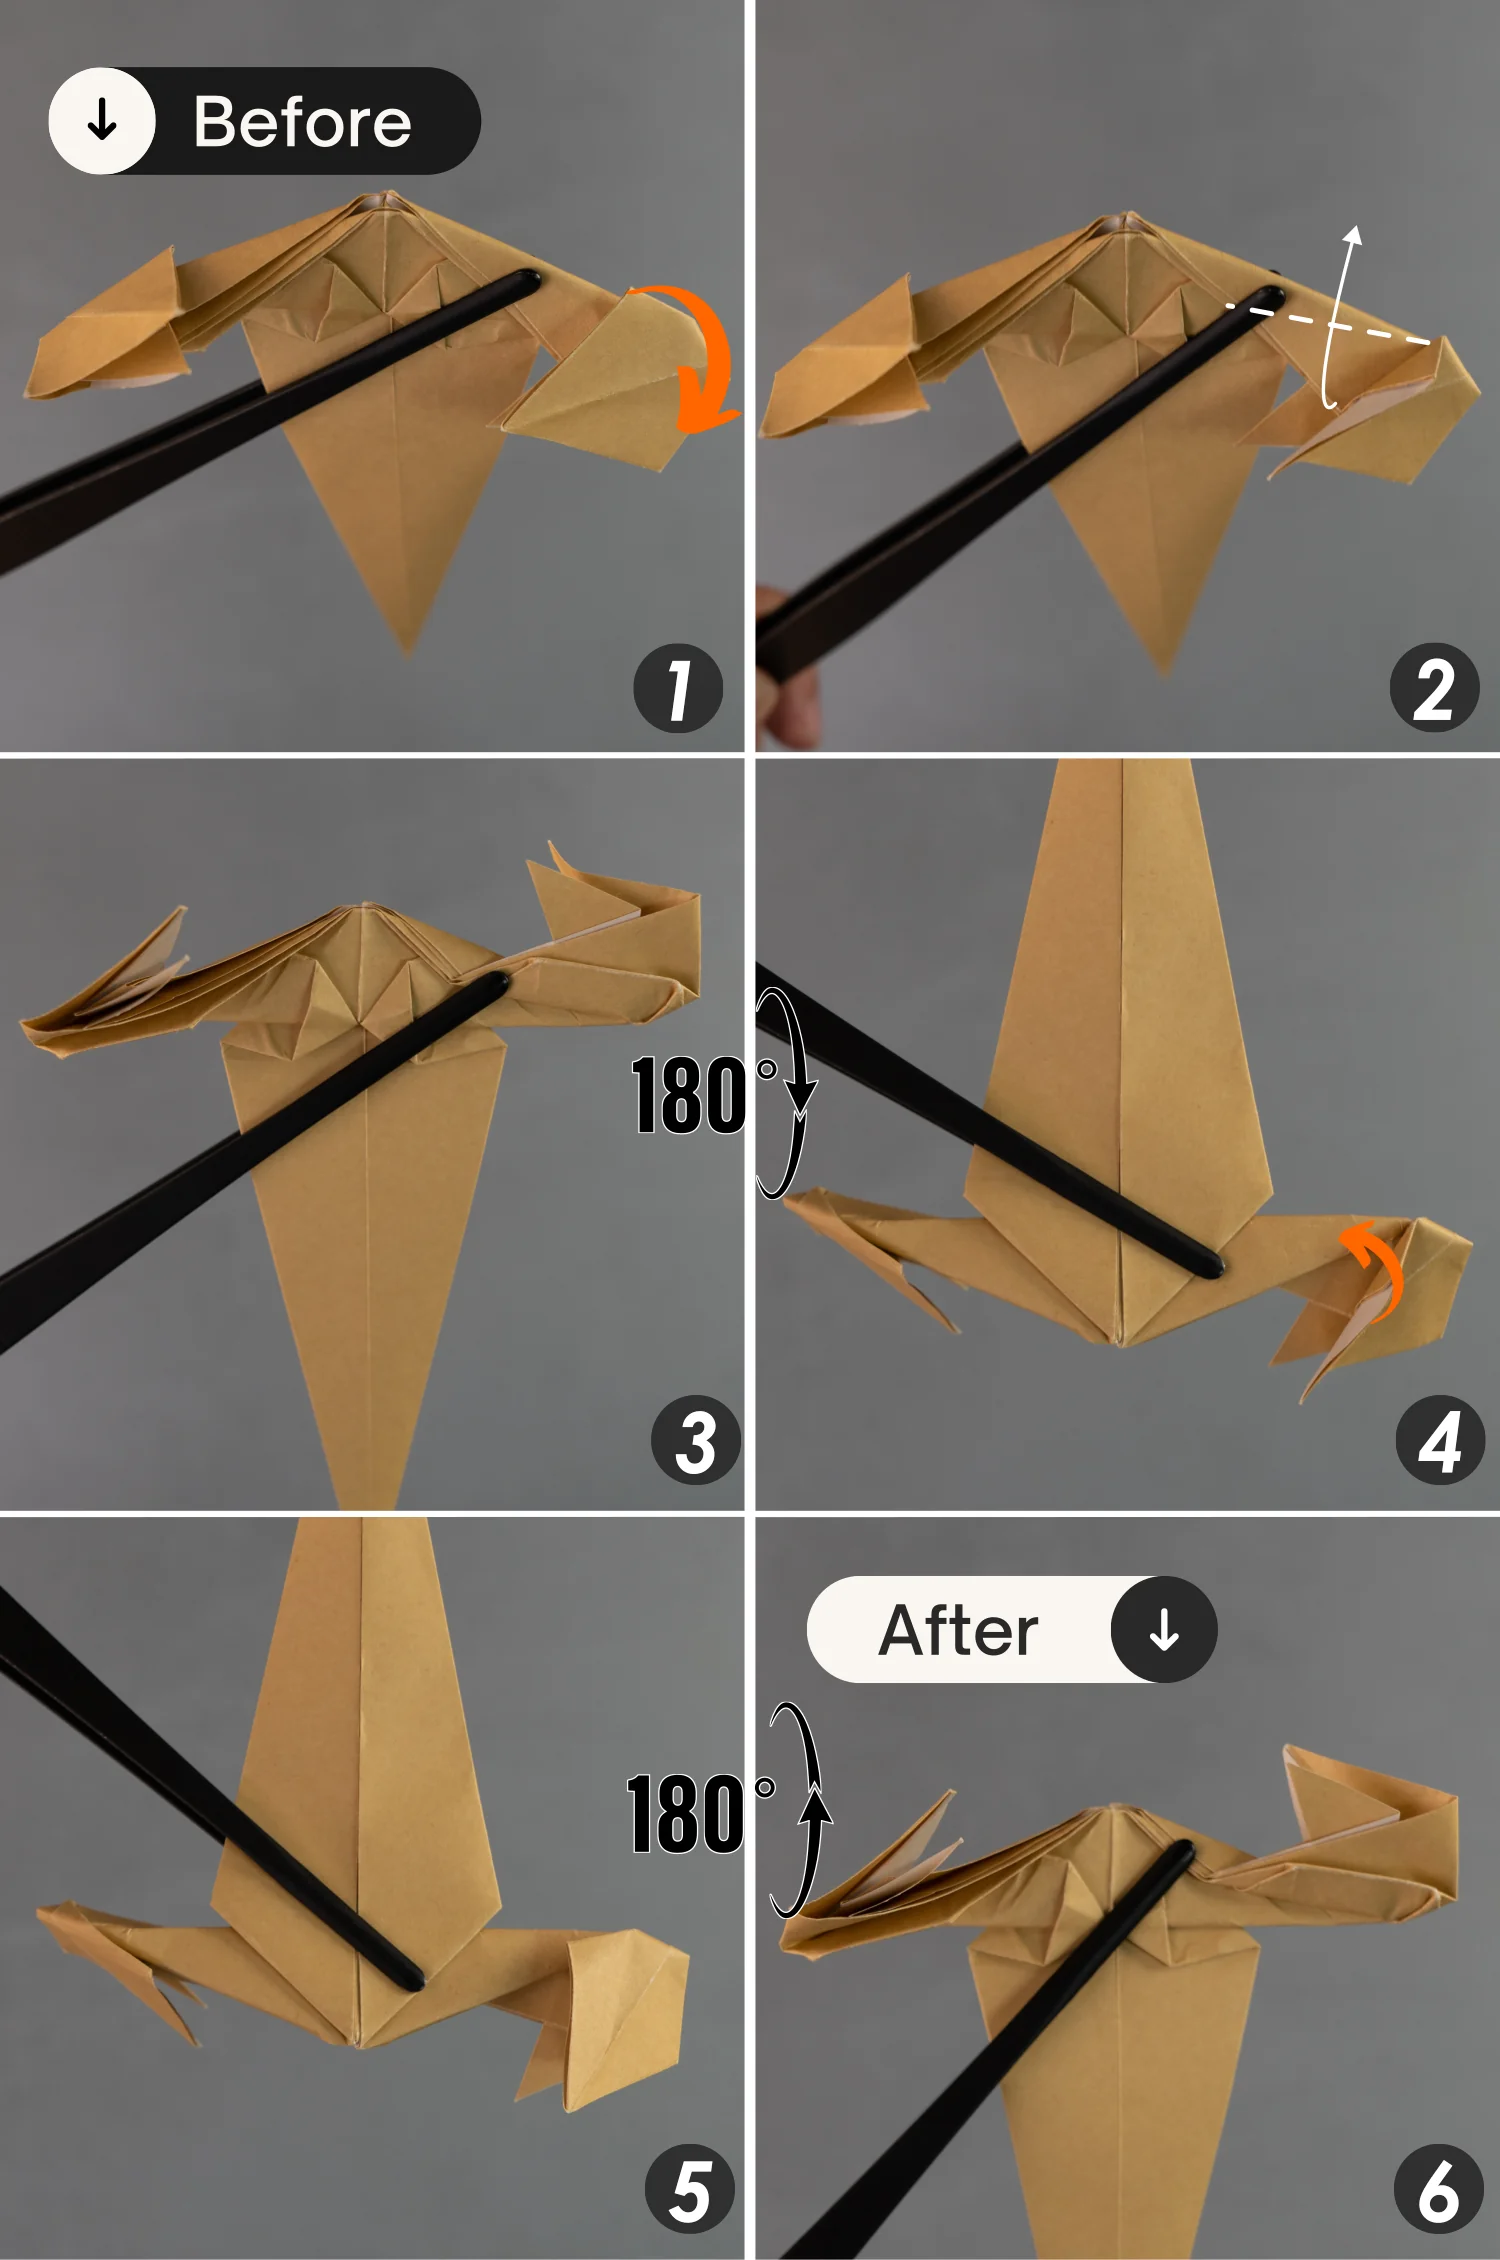
Slightly press down this quadrilateral on the right side, then fold up the right part of the model along the white dotted line [pictures 1 and 2].
Next, rotate the model 180 degrees from front to back and press down that quadrilateral [pictures 3 and 4].
Finally, rotate the model 180 degrees from back to front [pictures 5 and 6].
Step 27
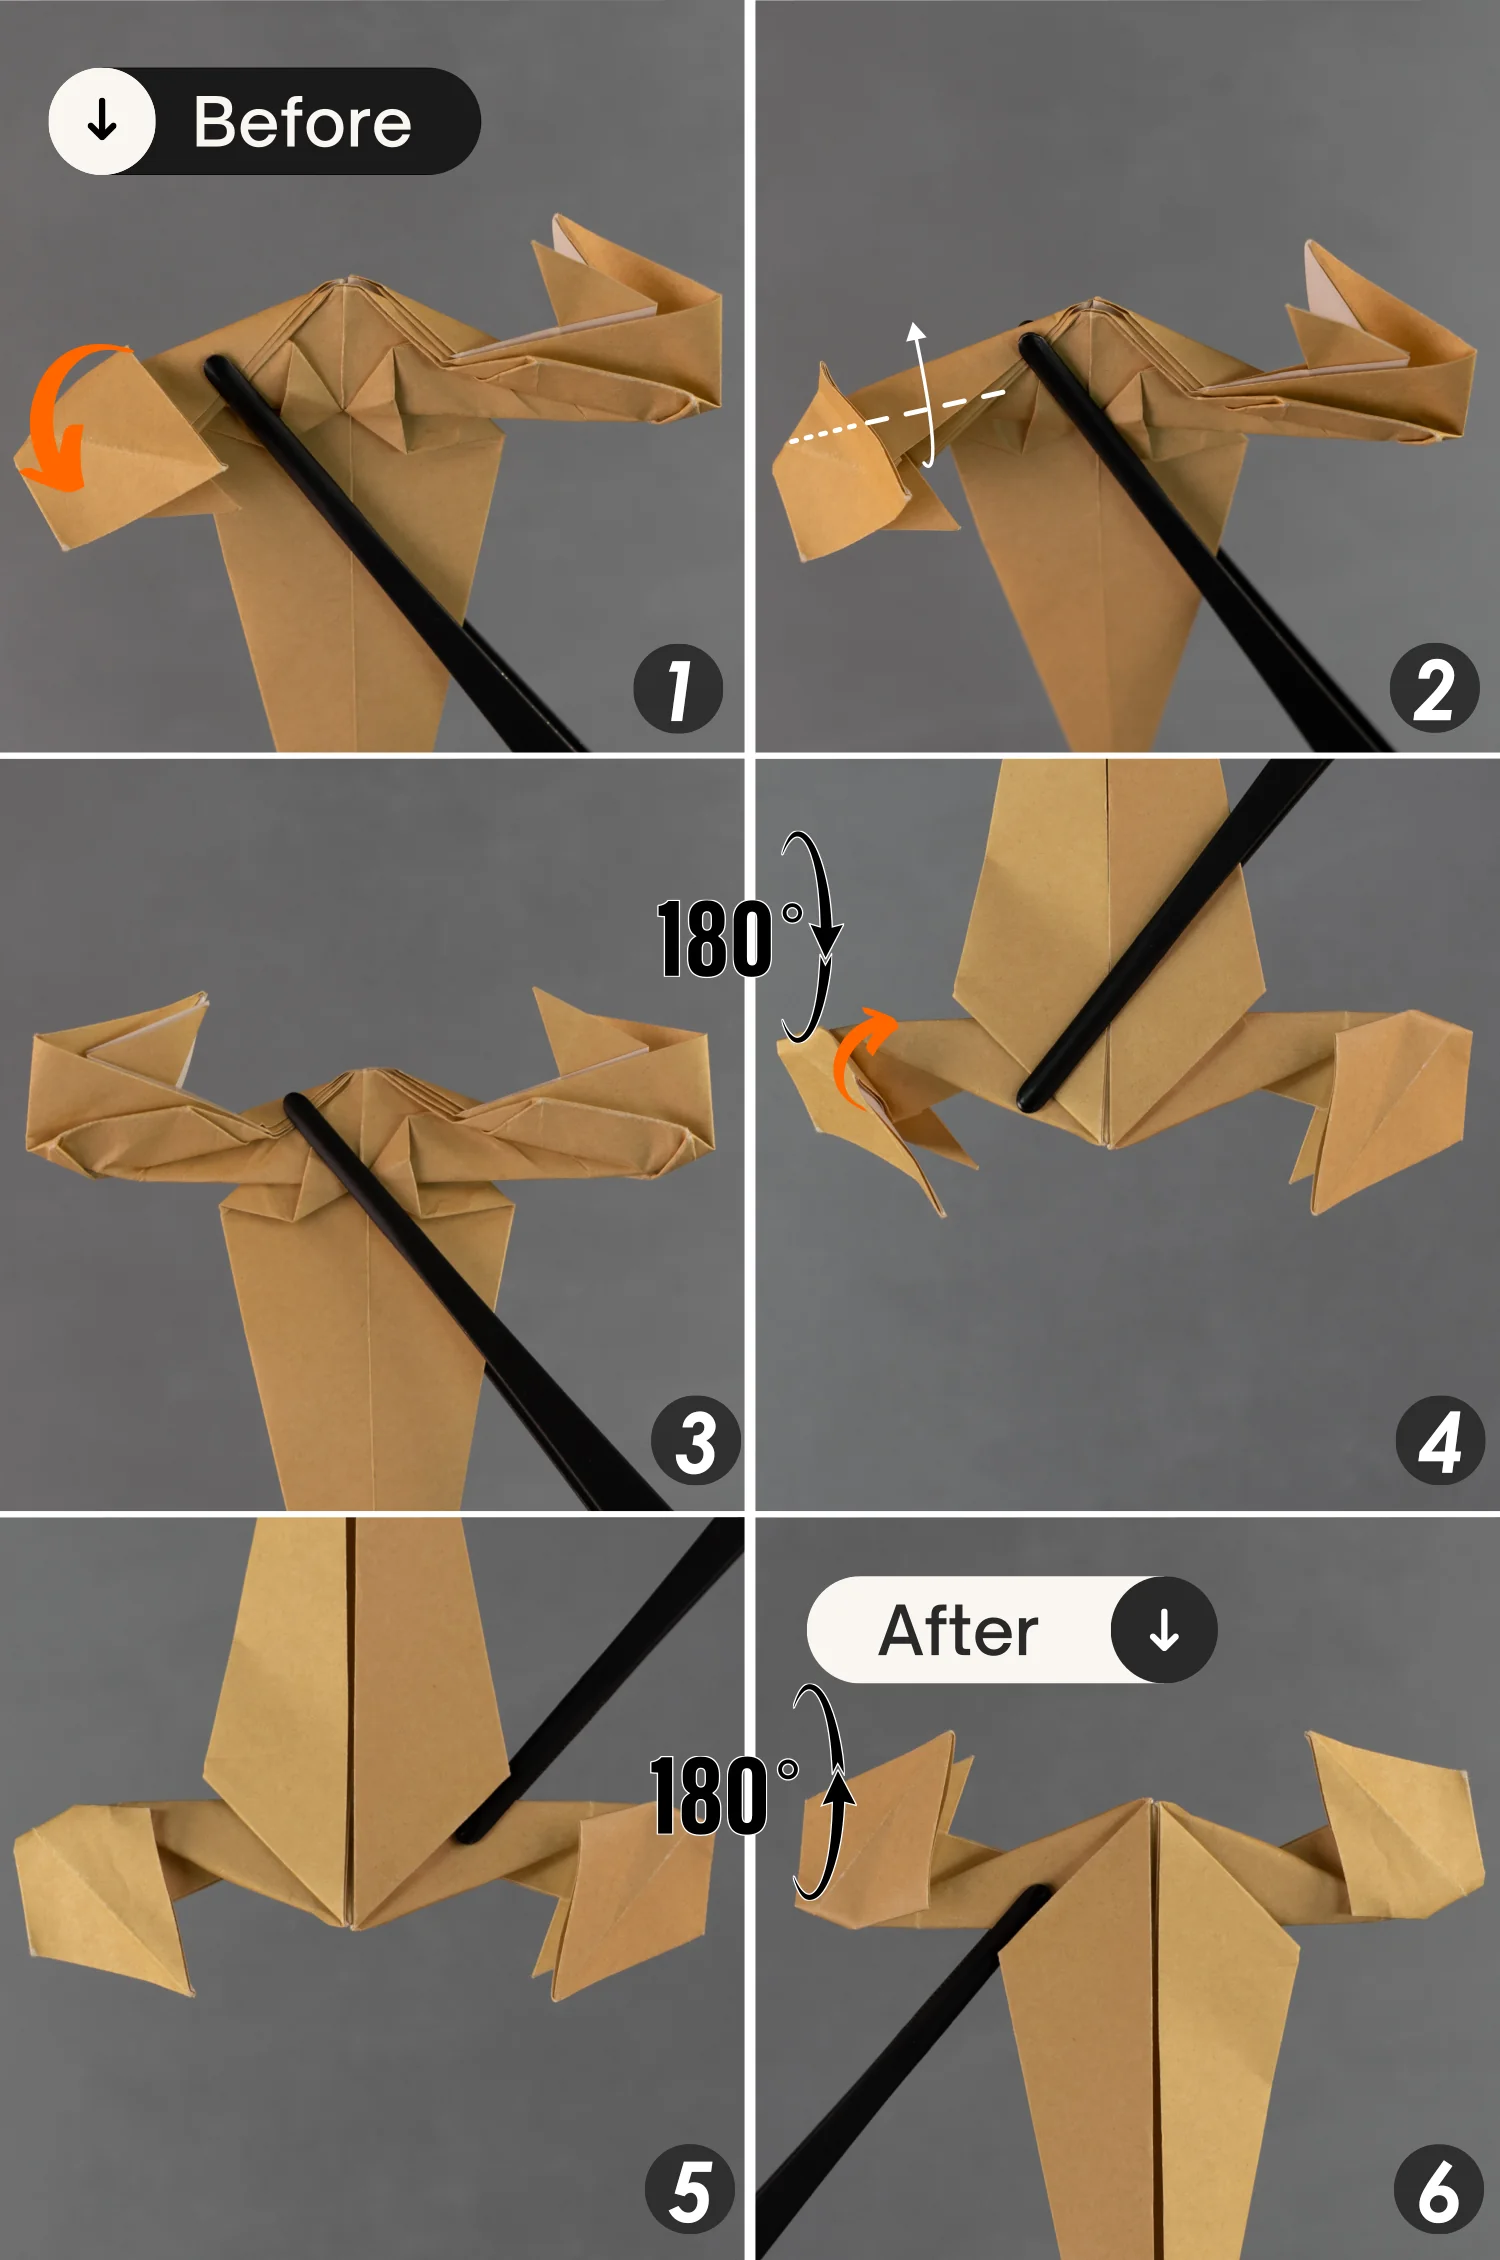
Similarly, slightly press down this quadrilateral on the left side, then fold up the left part of the model along the white dotted line [pictures 1 and 2].
Next, rotate the model 180 degrees from front to back and press down that quadrilateral [pictures 3 and 4].
Finally, rotate the model 180 degrees from back to front [pictures 5 and 6].
Step 28
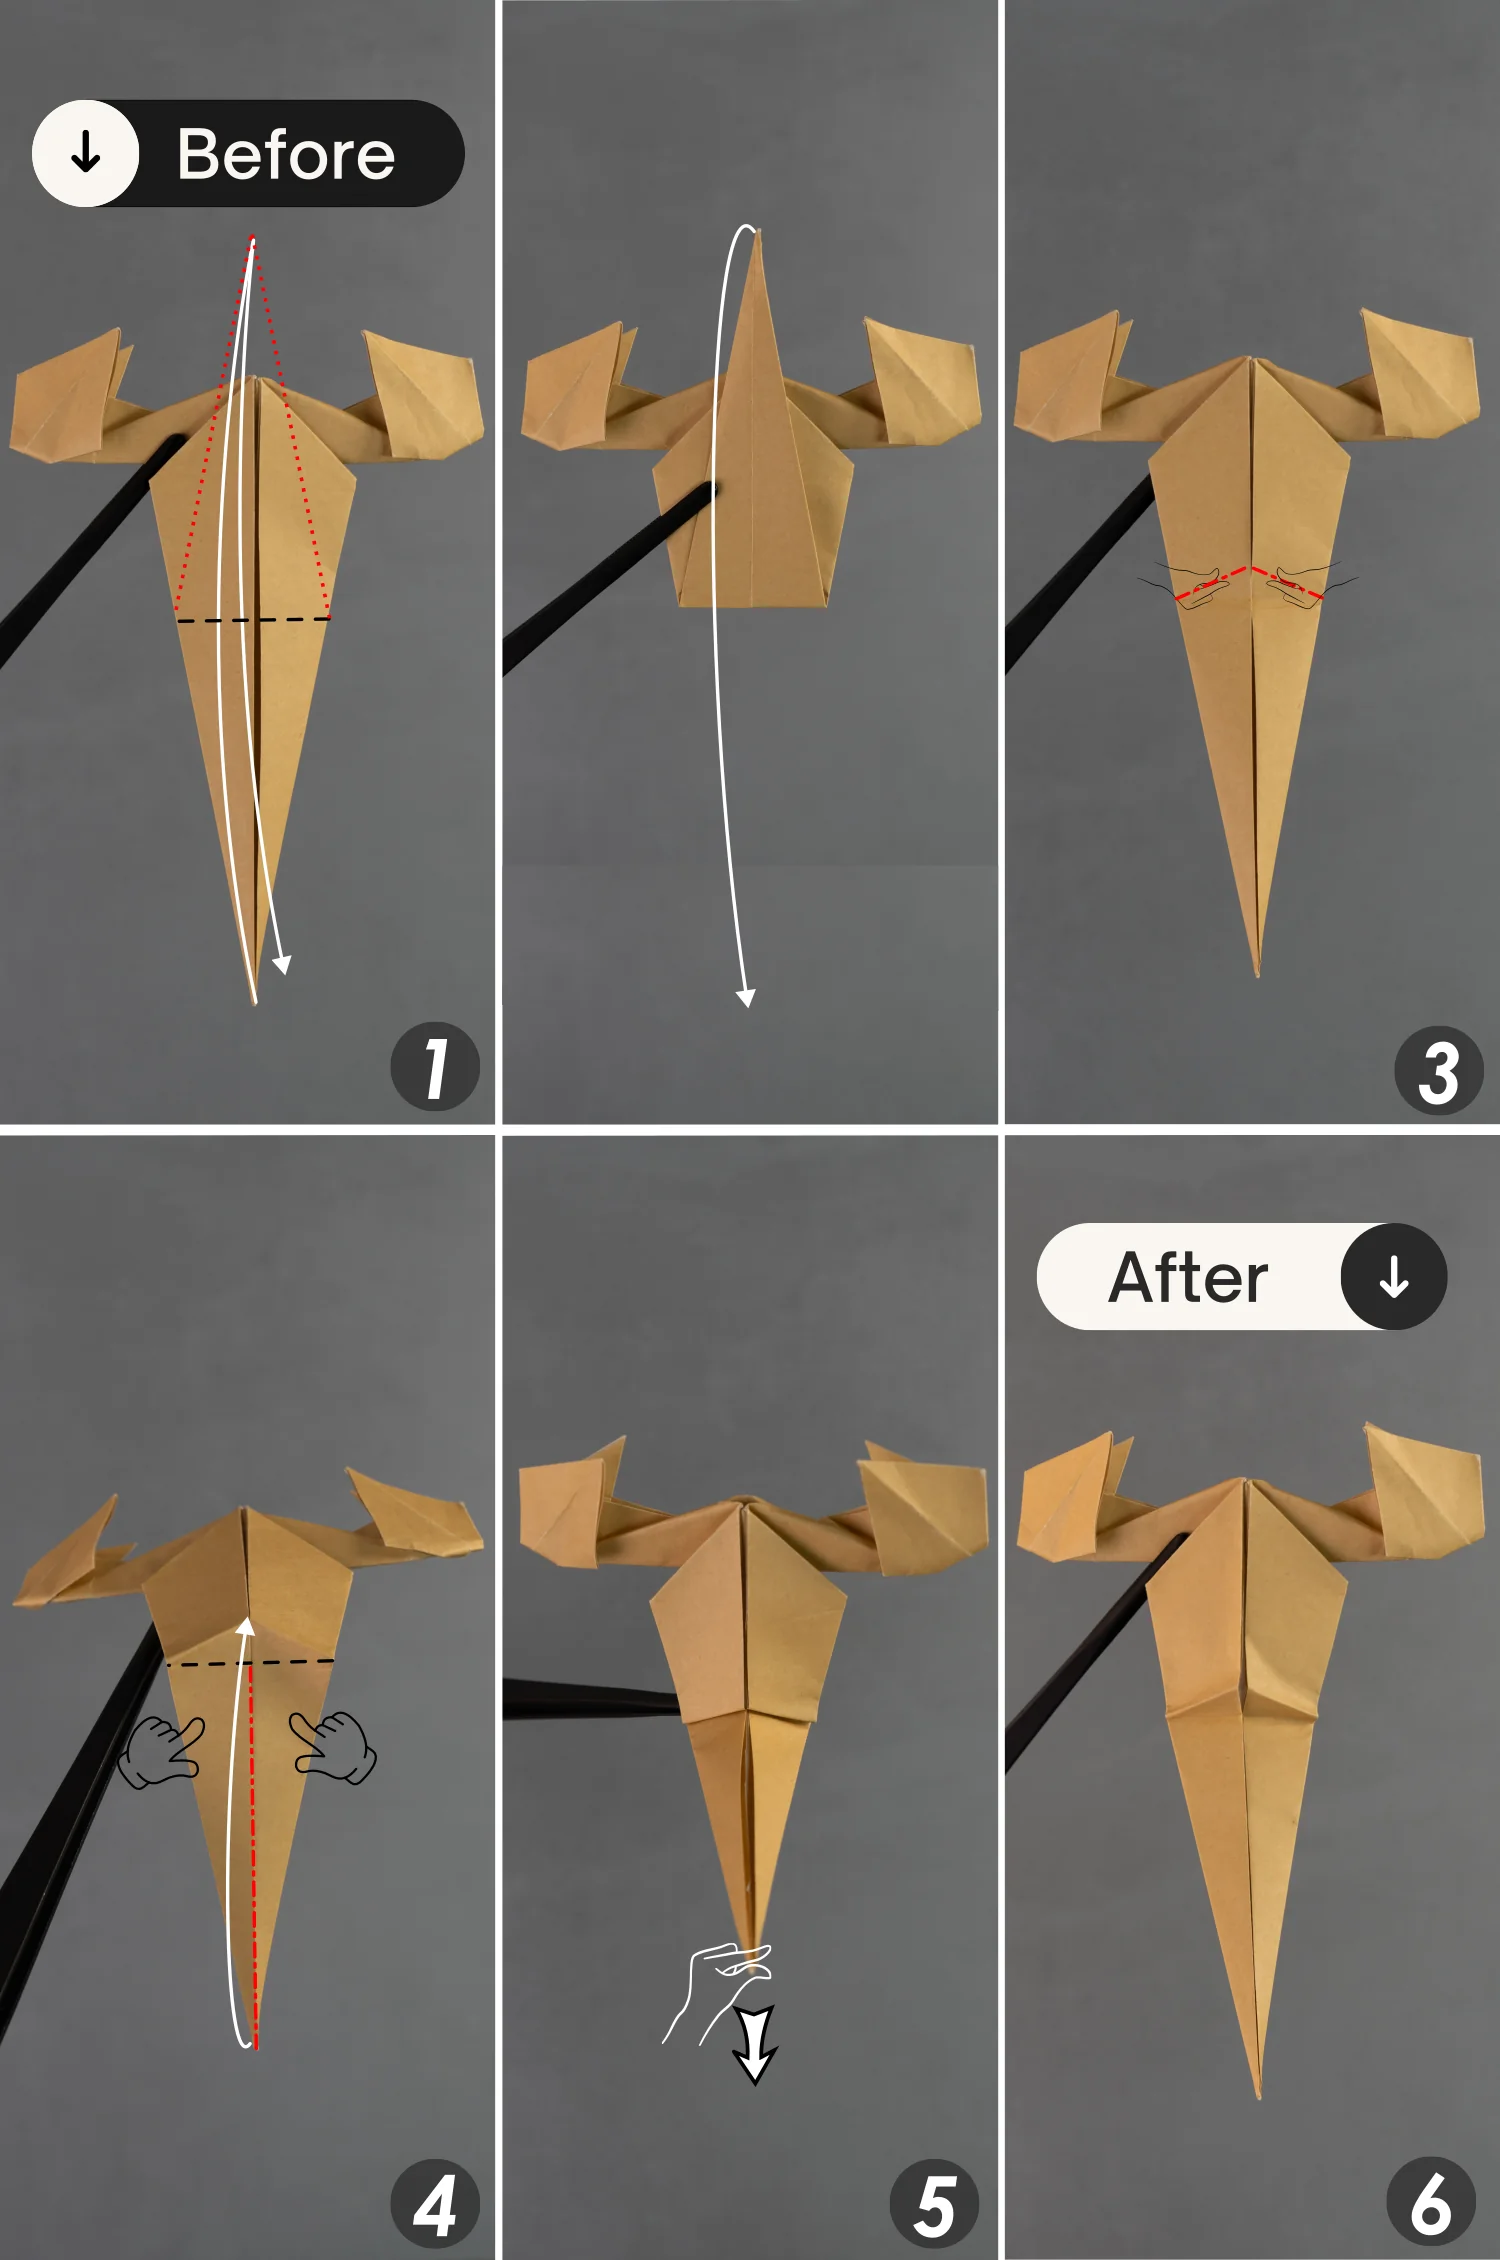
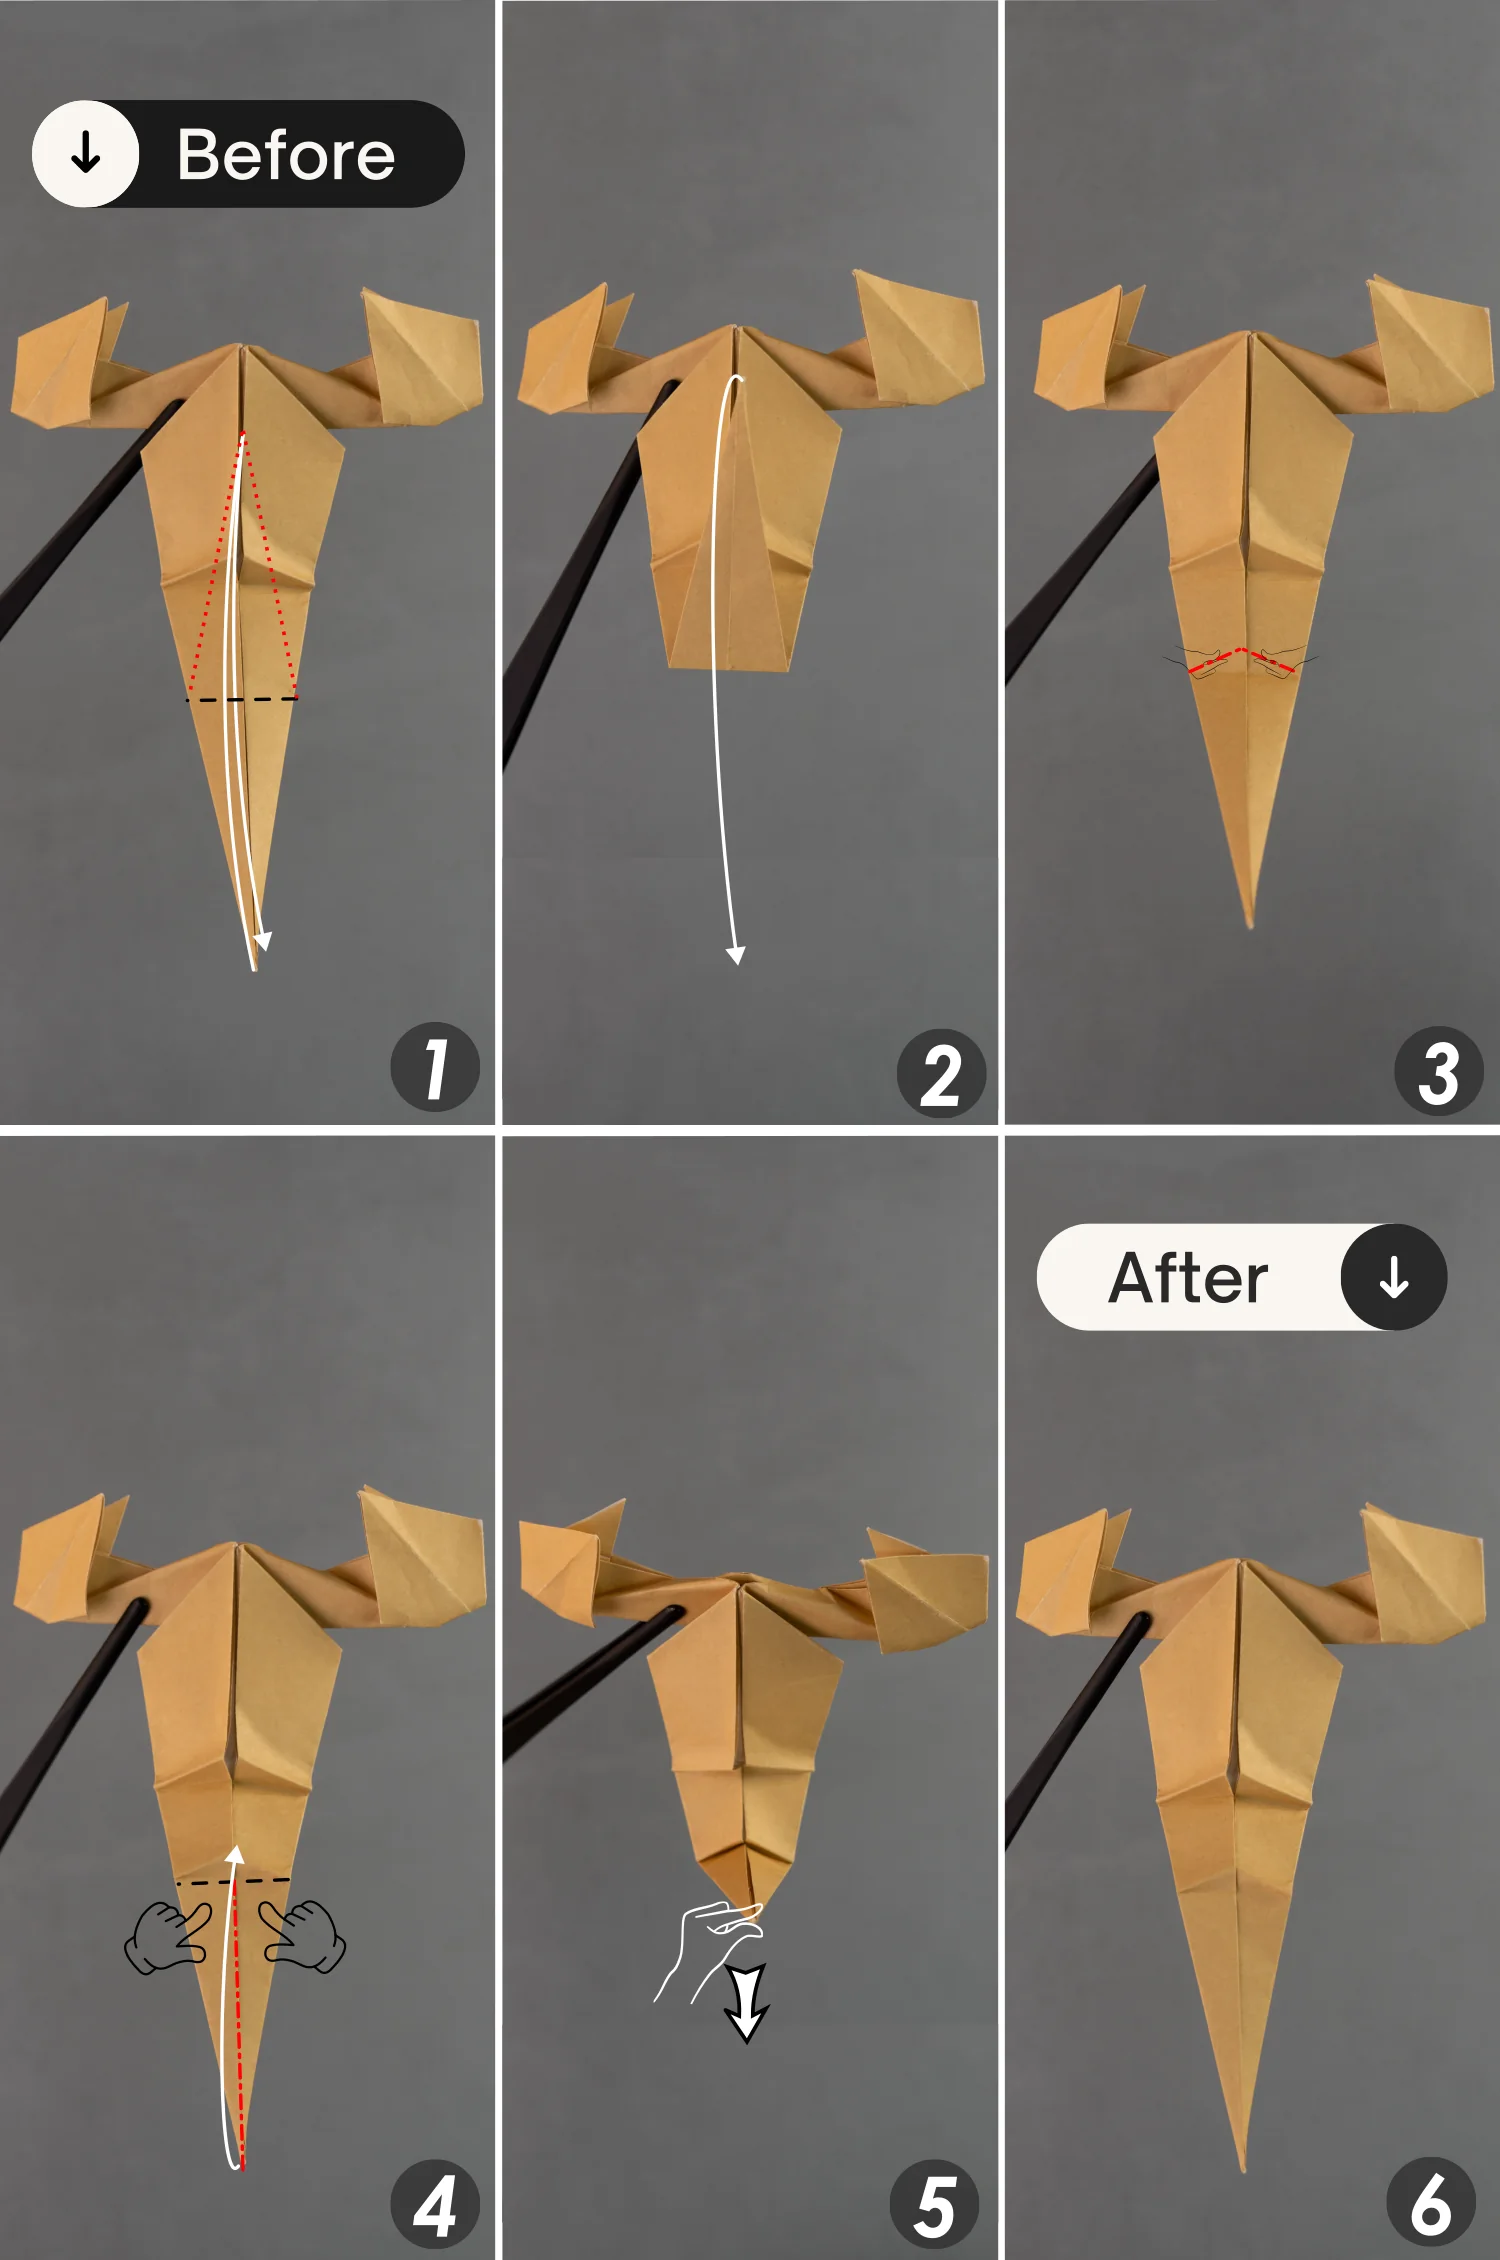
Fold up the bottom point along the black dotted line, leaving a crease, and unfold it [pictures 1 and 2].
Then, make two mountain folds, as you can see in the third picture indicated by the red dotted lines [picture 3].
Next, press down the left and right sides of the bottom part, transform the middle vertical crease into a mountain line, and then this bottom part will be lifted [picture 4].
Finally, unfold this fold by pinching the bottom point and pulling it down [picture 5].
(You will repeat this step twice in the following steps. I unfold this step each time for better presentation, because if I don’t, the entire bottom part will be bent by the third time, which is not conducive to presentation.)
Step 29
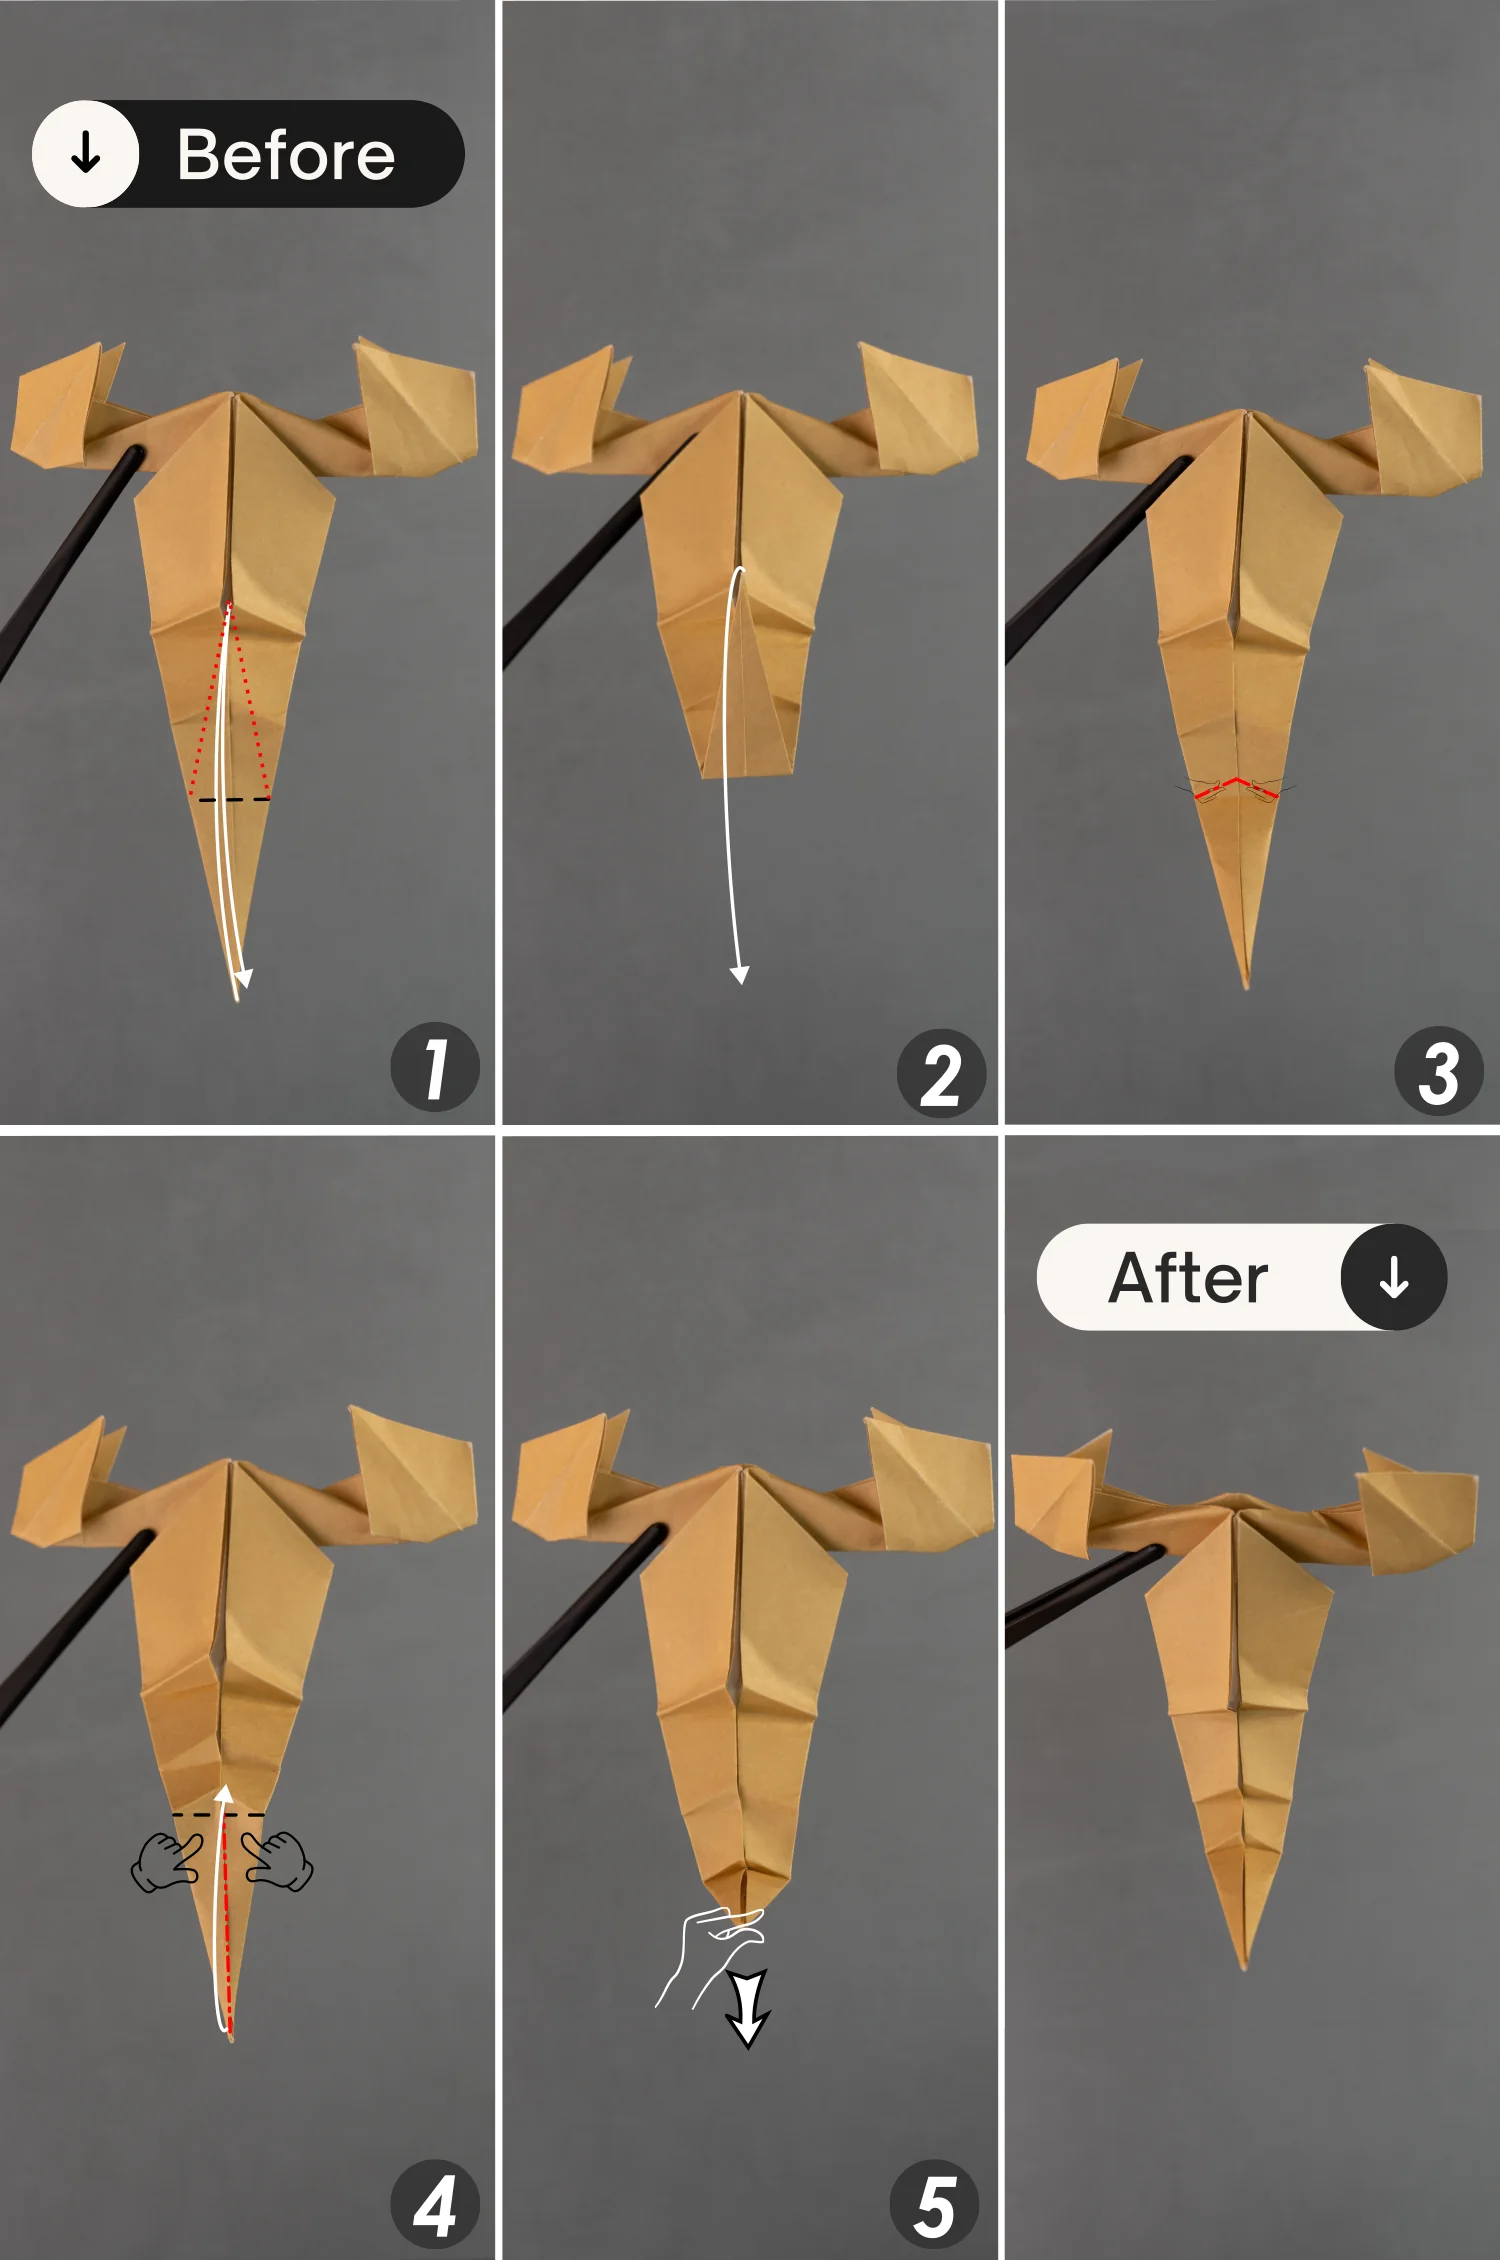
As you did in step 28, fold up the bottom point along the black dotted line, leaving a crease, and unfold it [pictures 1 and 2].
Then, make two mountain folds, as you can see in the third picture indicated by the red dotted lines [picture 3].
Next, press down the left and right sides of the bottom part, transform the middle vertical crease into a mountain line, and then this bottom part will be lifted [picture 4].
Finally, unfold this fold by pinching the bottom point and pulling it down [picture 5].
Step 30
Repeat the previous step.
Step 31
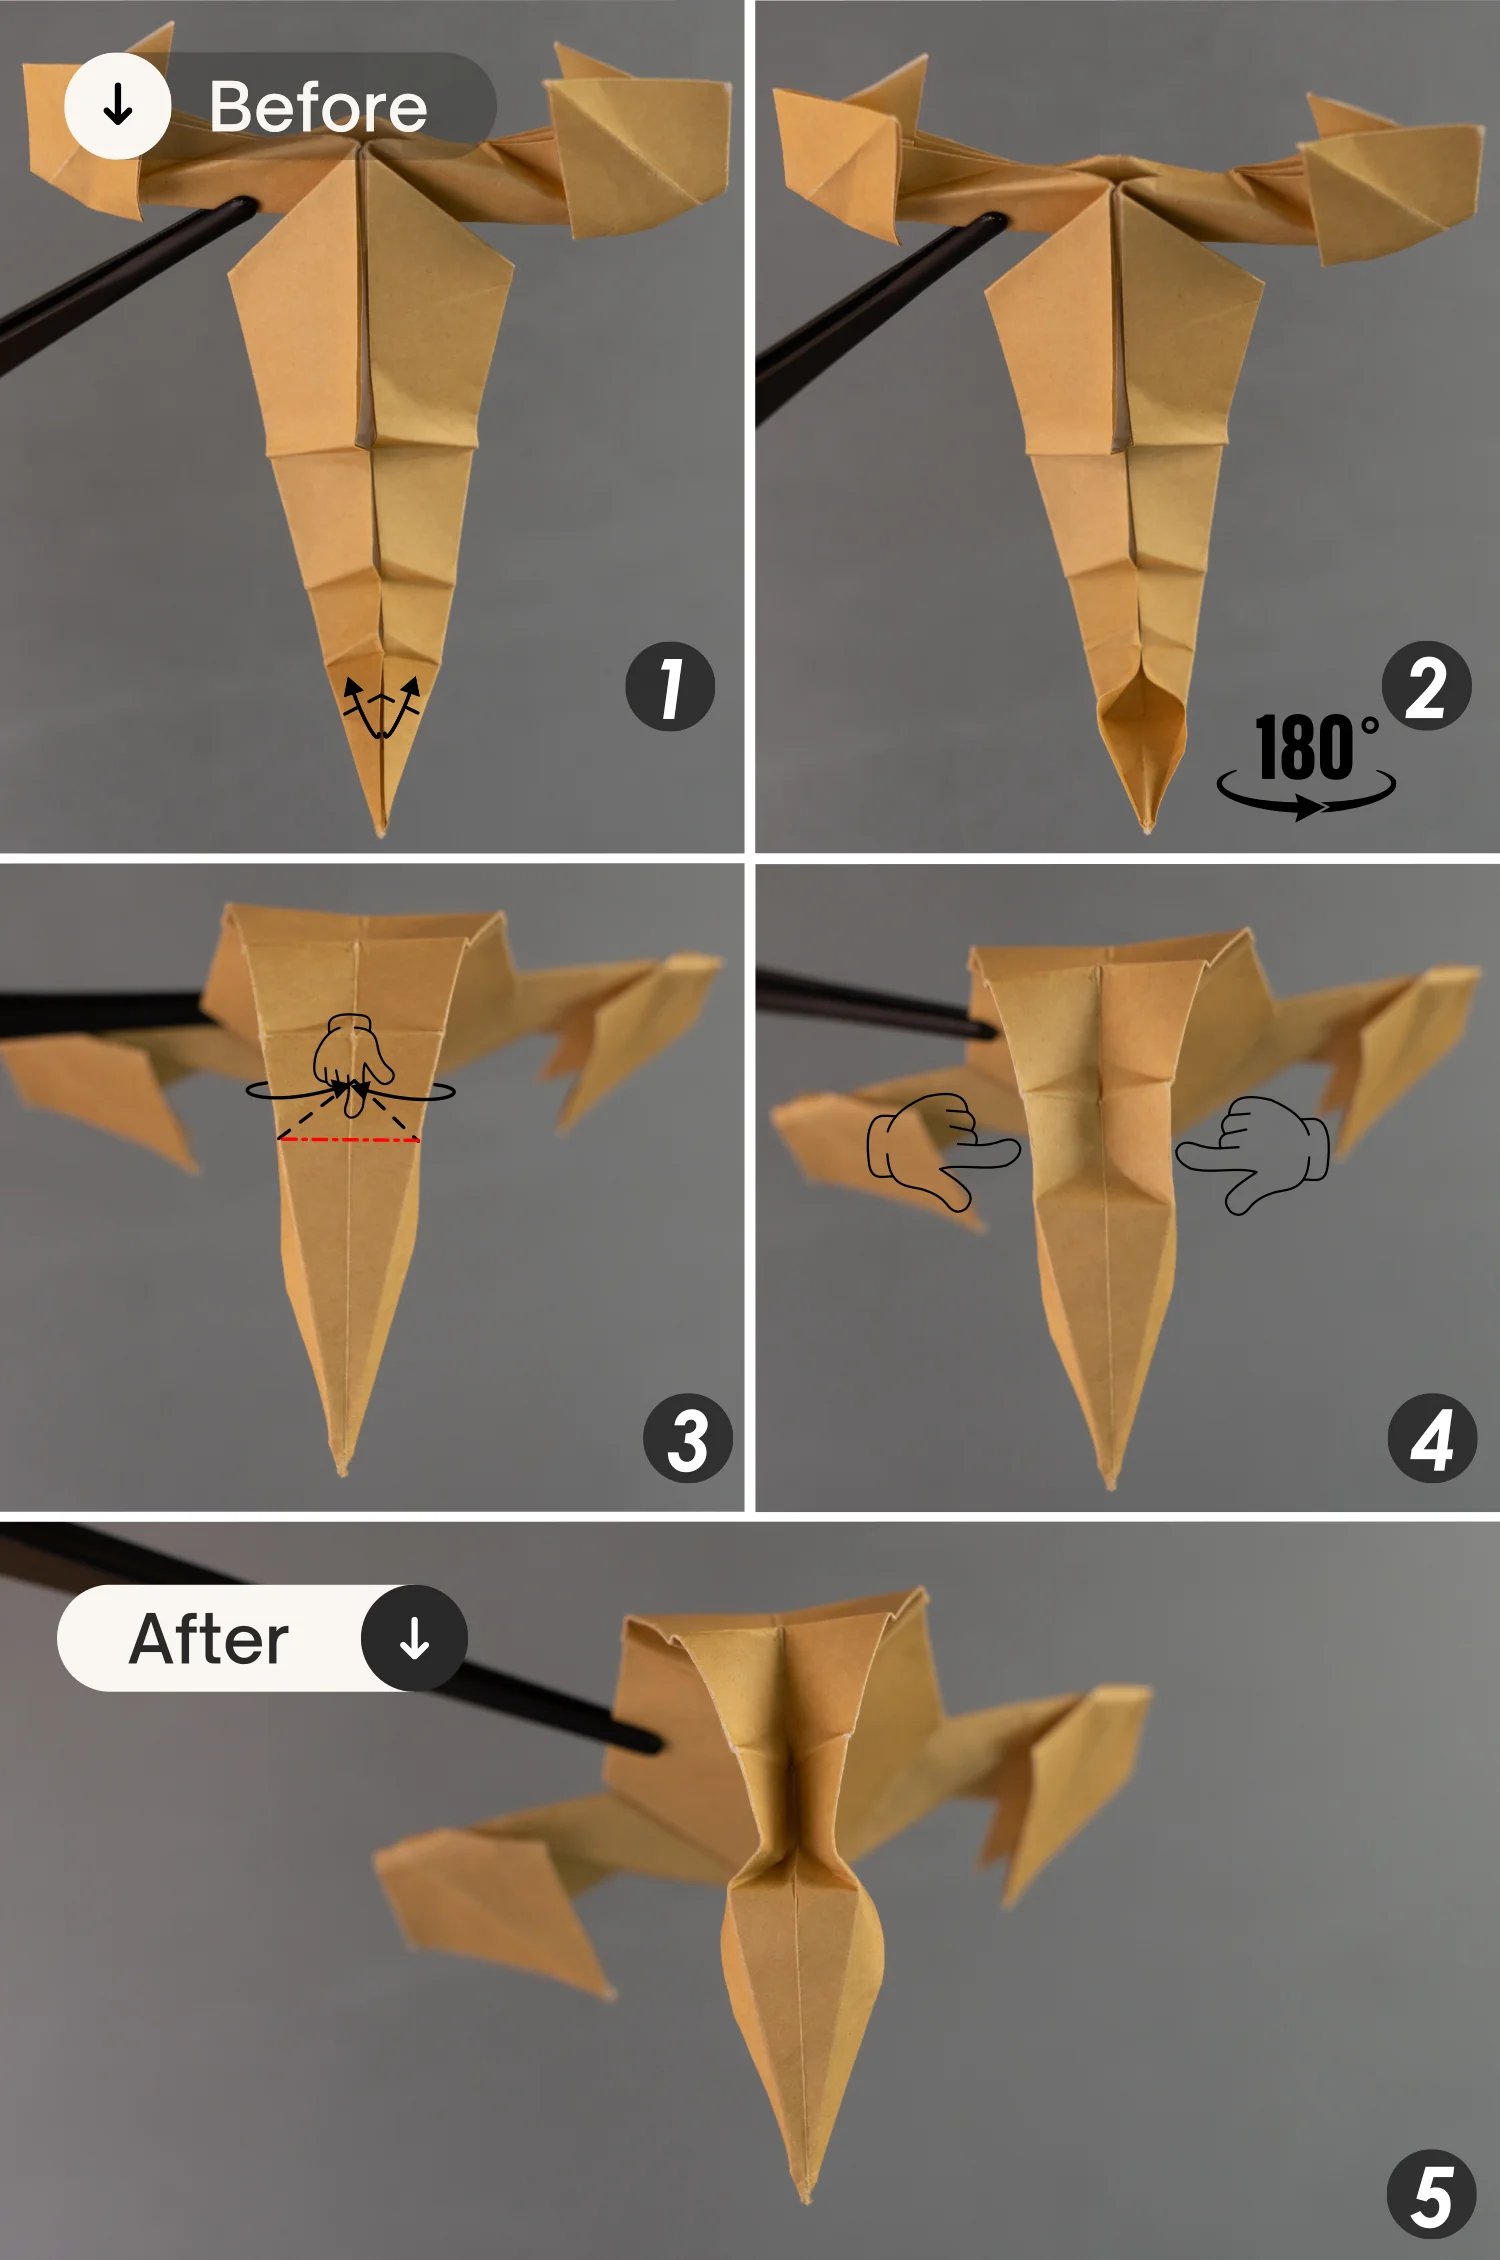
Open the bottom pocket [picture 1], then flip the paper over from left to right [picture 2], and press down the middle crease to transform the red dotted line into a mountain fold, and the black dotted lines into valley folds [picture 3].
Next, use your fingers to pinch the second section from the bottom [pictures 4 and 5].
Step 32
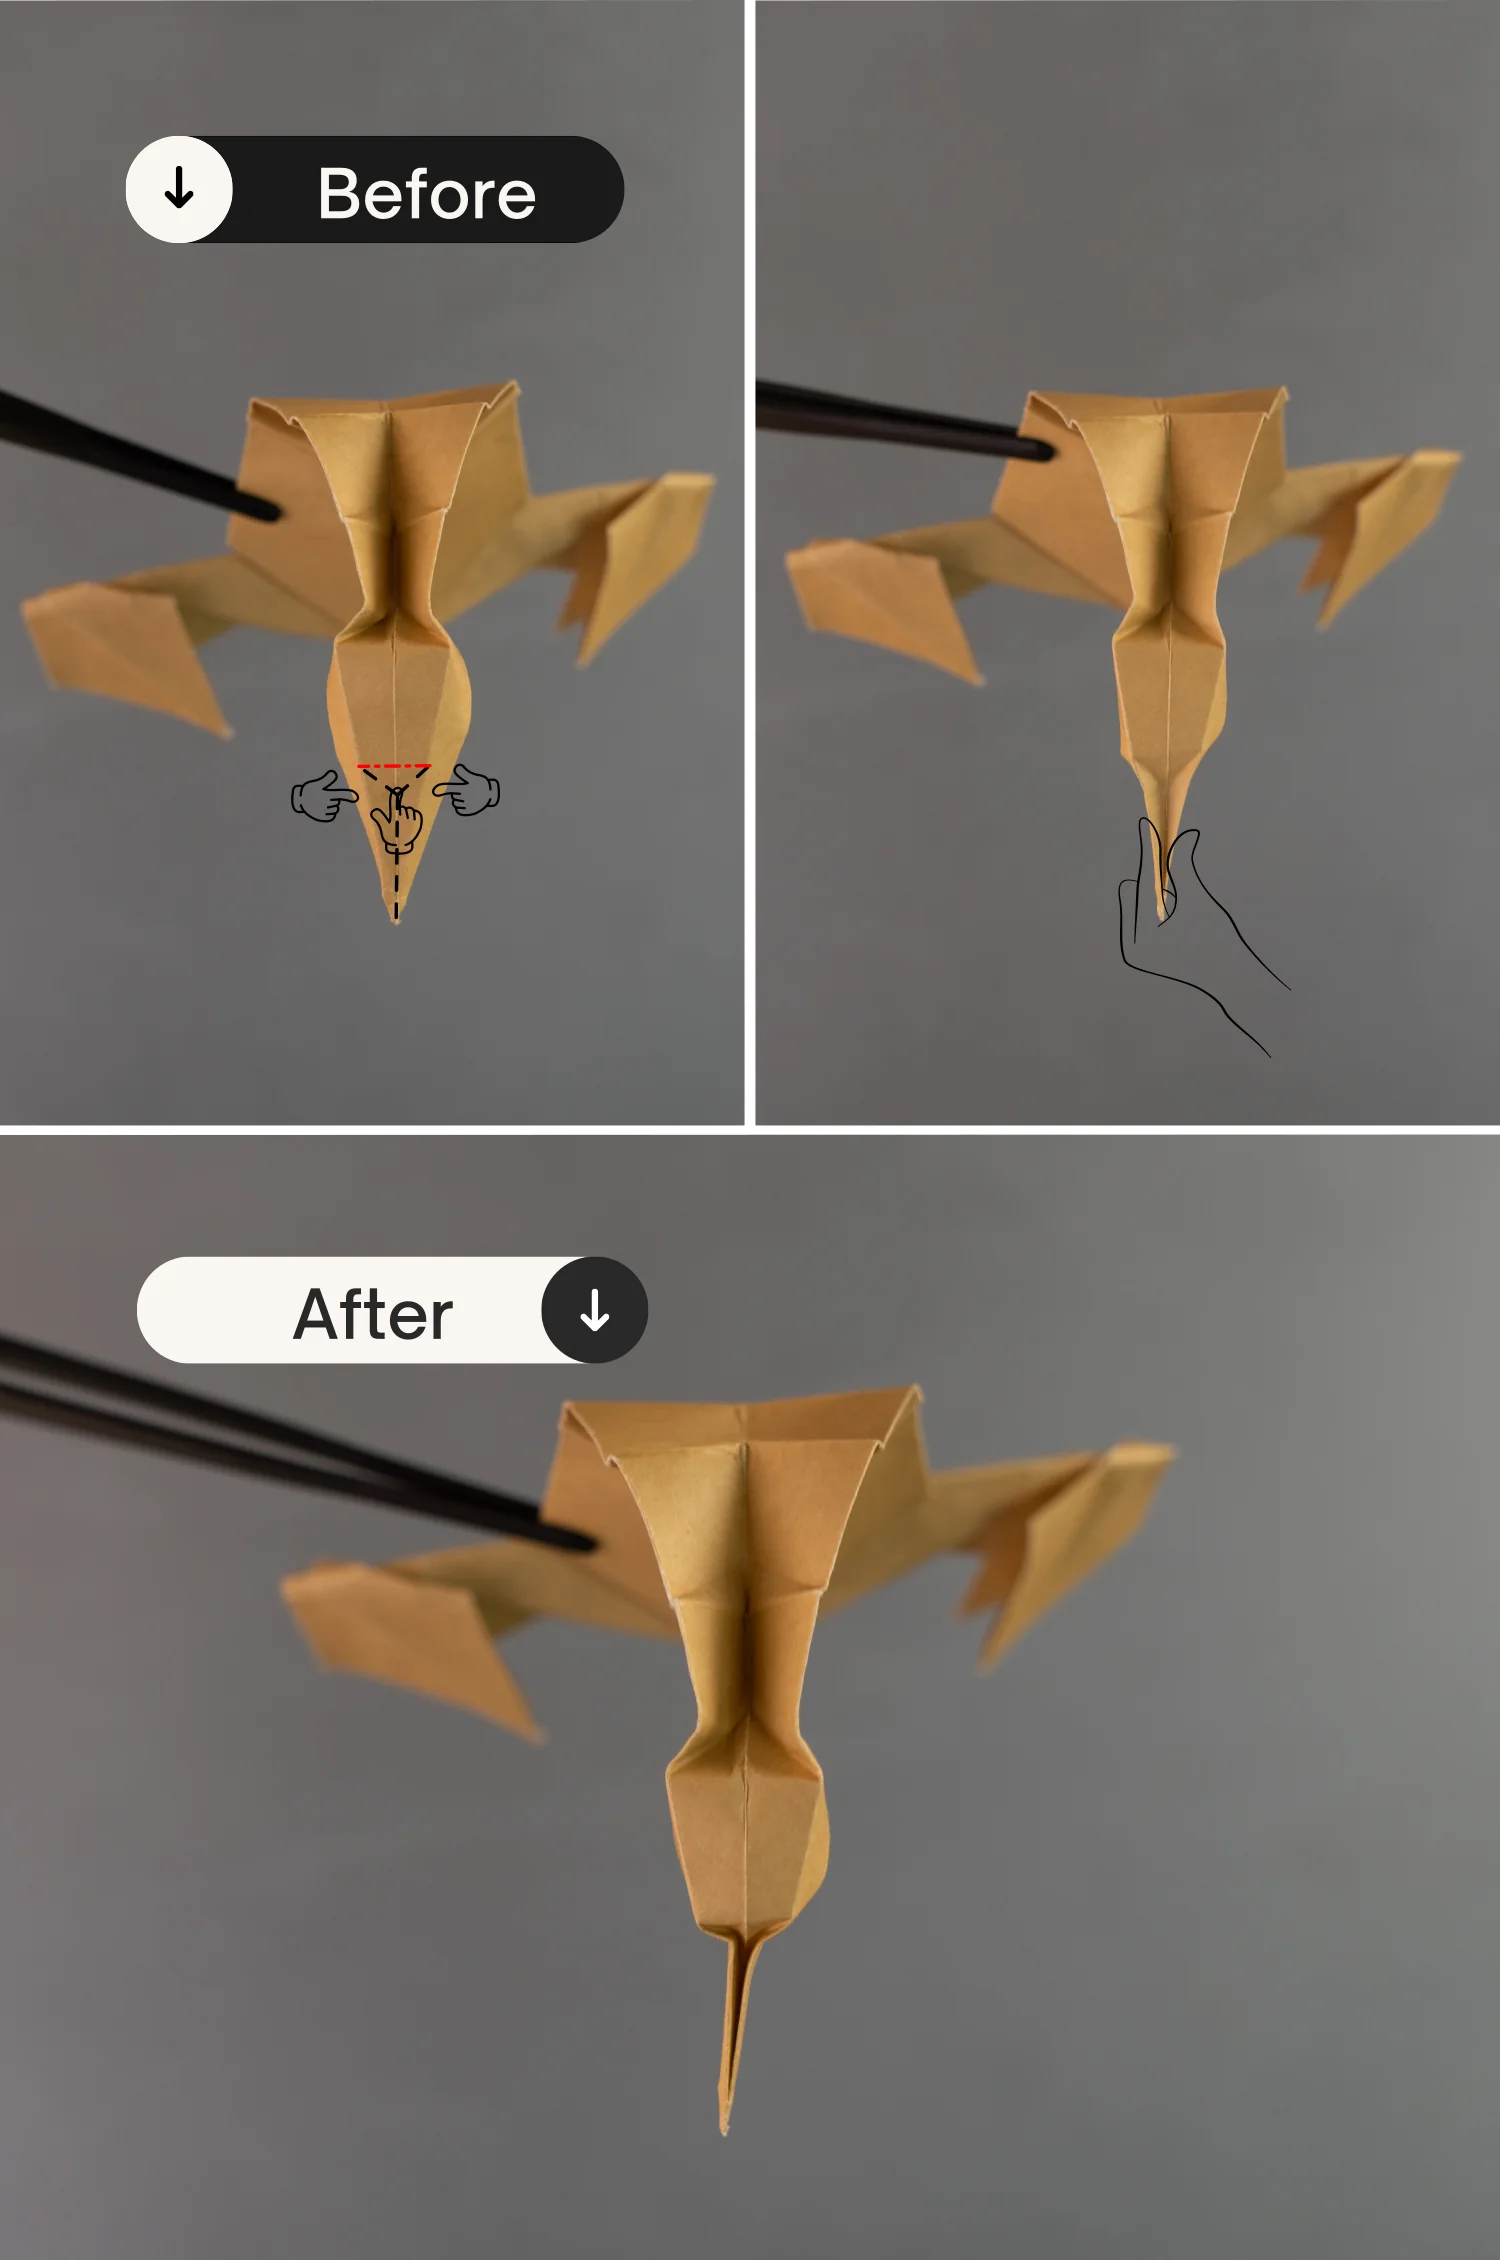
Transform the red dotted line into a mountain fold, and the black dotted lines into valley folds, to create the stinger.
Step 33
Flip the paper over from left to right, then shape the telson as the second picture shows: press down the upper four mountain folds, and press down the middle crease of the bottom section to create two mountain folds and two valley folds.
Step 34
Make three mountain folds on each pincher, as the picture shows.
What’s Next
Now you have completed making this cool origami scorpion. Next, check out our other origami animal tutorials. Happy folding!
Other Origami Animal Ideas